Celebrate Star Wars Day with a fun light saber card
Fun creating this card to celebrate Star Wars Day! Quick and easy….
Found the sentiment online and printed it onto regular paper, then fussy cut it. I used my sponge daubers to add a layer of Whisper White Craft ink onto the Starry Sky Cardstock background and then added a bit of Tahitian Tide ink on top to create a blue hue glow. I also daubed Tahitian Tide ink to a piece of vellum before adhering it in place. I used Multipurpose Liquid Glue to adhere the vellum in place, and I actually don’t mind the bit of “show through” – I think it makes the light saber look more dimensional.
To make it look more sky like, I used my water painter with a bit of White Craft Ink and splattered it onto the cardstock. I did share another fun galaxy sky technique in my Just Add Ink Online Class, so you can check that out if you want to learn more! Good for your Star Wars Day card or any other day!
I really wanted this to be a fast card, so I didn’t fuss too much with it….I don’t think that every card we make needs to be over the top – sometimes it’s more important to get it done and shared!!
Sharing the TikTok video I made – because it’s faster than the version on Instagram (I couldn’t figure out how to speed up the video on Instagram….).
Happy Star Wars Day! Still time to make a quick card to share with your family and friends who love Star Wars! (Or just love a good pun).
Have you checked out the new Stampin’ Up! Canada Annual Catalogue? You can see the online version here, or fill out this form if you would like a hard copy! Online shopping is 24/7 at YamStamps.com/shop or you can message me if you would like assistance placing an order, or want to pay by etransfer.
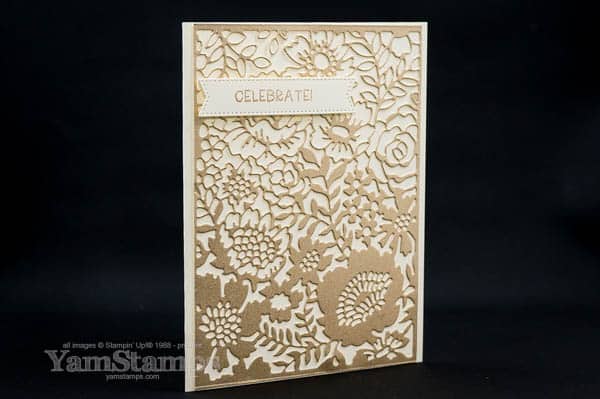
Stampin’ Up! has a number of larger dies that can be used to create backgrounds or main elements for your paper crafting projects. I used the large die from the Two Tone Flora Dies to create this shimmery die cut card. The dies include the large die, as well as smaller dies that coordinate with the large die and with the Two Tone Flora stamp set. Right now, they’re available in a discounted bundle, but that option will disappear after 1 May 2023. The individual products will still be available for purchase, though!
For this quick and elegant shimmery die cut card, I used the large die with the Fine Shimmer Paper Pack (also retiring – available until 1 May 2023/while supplies last). I love the shimmer paper for adding some bling but not being over the top (and also not leaving glitter/shimmer everywhere). To make this even easier, I applied strips of the adhesive sheet to the back of the Fine Shimmer Paper before die cutting.
Tips for die cutting thicker layers/detailed dies: I make the “sandwich” according to the instructions on the cutting plate, and run it through the Stampin’ Cut & Emboss Machine a couple of times. I also have found that if I have the die/paper on a slight angle (rather than lining it up straight on the cutting plates), it tends to cut more efficiently (plus it’s easier to feed through the machine). I definitely use both of these approaches if I have adhesive sheet on the back. I usually find that it may not cut all the way through the liner, but when I pull the adhesive liner off my die cuts, the little bits also tend to pull away at the same time.
I added a Stylish Shape die cut label and stamped “Celebrate” in Crumb Cake ink, which I thought complemented the tone of the Shimmer Paper. The sentiment is from the retiring Framed Florets stamp set (see previous disclaimer about retiring product…).
You could make a whole bunch of these shimmery die cut cards ahead of time, but just add whatever label was appropriate for the occasion!!
If you’re looking for more card making inspiration, information and tutorials, be sure to be signed up for the YamStamps Newsletter! New subscribers get a free video tutorial as well. Sign up using the box at the top of the website, or click here.
A quick and fun stripes and spots card that’s easily customized!
I love how it’s easy to get a custom card by swapping out colours or sentiments. That’s the case with this stripes and spots card! It’s a fun celebratory card that could be used for any number of occasions.
For this card, I used the NEW Core Colour Fresh Freesia. Yes, the same Fresh Freesia that is a 2021-2023 In Color – it’s sticking around and becoming part of the regular Stampin’ Up! colour offerings! I combined it with Pale Papaya and Polished Pink, also 2021-2023 In Colors, but those ones are retiring 1 May 23.
You could easily take this stripes and spots card design, and use it with any cardstocks and embossing folder you have on hand. In this case, I used the spots folder from the Basics 3D Embossing Folders package – which includes 3 different Embossing Folders which are great for all occasions. They are one of the Online Exclusives – so they don’t actually appear in any catalogue, just in the online store.
The sentiment is from the Eden’s Garden stamp set (available until 1 May/while supplies last) and is stamped in Fresh Freesia ink – because you know I like to coordinate my colours! I used a die that had angled edges because it made it easy to angle my sentiment across the cardfront. It’s actually from the retired Frosted Flurry dies….but apparently I couldn’t keep track of that and used it anyway LOL! I don’t feel it’s fair to use retired products here because they aren’t always available (though obviously this one will show up at my retired product garage sale if you’re able to attend!). There are other angled dies that would do a similar job – like the Something Fancy Dies or even the Sentimental Park Dies. Or you could go old school, cut a long rectangle and then once you’ve adhered it in place at an angle you like, just trim off the overhang!
If you’re looking for other card design ideas to help you get creating more quickly and easily, subscribe to the YamStamps Sketch System! Subscribers have been loving how quickly they can create cards based on the sketches! You get the “blueprint” or sketch of the card, including measurements, the first week, and then in the following weeks you’ll get samples (and a supply list) using the same sketch, showing different takes on it! For only $9.99 CAD a month that’s a lot of inspiration – and it’s exclusive to the program. Find out more and start your subscription here!
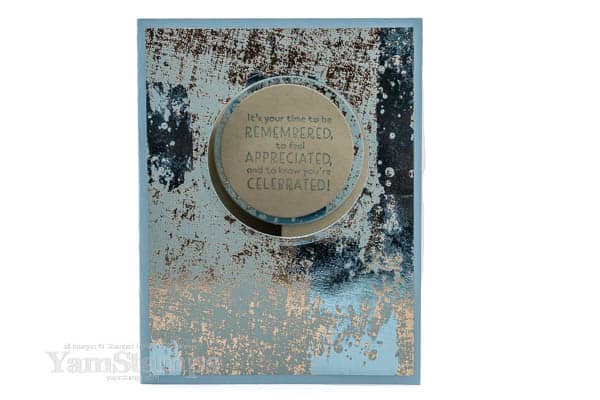
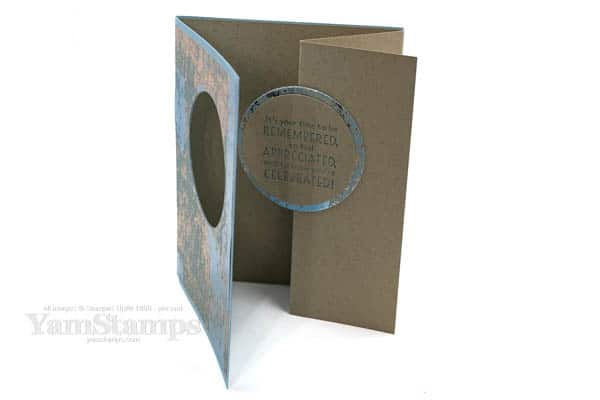
So for the super easy fancy fold card part…the Crumb Cake a “Z fold” card. Take your cardstock (8.5″ x 5.5″), fold it in half, and then fold one side in half again. Arrange it so it opens to the right, and then adhere it inside a 8.5″ x 5.5″ piece of Balmy Blue Cardstock that’s folded in half.
The impressive part comes from cutting a circle in the front of your Balmy Blue/DSP card. Take that circle, and with the entire card structure closed, adhere the circle on the fold of your Crumb Cake cardstock. It looks a lot trickier than it actually is!! Don’t you think it lives up to the Super Easy Fancy Fold Card title?!
For this card I did use the Layering Circles Dies with my Stampin’ Cut & Emboss Machine. The layering circles dies are retiring – so they’re only available until 1 May or while supplies last (whichever comes first). I am having a retiring product garage sale here in Burlington on Saturday, 6 May 23, but these dies will NOT be part of that – because I’m hanging on to them!!! If you don’t have these in your stash, you may want to grab them before they’re gone, or if you are recreating this card, you could easily use a circle punch, or another shaped die you have in your craft area.
(otherwise, garage sale in my garage Saturday 6 May 23 (EDIT) SATURDAY 13 MAY from 9am til noon, and yes I’m aware it’s Coronation Day, but you can still watch and then come by….or PVR it and come early). (also – it will probably be re-broadcast multiple times that day!!) Message me for more details and exact location!
If you’re interested in more easy and impressive card ideas, be sure to be on the YamStamps list – I send out weekly ideas, information and tutorials! Use the sign up box at the top of the YamStamps site, or click here. If you’re new to my list, you’ll get a free video tutorial when you sign up!
Grab retiring product while supplies last – at up to 60% off!
It’s time to make room for new products and colours from Stampin’ Up! The Last Chance Promotion has started – and will run until 1 May 2023, or while supplies last.
If you click on the image or go to https://yamstamps.com/shop, you’ll be able to see what’s currently still available in the Last Chance Promotion.
A reminder that the 2021-2023 In Colors are retiring, along with the retiring core colours – so there’s going to be some fun new additions to the SU colour family come May!
Stampin’ Up!’s New Annual Catalogue will be released soon – it will come into effect 2 May 2023. The current Annual Catalogue will finish on 1 May and we will be getting the Retiring List and more information on the Colour Refresh in a couple of days (29 March).
In the meantime, I’m finalizing my mailing list for the new catalogue.If you’ve made a product purchase through me in the past year, I’ll automatically add you to that list. If you are on my Demonstrator Team, you’ll get your complimentary copy mailed to you from Stampin’ Up! directly.
If you’d like a copy, and don’t currently have a Stampin’ Up! Canada Demonstrator, I’m happy to help!Just fill out this form here and I’ll be in touch to see about sending you a free copy.This offer is only open to Canadian residents due to Stampin’ Up! rules and regulations. If you sign up by 30 March 23, I’ll be able to include you in the first mail out for the catalogue!