Aug 22, 2012 | cards
 I know I've said this before, but many times, I'm like the cobbler whose children have no shoes….I am the cardmaker without cards on hand many times! Luckily, I have the supplies to whip up a card quickly and easily. Plus, I _am_ working on becoming more prepared and organized. (I have a feeling this will be a lifelong project?! LOL)
Anyway – this card uses Stampin' Up!'s Blue Ribbon stamp set as the main image, with one of the Confetti stamps in the background. The images from Blue Ribbon coordinate with punches so it's very easy to create a 3D effect ith little effort – punch & adhere with Stampin' Dimensionals! The tails of the ribbon are made from the Summer Smooches Designer Series Paper – you can cut them by hand or (get this!) use the Bitty Banners Framelit to cut them out with your Big Shot. You don't have to figure this one out on your own, though – if you look at the description in the catalogue, it will list what punches or dies coordinate with the images in the set. Yay! Less thinking! (and you KNOW I'm a big fan of that).
If you'd like to make more cards with less thinking 😉 be sure to attend one of my many card classes – or host one with your friends (free stuff for you!). I design and cut the materials ahead of time – you stamp, complete and assemble the cards! See my events page for more information or contact me.
Aug 21, 2012 | 3D samples, Business Opportunity, Events, specials
I love attending Stampin' Up! events – there's so much energy and enthusiasm that it's contagious! The fact that you get a lot of creative and business inspiration is just a plus. One of my favourite things is seeing my demonstrator friends from all over…or even from the same city. The joke is that half the time I have to travel to the US to see some local demonstrator friends!
Anyway, this time was closer to home – just down the road in Hamilton! I was most excited to be able to hang out with Leanne, one of my demonstrator team members who doesn't live very close to me. While we've been in a lot of contact both by phone and on the computer, this was actually the first time we got to meet in person!!

Here we are with Shelli Gardner, co-founder and CEO of Stampin' Up! I love that she tries to attend as many of these regional events as she can. One of these days, I'm going to make a collage of all the photos I have had taken with her over the 10 years I've been a demonstrator, and watch how our hairstyles change LOL.

This is a photo that was on my iphone (I actually tweeted it during the day) – me, Shelli and Dale Hampshire, Manager of Stampin' Up! Canada.

and because I know you don't just tune in for photos of me…. LOL here's a photo of the beautiful tag created by one of the Stampin' Up! artists that Shelli shared with us. Isn't it gorgeous?!
Thanks for stopping by. Don't forget that there's only 10 days left for the August specials – 1) 31% off 31 digital items! 2) Get a Spooktacular Hallowe'en Printers Tray Project valued at $75 for FREE when you purchase the starter kit in August! Please contact me if you have any questions.
Aug 20, 2012 | cards
 A handmade card! At least I think so.
I love the coordination of Stampin' Up! products – the less thinking I have to do, the happier I am…
This card takes full advantage of that! The Apothecary Art set provides the main image, which coordinates with the Labels Collection Framelits for the Big Shot, so you can easily cut out the image. The Bitty Banners Framelits for the Big Shot cuts out the sentiment from the Loving Thoughts stamp set that has the same font as the words from the Apothecary Art set. The 3/8" Stitched Satin Ribbon comes in Raspberry Ripple to coordinate with the Raspberry Ripple Ink and Cardstock. See how easy? I also used the Fancy Fan Folder to jazz up the background with a bit more texture.
Monochromatic cards are a great way to get a classy look – at least I think so!
I can't believe we're in the middle of August already. We are busy enjoying the last weeks of summer in our household – but I'm thrilled to say we already got most of the back to school clothes shopping done! (If you know my son, you know that's HUGE because he HATES shopping…half the chore is getting him into a mall…). Not to rush you either, but don't forget that I'm holding monthly Christmas Stamp a Stacks from now until December!! I've added some extra dates for those who can't make it out as easily on a weekend or a Sunday – so please check here and then either click on the link or contact me to register!
Aug 7, 2012 | cards
 I really like making cards (if you can't tell LOL). This is a card that I designed for a recent card class but with a specific recipient in mind…(doing double duty). The flowers at the left are done using a technique that was demonstrated at Stampin' Up!'s convention. The large flower from the Betsy's Blossoms set was stamped in Versamark and heat embossed with clear EP. The image was then punched out with the Blossom punch – creating a totally different flower! Of course, being the lazy crafter that I am, I simply pulled the colours from the Floral District Designer Series Paper (why think any harder than I have to?!).

The class attendees enjoyed making this card, and the recipient was just as happy! This is my great aunt (and cousin beside her) at a recent family gathering where we celebrated her 90th birthday.
Aug 1, 2012 | Announcements, Business Opportunity, Seasonal Catalogue, specials
So much is in store for August! First reason that August is Awesome around here – Stampin' Up!'s Holiday Catalogue is now in effect. If you didn't get a copy, here's a link to the digital version, and here's a link to contact me if you are in Canada and would like a "hard copy" of it!

Second reason that August is Awesome is that there is a BONUS for new demonstrators. Purchase your starter kit for $125 (you get to choose what's in it) and receive the supplies for a super-cute Printer's Tray Project!
If you would like more information about this or not sure what to select for your $155 worth of merchandise in your starter kit, please contact me. I'll be happy to guide you through the process. You can also read more here. Being a Stampin' Up! demonstrator is a great way to have fun, earn money doing something you enjoy, and (dare I say it) fund your own crafting habit?! LOL.
 Third Reason August is Awesome – MDS2 is here!! Stampin' Up!'s My Digital Studio software (MDS for short) has been upgraded and updated. I just finished downloading my copy so will get to work on new tutorial videos ASAP.
BONUS Reason August is Awesome – Stampin' Up! has 31 digital downloads on sale, plus 31% discount on printing services during August! See more HERE.
*phew*
If you want more information or are keen to take advantage of any of these awesome happenings, please contact me!
Jul 30, 2012 | Christmas, Events
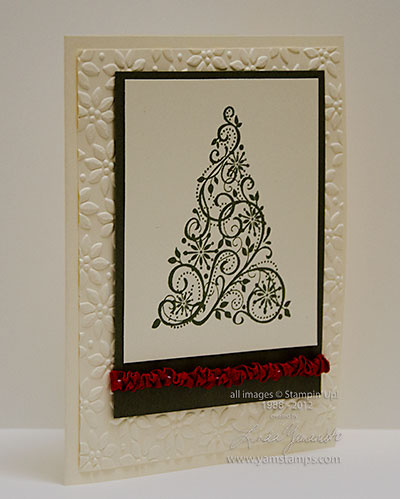
 The first Christmas Stamp a Stack was yesterday – thank you to those who attended and got a jump on their holiday cards! Each attendee received a full roll of the Real Red Stitched Grosgrain ribbon which we used on our projects. This is one of the cards we made. Each Stamp a Stack will feature different projects and a different featured accessory as part of the class fee, and August's class will of course have some product from Stampin' Up!'s Holiday catalogue. I keep wanting to call it a mini catalogue, but have you seen the size of it? It's not "mini" at all!!! If you'd like more information about the Stamp a Stacks, please feel free to contact me or see my events page here.
August's Card Class is THIS Wednesday – cost is $20 or free with a minimum merchandise order. We'll be making 4 cards (probably with some Holiday product, hint hint LOL) and it will be fun! I promise to boost the air conditioning so it will be a break from the heat outside!! Contact me to register. Can't make it that night? Consider hosting a private class for your friends – my place or yours!
Jul 27, 2012 | rubber stamping
I did a previous post a couple of years ago in honour of the Vancouver Winter Olympics, and I thought I'd do another version in honour of the London Summer Olympics, which open today – woohoo! I can't decide which event I'm most excited to watch, but I know that since I've started running, I have a totally new appreciation and insight into the running events. This year, I'll be very busy watching the opening ceremonies as well, as a friend of mine will be participating as a performer! I will be trying to pick her out in the crowd on the field…thank goodness for DVRs! I made this card to send to her in honour of her performance, which I'm sure will be wonderful.

The rings are all current Stampin' Up! colours – Pacific Point, Basic Black and Real Red on the top row, Daffodil Delight and Garden Green on the bottom row. I used the 1-1/4" circle punch first, then centred the hole in the 1-3/4" circle punch to create the ring. I then cut slits in all the rings so I could interlock them like the official symbol. I realized afterwards that I could probably have gotten away with just slitting the yellow and green rings… but I need all the help I could get to get them positioned correctly!! I have a background of Melon Mambo as the London Olympics are using a similar colour on the logo.
I will most likely have the games on the TV while we do our Christmas Stamp a Stack on Sunday, playing in the background in case people want to keep track of how things are going. If you'd like to join us, please let me know ASAP!! We'll be starting at 1pm – cost includes all supplies and envelopes for 8 cards, 2 tags and will include a whole roll of stitched Real Red ribbon for you to use (and keep the remainder!). Don't forget these will be monthly events, so start building up your card stash now!
Jul 24, 2012 | 3D samples, Announcements, Business Opportunity, Events, specials
So, internet connection was a bit spotty at times and my posts were postponed LOL. Here’s a few shots from around & about Stampin’ Up!’s Convention.

This is the distribution area of Stampin’ Up! (they were finishing lunch break when we were in this area). Cool to see how automated this system is – boxes are tagged and move in & out of the picking area on a conveyor belt, waiting to be filled with items and then sent on to us!

The theme for convention this year was “I Am” – loved the theme and the song. I posted the video on my facebook page here. The end of the video is the live performance portion at the opening session of convention.
2012 marks 10 years of Stampin’ Up! Canada and this was celebrated by having all the Canadian demonstrators march across the stage. Nice to be recognized that way by the company and other demonstrators 🙂 There was a special march for those of us who were demonstrators in the first year as well.

Here’s the upcoming special which is so fun! If you sign up as a demonstrator in August, you and your upline will both get this cute printer’s tray project – just add ink! I think I might have a special team get together in September to assemble these! More information on being a demonstrator in my group can be found here. Our “Eh” Team group has demonstrators across Canada and we’d love to have you join us – I hope to have demonstrators from each province and territory as part of our group.

I am enjoying being home again, and busy preparing for my upcoming weekend of events – “Eh” Team get together on Saturday, first Christmas Stamp a Stack on Sunday! I hope to see you soon at one of my events. If the dates don’t work for you – let me know and we can get a private class together for you and your friends. Keep your eyes on www.yamstamps.com for more news and events.
Jul 18, 2012 | 3D samples, Events
and technically, it hasn't officially even started! My friend Sue & I arrived yesterday and went for dinner with other demonstrator friends that we haven't seen since January (at Stampin' Up!'s Leadership conference). Great fun catching up with them!!

Sue & I with the sign at the entrance to Stampin' Up!'s home office.

We took a bus ride to tour Stampin' Up! headquarters – viewed different areas of the home office including the large distribution centre. It was fascinating to see how automated the line is – boxes will roll along the conveyor belt and stop off at the correct spot for the items to be picked off the shelf and placed inside. Once the order is fully completed, the box is weighed to make sure everything is inside! Neat to see.

Here's a cute set of the purses from the Petite Purse Bigz die. Love how they made the little flowers out of circle punches – how cute and easy is that??!! Don't be surprised if you see them show up on a project at one of my future classes LOL!!
I'll be posting more ideas and inspiration from Convention over the next while. I will be sharing them in person with my demonstrator team members at our get together on July 28th – if you'd like to join us, please contact me for more information!
Jul 16, 2012 | cards, rubber stamping
 I love to watercolour…even though I'm not that good at it! I have to confess that drawing, painting etc are definitely not strong skills of mine – which is why I love rubber stamping! Stampin' Up! has made it easy for me to look artistic without me having to do the "heavy lifting" as they say :) For this card, I stamped the bicycle image from the hostess only set "Summer Afternoon" (check the back of the Stampin' Up! Catalogue to see the stamp set). I used Stazon Jet Black ink on watercolour paper to be sure that my image would stay clear once I soaked the paper. I then used my aquapainter and my Watercolour Wonder crayons to colour in the image. This is my favourite way to add watercolour to my images – I can control the amount of water used and can direct the colour where I want it. Takes me back to my watercolour painting class days without the anxiety of hearing "Oh, just sketch out what you want to paint". (See back to initial comment about not being able to draw).
I created these cards to send to everyone who sponsored me (and my son) in our recent bike ride efforts. We participated in "The Healing Cycle" which is a varying distance bike ride to raise funds for hospice care. We had a lot of fun and were thrilled to raise over $18,000 with our teammates for the Carpenter Hospice here in Burlington. The Carpenter Hospice not only provides end of life care but also runs wellness programs for those living in the community with terminal illnesses. I know a number of people who have benefitted from the valuable services that the staff and volunteers provide, so spending some of my time to raise funds for them was not an issue at all, nor was spending a bit of time on creating special thank you cards for my friends and family who gave generous donations to sponsor our efforts.

 I know I've said this before, but many times, I'm like the cobbler whose children have no shoes….I am the cardmaker without cards on hand many times! Luckily, I have the supplies to whip up a card quickly and easily. Plus, I _am_ working on becoming more prepared and organized. (I have a feeling this will be a lifelong project?! LOL)


