We are heading into a long weekend! Getting ready for Canadian Thanksgiving, and it’s one like none before, that’s for sure! I am giving thanks for the health of my family, even though we won’t be gathering together like normal. I am giving thanks for employment, and giving thanks for support of friends. I am always thankful for having a creative outlet – and the bonus that I am able to turn it into a business as well.
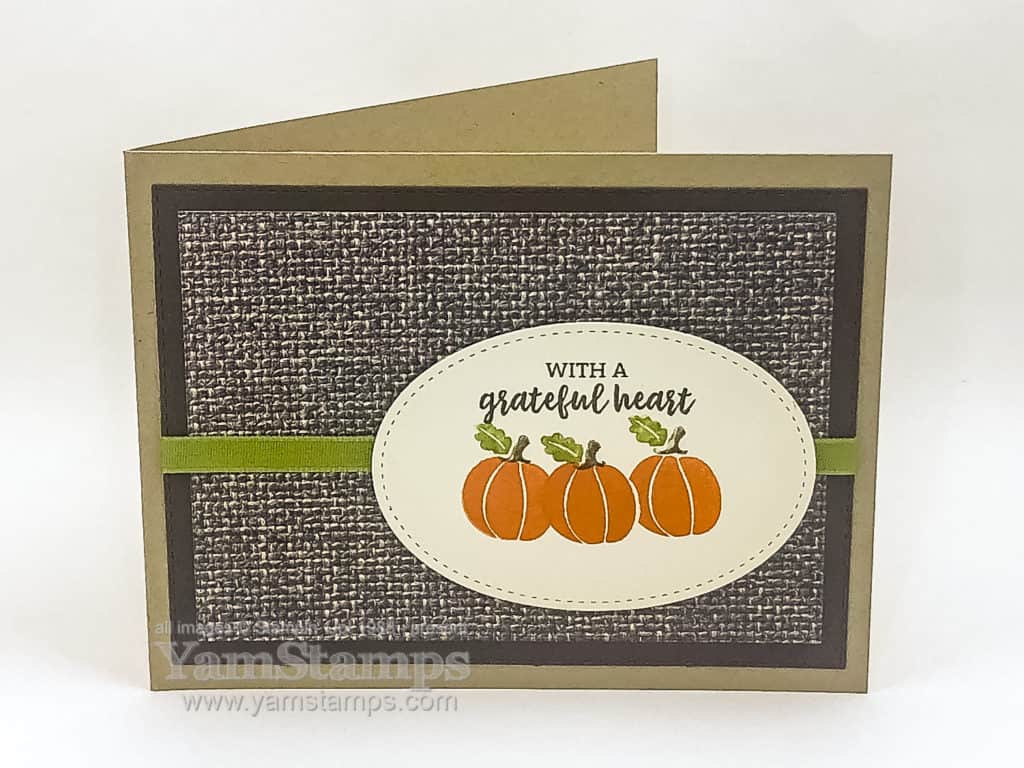
I made this card with the Banner Year stamp set. I love that this set has a variety of sentiments and images – it’s very multipurpose! I stamped the centre pumpkin first, then created the mask by stamping the pumpkin image over the sticky portion of a post-it note before cutting it out. I put the mask over the centre pumpkin before stamping the pumpkins on either side – to give the appearance that they are behind the middle pumpkin. If I remember, I keep the mask in the stamp set box so that I don’t have to re-do it each time. The pumpkin stalk & leaf are a separate stamp, and I used the brush ends of Stampin’ Write markers to ink the stamp before stamping in place. I used a piece of the In Good Style Designer Series Paper to add texture and interest easily. Bonus – it’s one of the Designer Series Paper on sale this month!
I hope that you have a happy Thanksgiving! I’m looking forward to a long weekend, eating some good food and spending time with family – even though we will be face-timing with some, rather than having face to face time. I’m also giving thanks for you! Thank you for visiting the YamStamps blog and supporting my business.
There’s all sorts of “days” to celebrate, aren’t there? So for today, I’m sharing this card in honour of World Cardmaking Day! It’s also got some pink, so I think it also qualifies to celebrate Mean Girls Day (which is also today) (and even though it’s not Wednesday)… So here’s the World Cardmaking Day Fun Fold Card 🙂
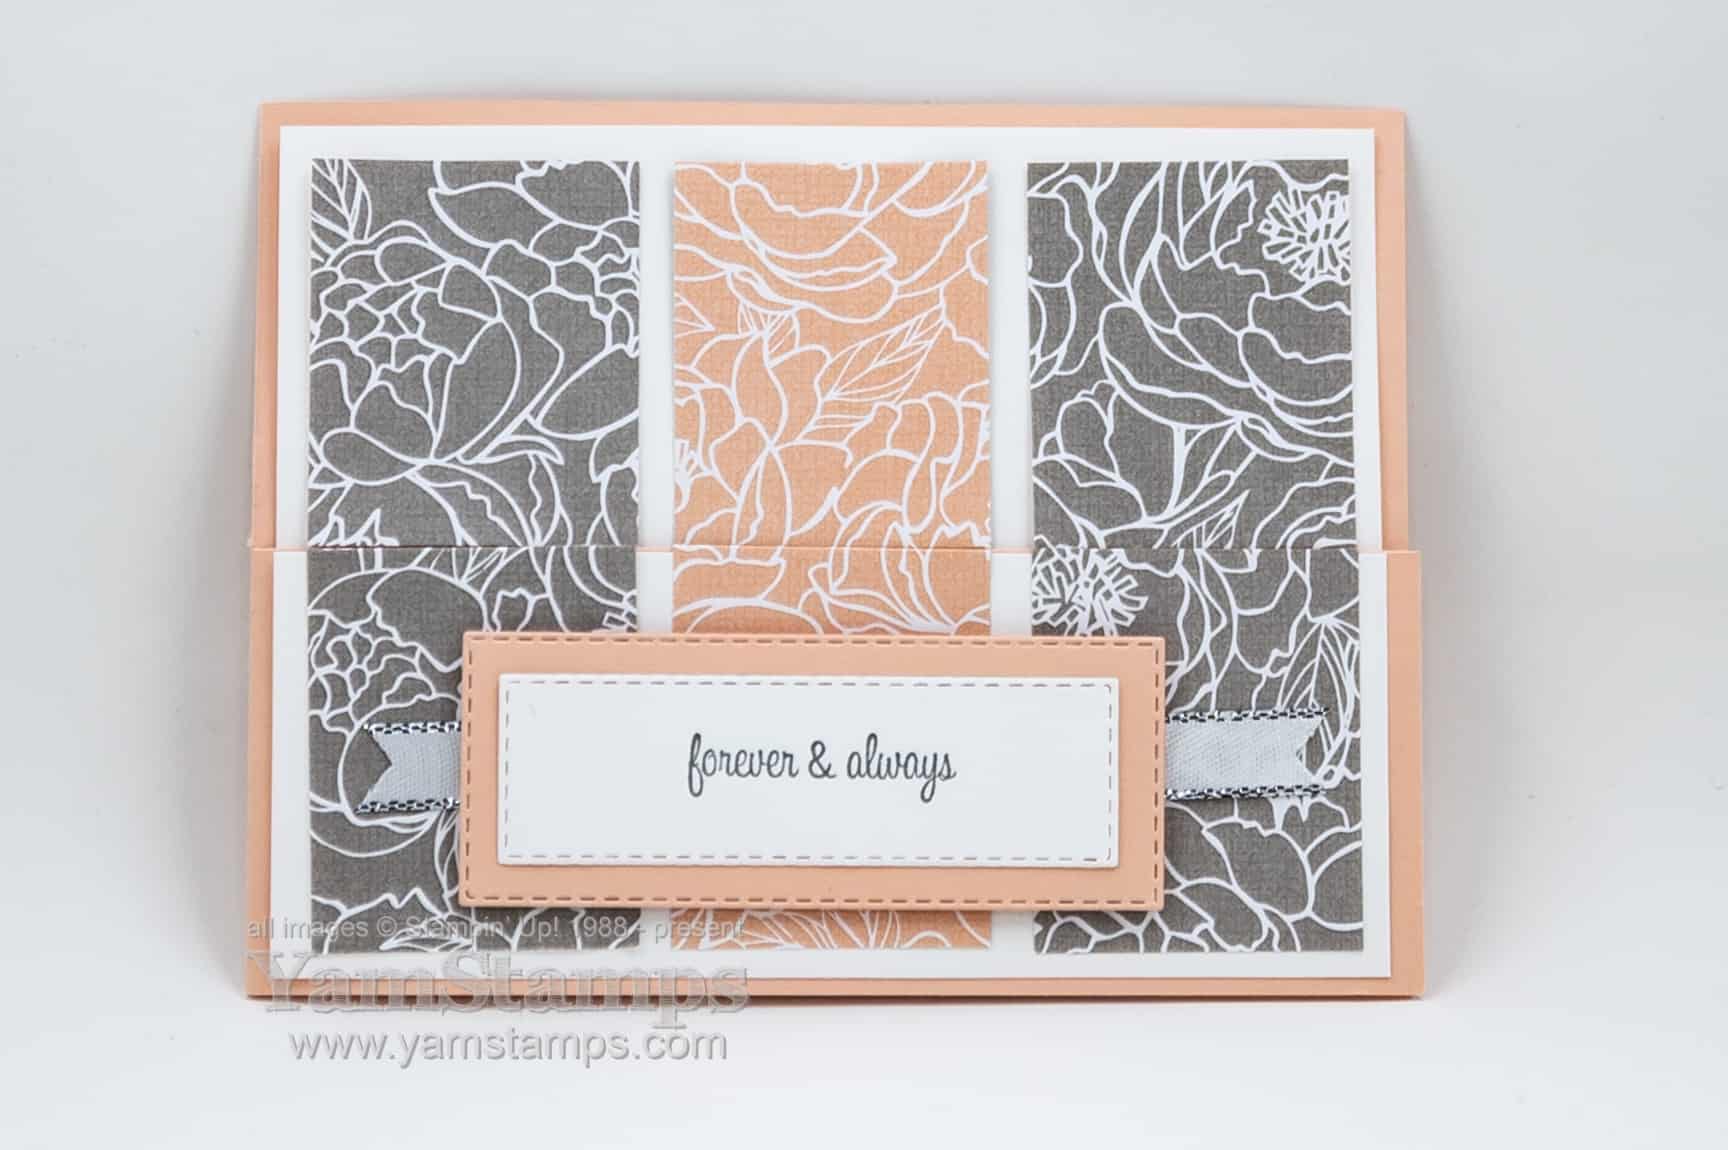
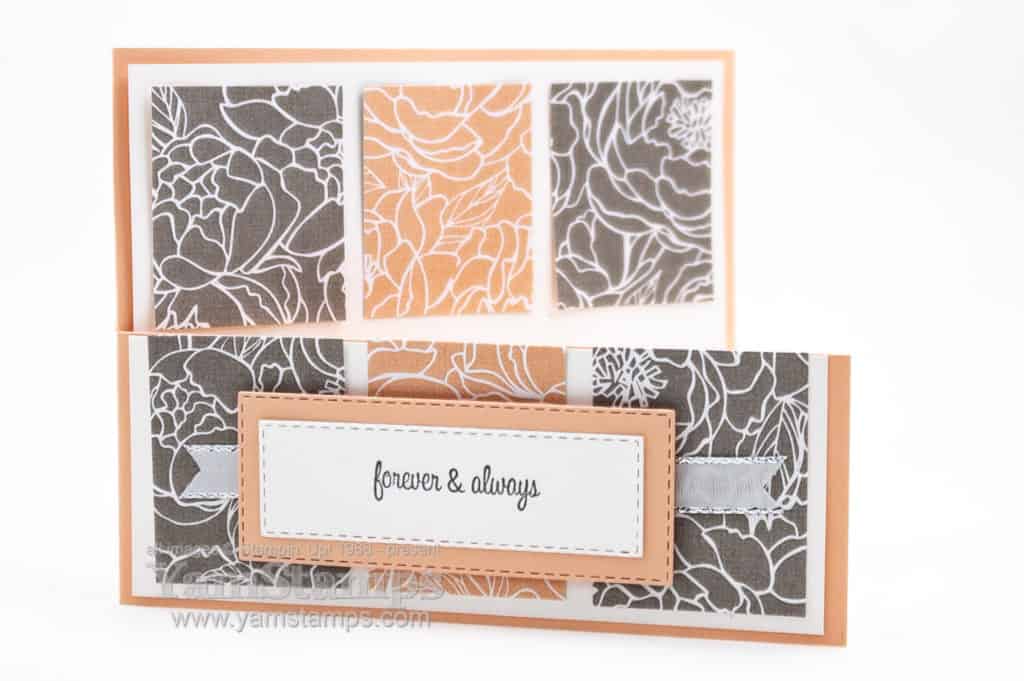
OK so admittedly – this doesn’t look very fun fold-ish on first glance. I think that’s what I like about it! This is a card from the latest Card Class To Go / Stampers Club. Class/Club members get the precut card supplies for the projects – so they just add the finishing touches and assemble! While the sentiment on this sample is from the Itty Bitty Greetings stamp set and is good for a wedding/anniversary card, you can switch out the sentiment and/or the patterned paper to suit the occasion. I used the Peony Garden Designer Series Paper for this card – it’s one of the papers included in this month’s Designer Series Paper Sale for 15% off!
Here’s the fun fold aspect of it – it’s just an extra cut to create this different opening.
Just a little different, and fun, I think! One more little detail that can be fun – I used the two sheets of paper that had the same pattern but different colour backgrounds, and then when I cut the strips, I tried to arrange them so that the pattern continued across all three. If you are trying to be a thrifty crafter, while it might pain you to cut 3 strips from each sheet you’ll be able to get 6 cards with the same pattern because of the 12″ x 12″ size of the patterned paper, but they’ll all be _slightly_ different. Three will have grey-pink-grey and three will have pink-grey-pink, because you use 2 strips from one sheet and one strip from the other for each card.
Oh – and here’s the Mean Girls Reference too..
Hope you enjoyed this World Cardmaking Day Fun Fold Card!Fun fold, regular fold, whatever – hope that you get the chance to create something today – maybe while watching Mean Girls?
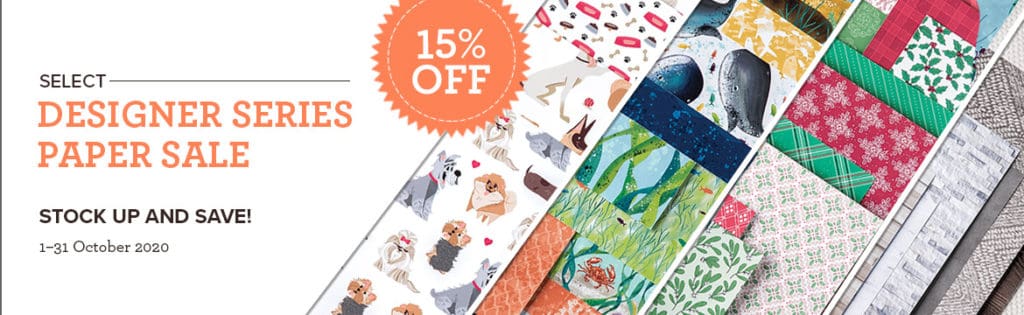
All of October you can save on selected Designer Series Papers from the Stampin’ Up! Canada Annual Catalogue and the August-December Mini Catalogue. You can download the flyer here. The image below that shows all the papers included in this sale (if you click on it, you’ll go to them in the store).
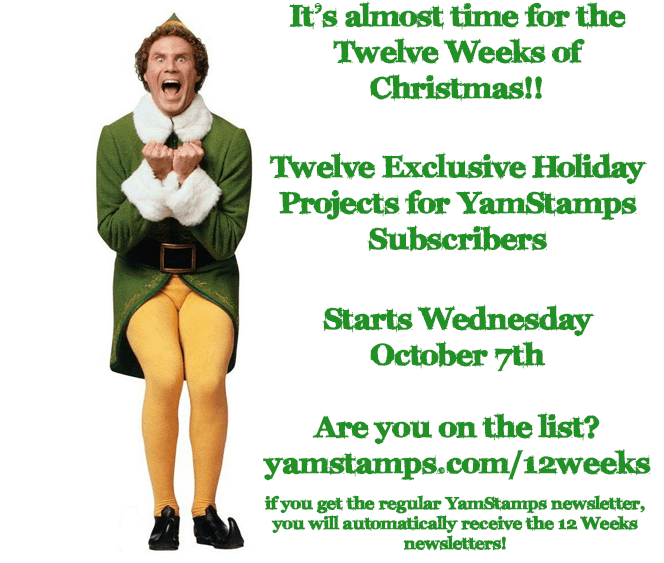
It’s that time of year again….starting next week, it’s the Twelve Weeks of Christmas! As a special feature for subscribers of the YamStamps Mailing List, each year at this time I have a special extra newsletter edition. Each week brings a holiday project tutorial – complete with a picture, supply list, and step by step instructions. This is in addition to the regular YamStamps Projects Newsletters – so there’s lots of ideas and inspiration coming to your inbox – but only if you’re a subscriber! Just like the regular YamStamps newsletter project – these projects won’t be shared elsewhere.
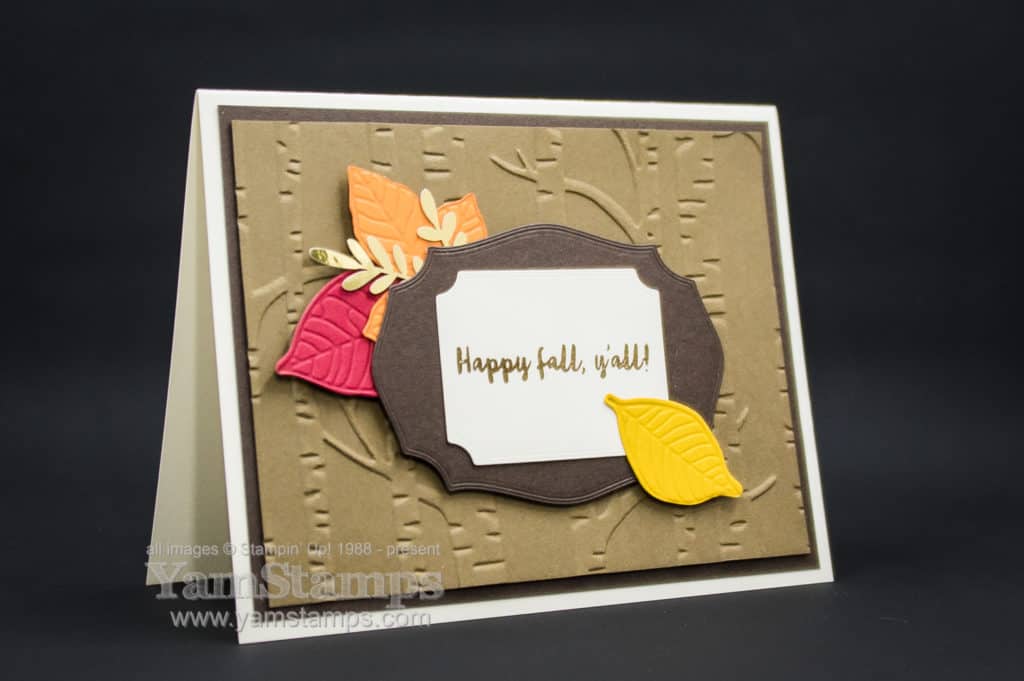
Thought I would share an autumn card with you today! This card was featured in the most recent Card Class to Go and Stampers Club.
This card is all about autumn colours and textures, the background is the Woodland Embossing Folder on Soft Suede Cardstock. The leaves are die cut and embossed with the Nature’s Root Dies, and I added one of the leaves from the Forever Gold Laser-Cut Specialty Paper. I love that the paper features multiples of the same shapes so that I don’t feel the need to hoard them quite so much as I might… I used the Tasteful Labels dies to cut out the shapes for the sentiment from one of my current favourite all purpose sets, Banner Year.
One of my favourite thrifty tricks is to use to die cut or punch shapes out of the backing mat piece – and I used that trick here on my Autumn card. Noone will see the gap in the cardstock when it’s layered up like this!
There’s a couple of days left for the Get & Go Starter Kit Special! Until September 30th, you will receive 2 additional free stamp sets (Queen Anne’s Lace and So Much Love) plus 16 card kits and some bling with your starter kit order – which, as usual, will include $165 worth of product of your choice – plus all the basic business supplies you’ll need to get started! You can find out more information here about joining my group of demonstrators. There’s also some exciting things coming up in October…selected Designer Series Papers will be on sale…so be sure to come back to YamStamps.com for more details! I will share some more autumn cards…but you know that winter and holiday cards are going to be featured in the next few weeks!!
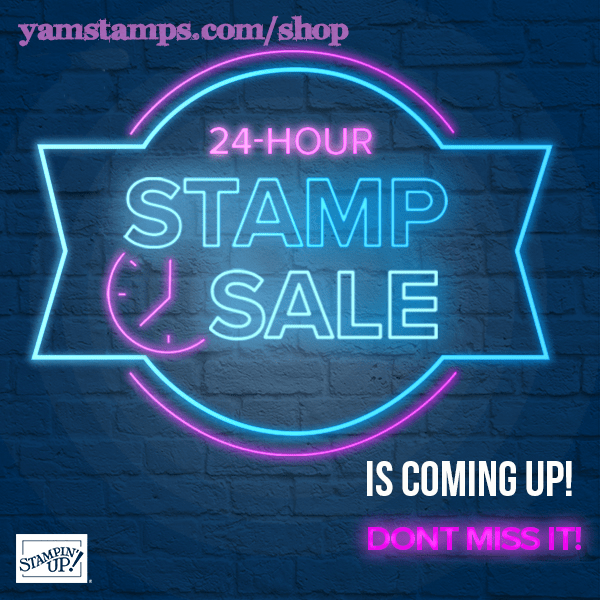
The 24 hour sale is in progress – save 15% on selected stamp sets until 1159 pm Mountain Time September 23rd. (If you’re on Eastern time like me, that’s actually 159am September 24th for you night owls to shop…).
Here’s a fun project to get you into the spirit, using one of the stamp sets that is on sale – Itty Bitty Christmas. You can click on the image or this link and see all the items used to create this project in the YamStamps Online Stampin’ Up! Canada store. (let me know what you think about this feature!)
While we’re in the spirit….a reminder that the Twelve Weeks of Christmas projects newsletter will be starting soon (yes, it’s true – hard to believe, I know!!). It’s an exclusive feature for subscribers to the YamStamps Newsletter – as a bonus thank you for being part of my business! If you’re not yet subscribed to the YamStamps Newsletters – you can sign up here!
In the meantime – happy shopping! Please feel free to contact me if you need assistance placing a order or have any questions.
For 24 hours, selected stamp sets will be on sale! Starting September 23 at 12 AM Mountain Time (which is 2AM Eastern if that helps with your time conversion…) and running until September 23 at 1159 PM Mountain Time (which is 159AM September 24 Eastern) you can save 15%.
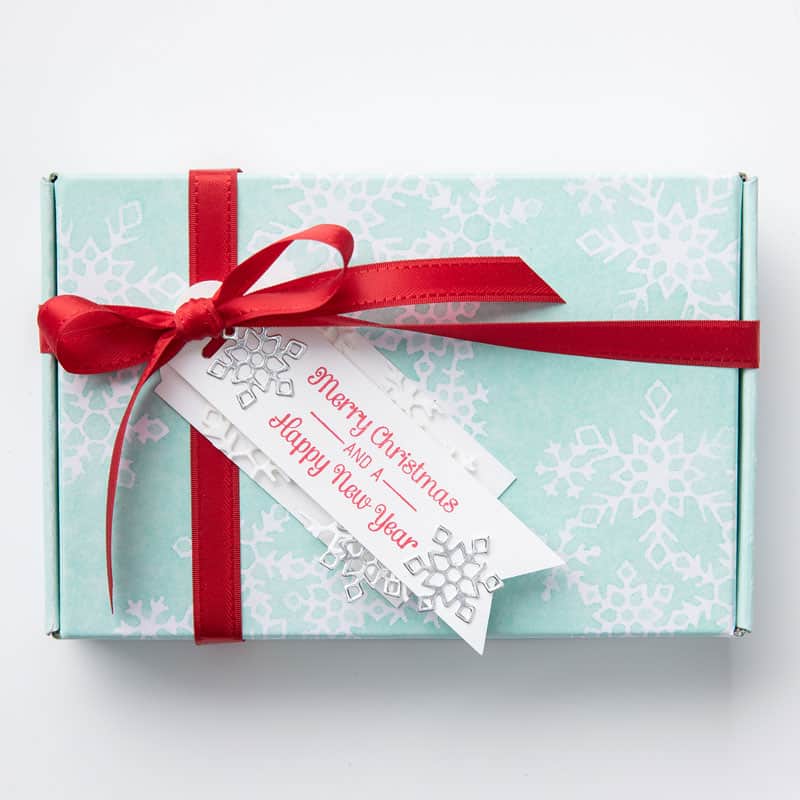
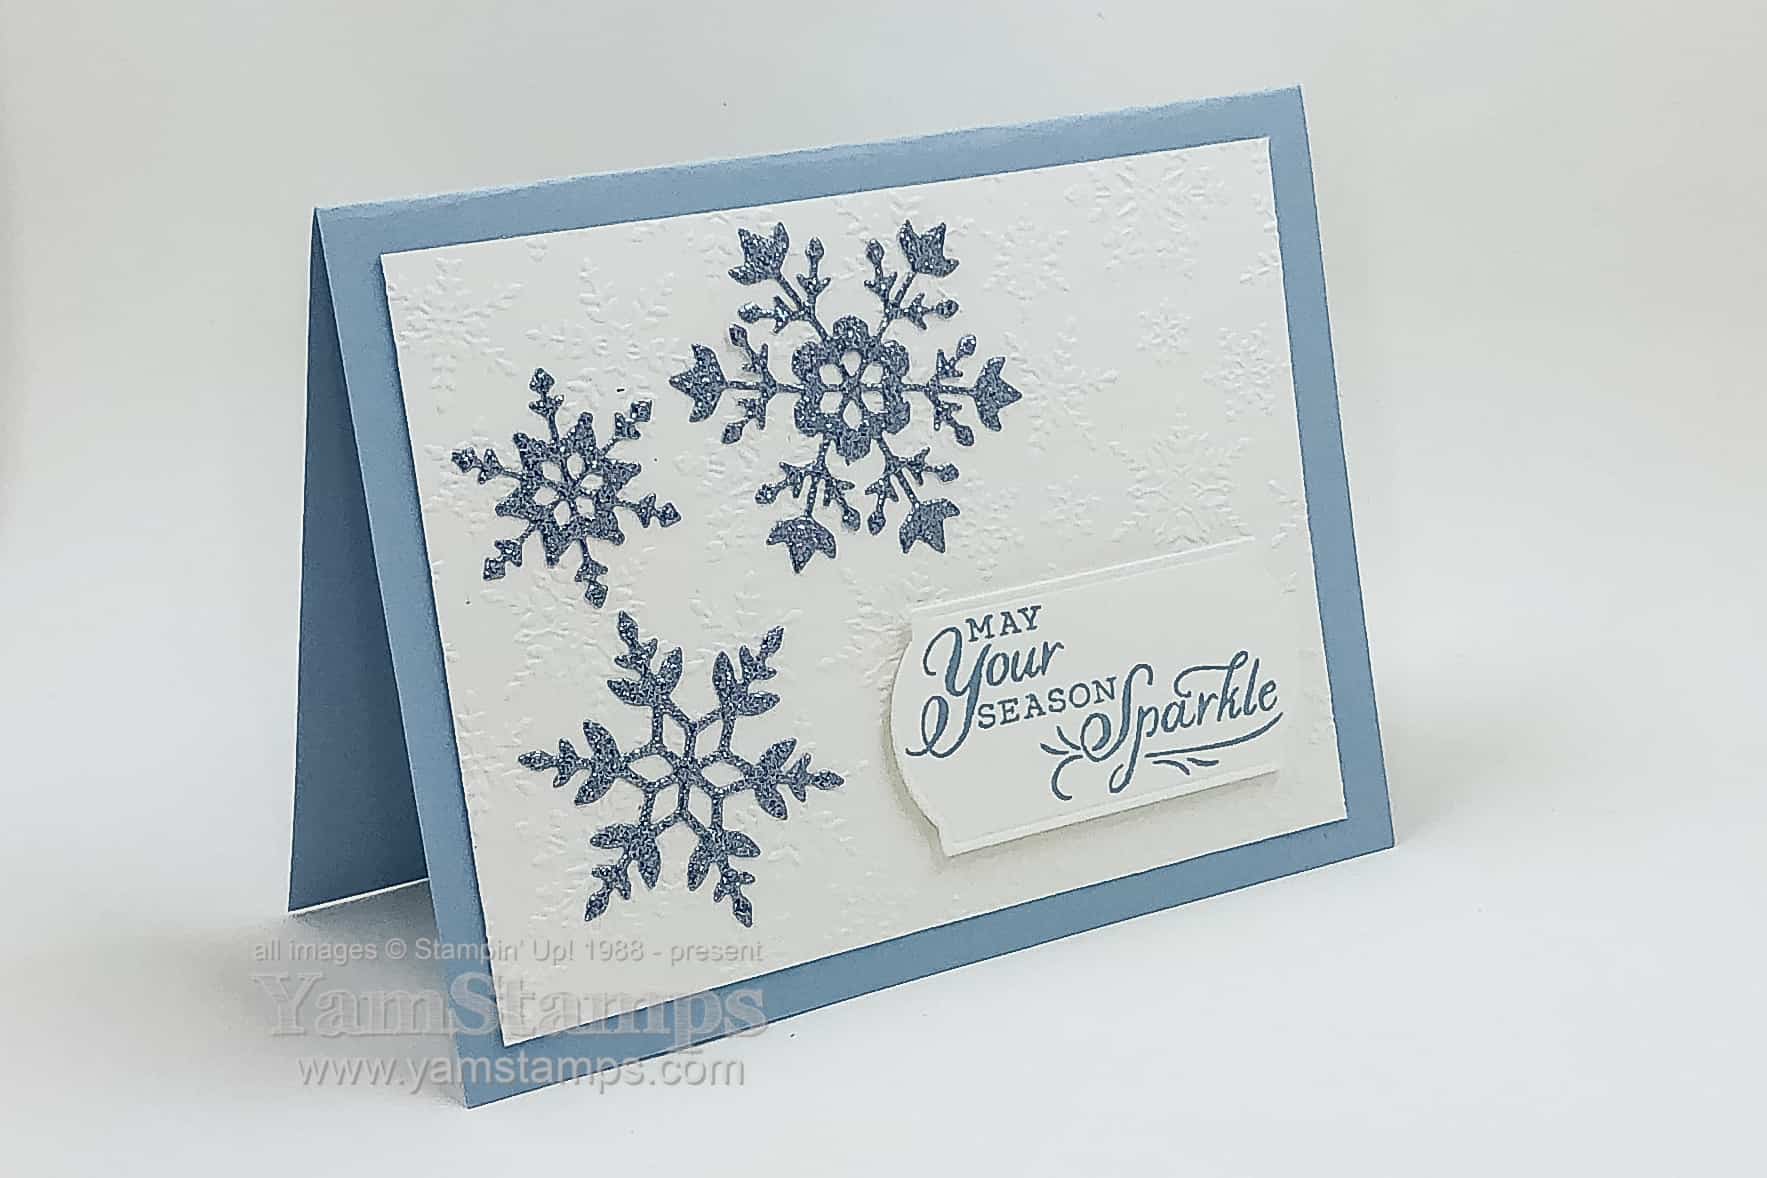
Too soon? Sharing a glittery snowflakes card that is part of the Card Class to Go “A” set. Typically in card classes around this time of year, I’ll start including one specific holiday-type card in the mix…so that class/club attendees will have a small selection of designs and cards by the time they need to mail them.
This card features products in the Snowflake Wishes Bundle, which includes the Snowflakes Wishes stamp set and coordinating So Many Snowflakes dies. Not sure if you can see it well in the photo but the Whisper White cardstock background is embossed with the Winter Snow Embossing Folder. Since it was part of the Stampers Club / Class to Go, I pre-cut all the snowflakes from the Balmy Blue Glimmer Paper for the card kits. Before I die cut, though, I adhered one of the Adhesive Sheets to the back of a 6″ x 12″ piece of the Glimmer Paper – so assembling the glittery snowflake card is even easier – just peel off the backing and stick the snowflake in place! Truth be told, I’m a slightly lazy crafter – so if I have to use liquid glue, I won’t go over every inch of the embellishment – just dots here & there, which usually works…as long as I am sure to cover enough areas so that it will stick! This leads to my second confession – I’m also a messy crafter, which means that usually the first embellishment (or even card, if I’m lucky) will be okay, but the second or third has my gluey fingers often mucking up things or getting stuck to the project as well. Thankfully, I have ALSO learned to use my Silicone Craft Sheet because nothing sticks to that…not even my sticky fingers.
I used the sentiment from the Snowflake Wishes stamp set, but those in Club/Class received a blank precut label and could stamp whatever sentiment they wished from their stash. (Stampin’ Up! rules prohibit us from including any pre-stamped materials in our kits). If you’re interested in getting a Card Class to Go kit, contact me! Delivery is either porch pick up in Burlington ON or via Canada Post.
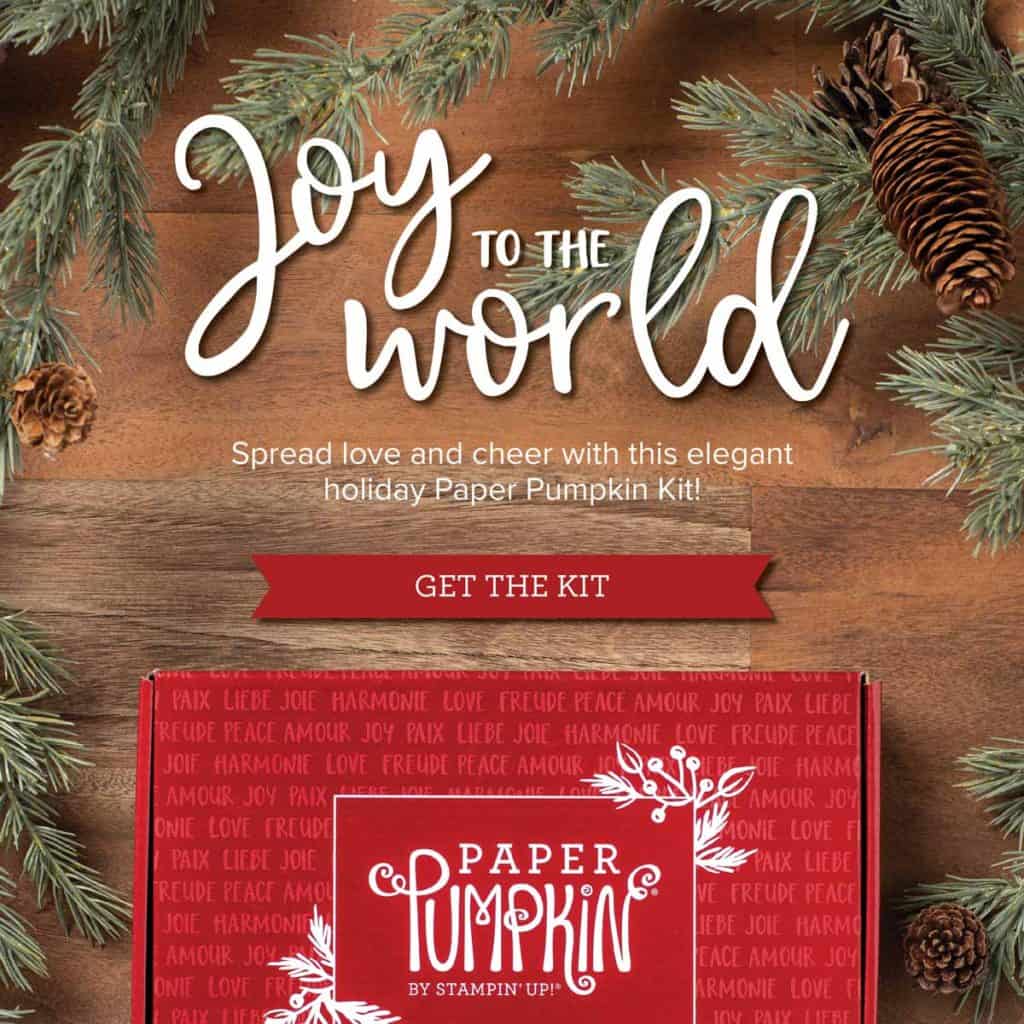
If you’re looking to start in on your stash of holiday cards, I’m working on a class revolving around a Holiday themed bundle, but in the meantime, you may also want to consider grabbing the next Paper Pumpkin kit, which is on sale right now. September 11-October 10 is the subscription period for the October box, which is called Joy to the World. It includes supplies to create 8 cards, and includes die cuts in English, French & German. Great for sending to friends around the world! I’m looking forward to this one. You can subscribe to get a new kit each month, and pay month by month, or purchase a pre-paid subscription for 1 month, 3 months, 6 months, or 12 months. You can cancel at any time, or put a month on hold if you need.
If you purchase a Demonstrator Starter kit this month, you’ll receive a code to redeem for a Paper Pumpkin kit. **If you purchase between Sept 1-15, you’ll receive a code you can redeem as of September 16th. If you purchase the starter kit Sept 16-30, you’ll receive a code you can redeem after October 10th.**SO –if you would like to get the Joy to the World kit as your free Paper Pumpkin kit you will need to complete the Starter Kit purchase by Tuesday September 15th. Check out the FAQs for joining my group of Stampin’ Up! Demonstrators here or message me if you have any questions.
In the meantime, I’m packaging up the next Card Class To Go / Stampers Club kits – no glittery snowflake cards this time around (different set of cards each time) – but still 4 fun projects!
Hello September! I often think of September much like January – the start of a new year or phase. This September is definitely different than previous Septembers, and one of the things I missed most this year was the Back to School shopping excitement. I am totally one of those geeks who loves new pens, pencils, paper, notebooks….so perhaps it’s a good thing I missed out on most of that shopping because I’m sure I saved some money along the way – well at least in that section of my budget.
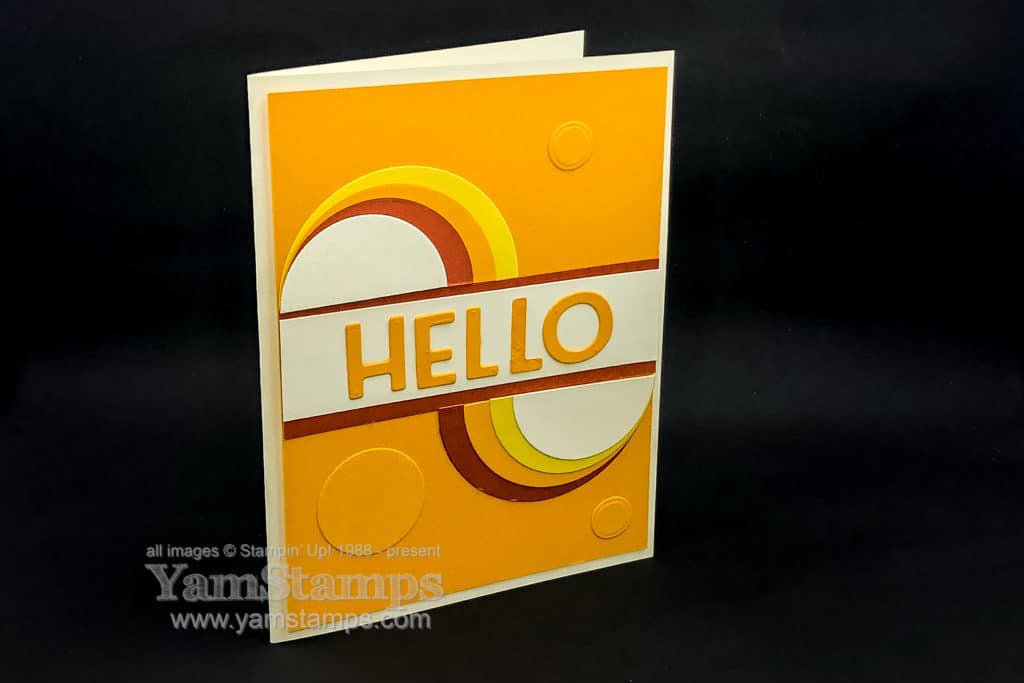
Here’s a card to sayhello – whether it’s to a month or to a friend. It’s part of a previous Class to Go and Stampers Club. I love how simple shapes can be manipulated to make a more complex effect!
I love the Playful Alphabet Dies – and I love that there are multiples of many letters, meaning it’s easy to die cut whole words at one time (without having to go back and re-cut a single letter). The other feature on this card is circles (or semi-circles) – so I used the Layering Circles dies, plus the smallest Mango Melody Circle on the background is actually the centre of the “o”. Can you see the “trick” to make the colours line up on the larger semi-circles to emphasize the swooping motion? You need extra circles to do it – two of the largest and second smallest circles, one of each of the colours (in this case, Cajun Craze and Daffodil Delight). You only need one of the second largest circle in one colour (Mango Melody in the sample). We were laughing in Stampers Club at the colours – they’re a little “retro” – and someone mentioned that we just needed an Avocado Green shade (hmm I guess the closest Stampin’ Up! shade might be Old Olive – or maybe Mossy Meadow??) to go with the “Harvest Gold” like theme and we would have a totally 70’s card.
One of the challenges I face with doing club virtually is figuring out the projects. Normally when we meet in person, I have the stamps and inks required for the different projects on the table, and each person uses them for that card. Right now participants are picking up (or receiving their card kits in the mail) – and Stampin’ Up! prohibits us from including any pre-stamped images in our kits, so the cards we do in Stampers Club these days are tending to be based on techniques, papers, die cuts or punched images (because I can include those). If a card could use a sentiment on it that is stamped, I usually will include a die cut or punched label or tag, but then each person can add their own sentiment from the craft supplies they have in their stash. Class to Go operates under the same format – you get all pre-cut cardstock/embellishments or pre-die cut/ punched elements for each card, plus an envelope. You supply the adhesive (or let me know if you need some and you can purchase some to be included in your kit) and have the option to add stamped sentiments of your choice.
I’ll be adding a few Bundle Classes in the next while that will focus on a particular stamp & tool combination. While the supplies will be still be precut, the projects may require further stamping or die cutting for completion as per the samples. If you’re interested in joining us, drop me a message and I’ll get you set up! Club is a 6 month commitment, Class to Go is a stand alone (i.e. no ongoing commitment), and Bundle Classes will also be stand alone (though you’ll want the featured bundle to complete the projects as per the class samples).
In the meantime, I will continue to create cards that also require stamping in addition to die cutting and punches – because that’s what I do…LOL! Wishing everyone a safe and smooth return to routine – recognizing that our routine may be a new and unfamiliar one – at least to start.
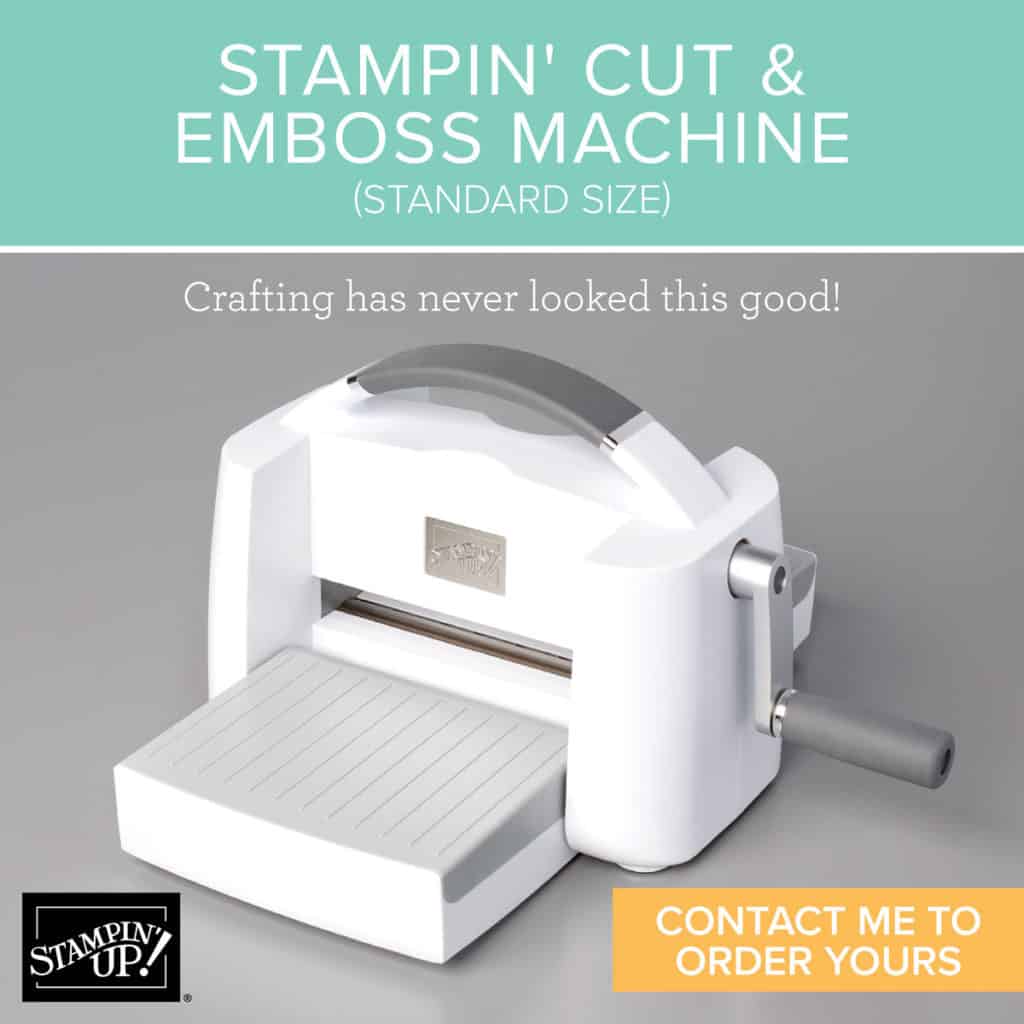
Now available to order – the Stampin’ Cut & Emboss Machine!Stampin’ Up!’s standard sized machine is available for customer order starting today. This machine has a wide 6″ (15.2 cm) platform that works with all Stampin’ Up! dies and embossing folders. It comes with 1 Base Plate (Plate 1), 1 Die Plate (Plate 2), 2 Cutting Plates (Plate 3), and 1 Specialty Plate (Plate 4). All the plates are numbered so you know exactly which one goes where (and which one to use when, thanks to the printed instructions on the base plate!)
The machine platforms fold up so it’s compact for storage or portability. Also available today – the Magnetic Cutting Plate. While Demonstrators were able to order the Stampin’ Cut & Emboss Machine in August, the Magnetic Cutting Plate was not available until now – so you can be sure that will be on my order today! Much as we loved the Magnetic Platform for the Big Shot – the Stampin’ Cut & Emboss Magnetic Cutting Plate will replace one of the plates in the sandwich. Once I get my Magnetic Platform in hand, I’ll be sure to do a video to show it off! You can place your order in the YamStamps Online Stampin’ Up! Canada Store here, or contact me for assistance.
The Stampin’ Cut & Emboss Machine(Standard Size) is $163 CAD – so the other news is that you could select it in your Demonstrator Starter kit and pay just $135. During September, there’s a Get & Go promotion as well – new demonstrators will receive two stamp sets (Queen Anne’s Lace and So Much Love), a package of rhinestones and 16 precut card packages to create 8 cards of 2 different designs – or use to come up with your own creations! The kits are designed for you to either make cards to send to friends and family, or to help you share the fun of cardmaking with others in a class (virtual or socially distanced). Check out this FAQ about becoming a demonstrator with my group, or if you can go here or contact me if you’re ready to start the process!