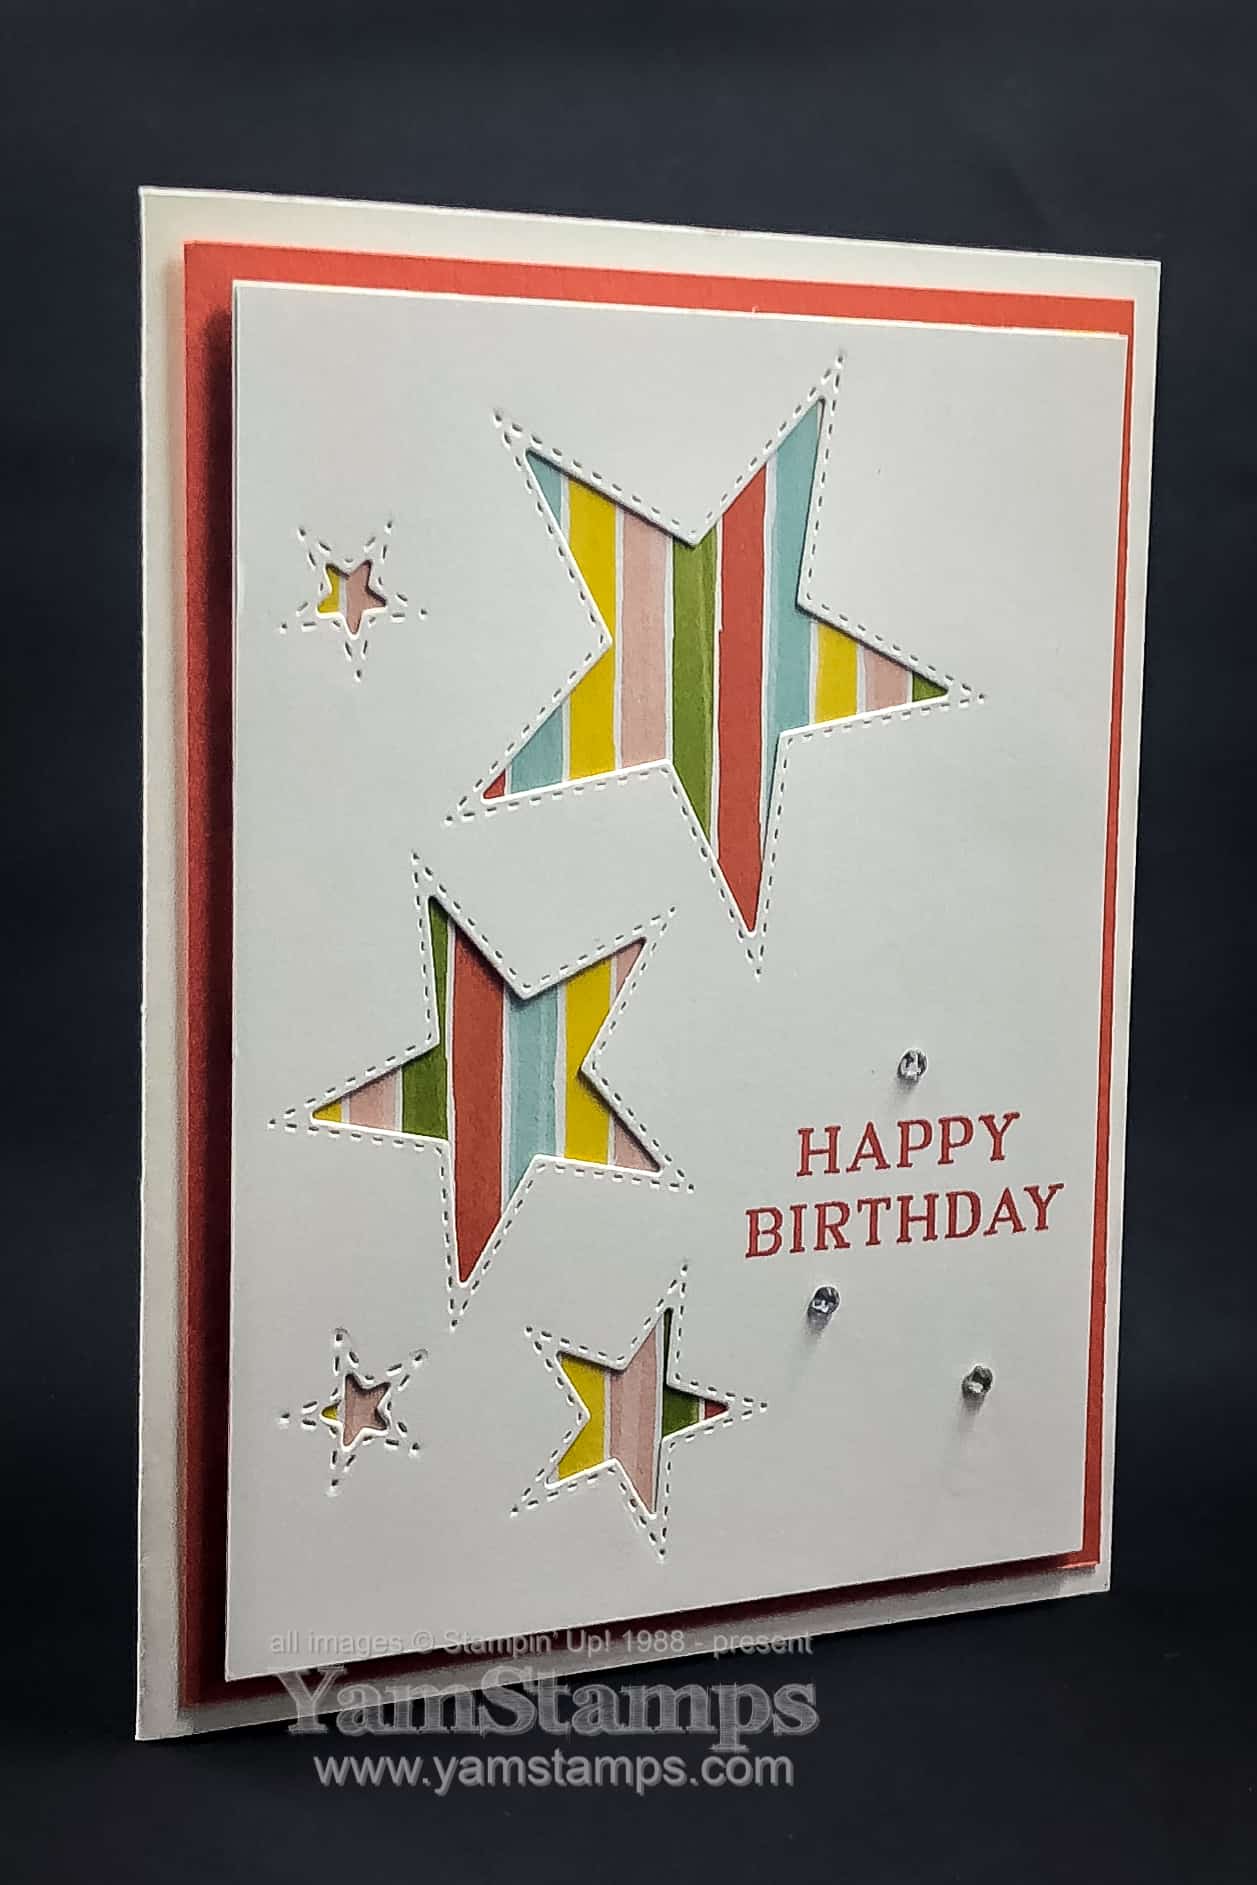
Stampin’ Up!’s Holiday Catalogue has a lot of great products for the holiday season – and I love being able to use them for something other than holidays! This starry birthday card is an example of using a holiday catalogue product for another occasion. (OK, maybe not too much of a stretch there, but still an alternative).
Like many of Stampin’ Up!’s “stitched” dies, there is a stitching mark on the outside and the inside of the cutting line for the Stitched Stars dies – so both the positive and negative die cuts have that detail. For this card, the stars were cut from the Whisper White cardstock and then set aside (to be used on another project at some point in time!). The cardstock was then adhered to some Designer Series Paper – in this case, Bird Ballad, and then onto the cardfront. We just used a single piece of paper, but if you wanted to be really tricky, you could either die cut the stars from the Designer Series Paper and then place them in the negative spaces of the cardstock, or cut squares/circles from the DSP and place them behind the negative spaces. In either case, you could vary up the pattern direction if you desired. However, you may know that I sometimes refer to myself as “The Lazy Crafter” (trademark pending LOL), so the single sheet of Designer Series Paper was the way to go for my starry birthday card design. This card design could be used for so many different occasions by changing out the sentiment and switching the backing papers. Easy peasy!
The sentiment is from the Perennial Birthday stamp set, and a little rhinestone bling goes a long way to make a card more special. The backing cardstock (and ink) are Calypso Coral, which is one of the colours in the paper’s design. (Lazy crafter – why think too much?).
This starry birthday card was one of the featured projects during September card classes. Tomorrow is the September Christmas Card Class – using some of the elegant Brightly Gleaming Foil Elements. At the time of writing this post, there were a couple of openings left – so if you are free at either 1pm or 7pm, contact me ASAP if you’d like to join us! Class fee of $30 covers all supplies, including a full package of the elements. Next month we’ll be using the Holiday Rhinestones for our projects – and class is filling quickly. Check the YamStamps Events page for all the upcoming events, and contact me if you have any questions or for registration! Thanks for stopping by the blog today.
So we had a complete cable/internet outage in our household the last couple of days and it was painful! I know, first world problems and all…but it did emphasize to me how much I rely on technology to make my life easier – both my work life and my home life. Breathing a bit easier now that we have internet and wifi back – and I’m not going to look at data usage over the past couple of days. Thankfully my son is away at school, because I can imagine the wailing and gnashing of teeth if this had happened when he was home!!
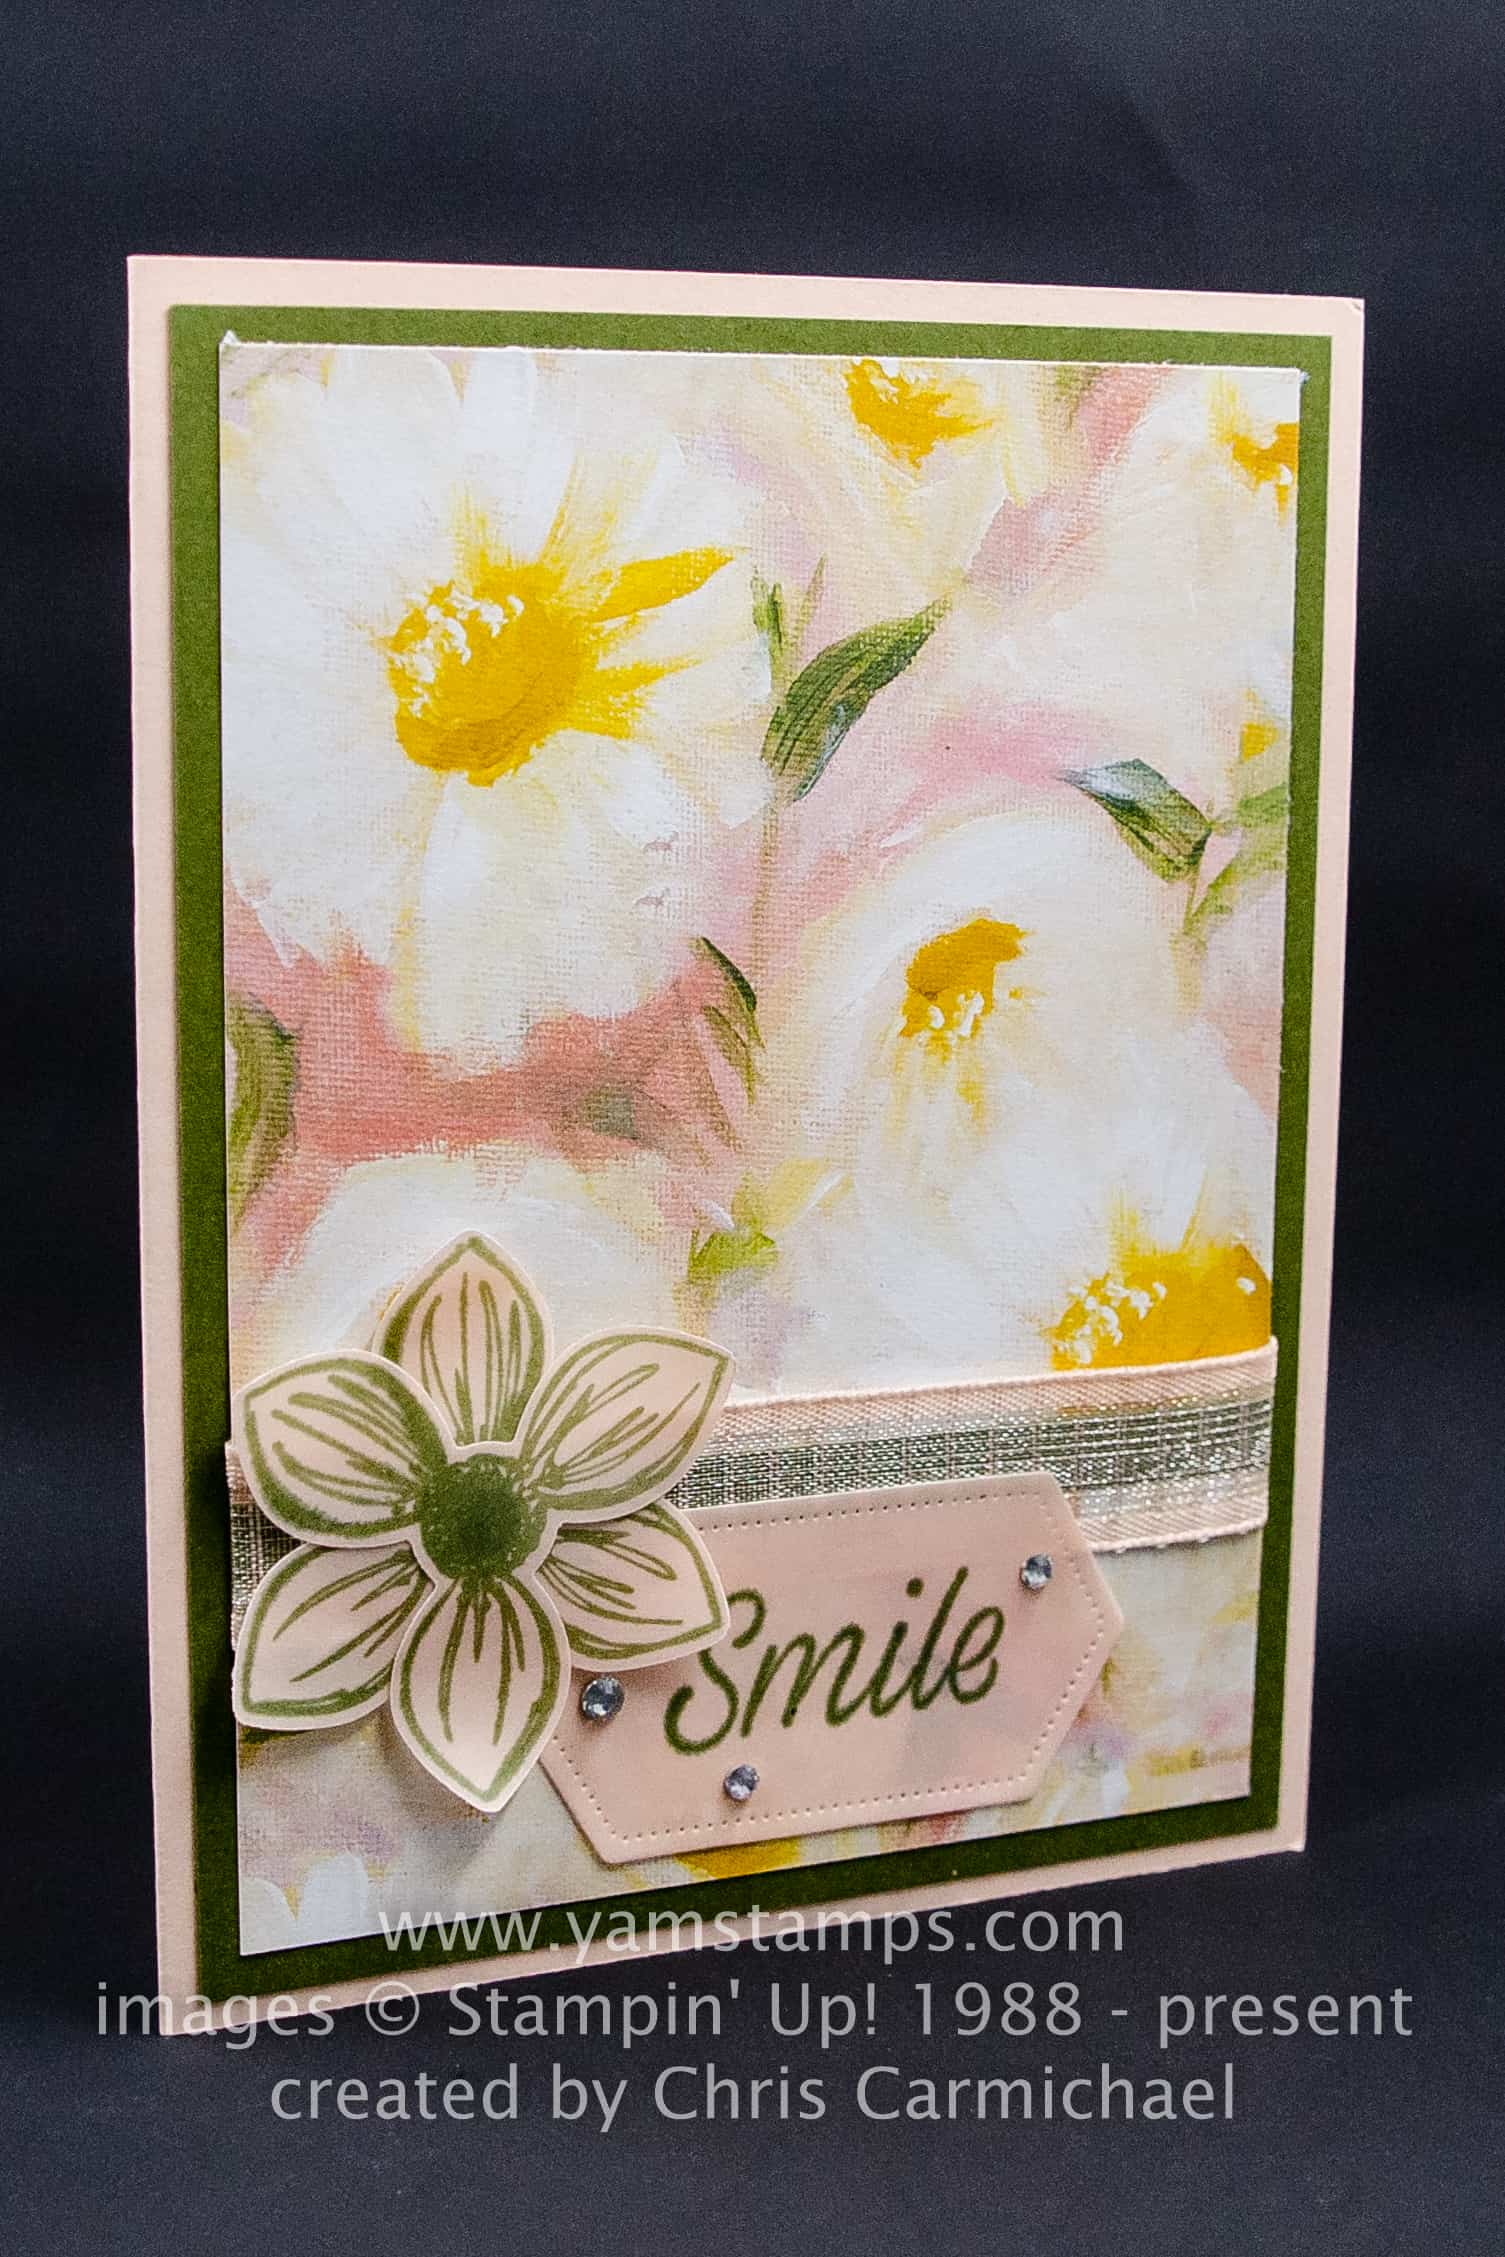
In the meantime, now that I’m not hovering by the door waiting for the service call, I’ll go back to prepping for this week’s Stampers Club and Christmas Card Classes! There are a couple of last minute openings in the Christmas Card Class on Wednesday if you’d like to join us – message me! Otherwise check the YamStamps Events Page to see upcoming dates (I’ve written them down until the end of the year!). Thanks for stopping by and thanks again to Chris for this lovely floral paper card.
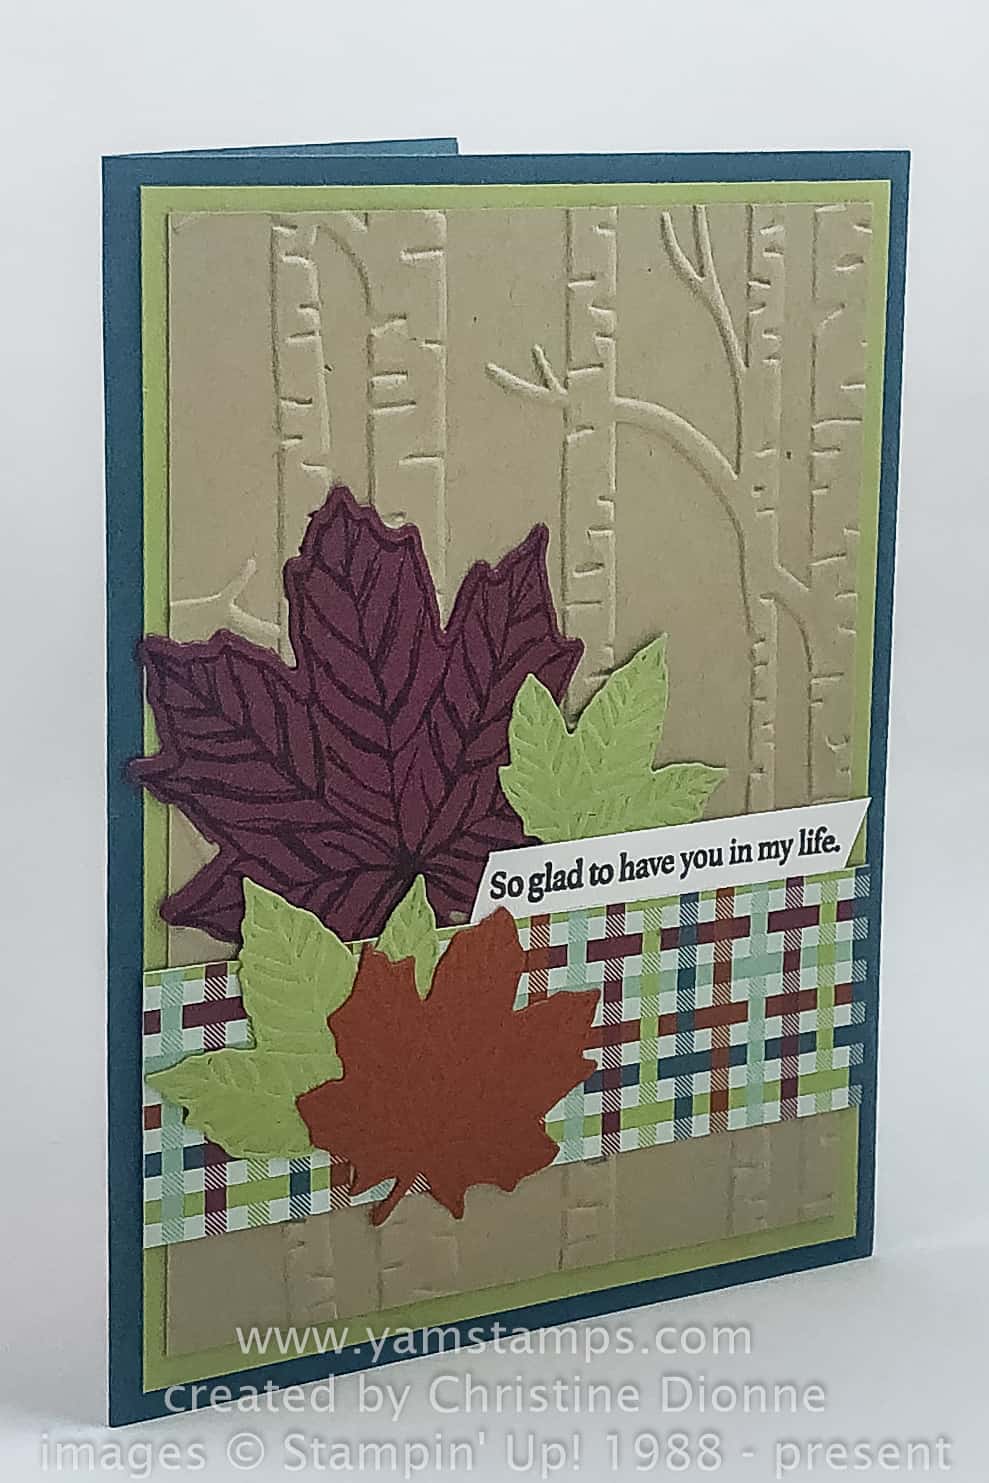
This week’s Sunday Swap Share is from the Holiday Catalogue – but it’s not a Christmas Card! This Autumn Leaves Card was created by Christine Dionne and highlights some of the “other” holiday products in Stampin’ Up!’s Holiday Catalogue.
I’m just starting to go through the fantastic cards I received as part of this demonstrator card swap. This was another organized swap – focusing on Holiday Catalogue product, with some guidelines in terms of card construction. At Stampin’ Up! demonstrator gatherings, there’s usually a fair bit of swapping occuring! Demonstrators will create multiples of a cardfront, or full card, and then trade them with other demonstrators. It’s a great way to get ideas and inspiration. I’m looking forward to On Stage in November – it’s the Stampin’ Up! organized event for demonstrators. The main event moves from location to location, since Stampin’ Up! is a global company, but there are smaller, pretty much identical events that happen on the other continents. This fall there’s a local event in Toronto! I love that it’s just down the road from my home. If you’re interested in joining me at that event, check out my FAQ page about becoming a demonstrator with my team. You’ll be able to purchase a starter kit and once you’ve got your demonstrator number, you can buy your ticket to On Stage! I’ve also got an Information Evening scheduled for Thursday, so you could RSVP for that and join me to find out more and ask any questions. I’d love to have you as part of my group of demonstrators – known as the “Eh” Team!
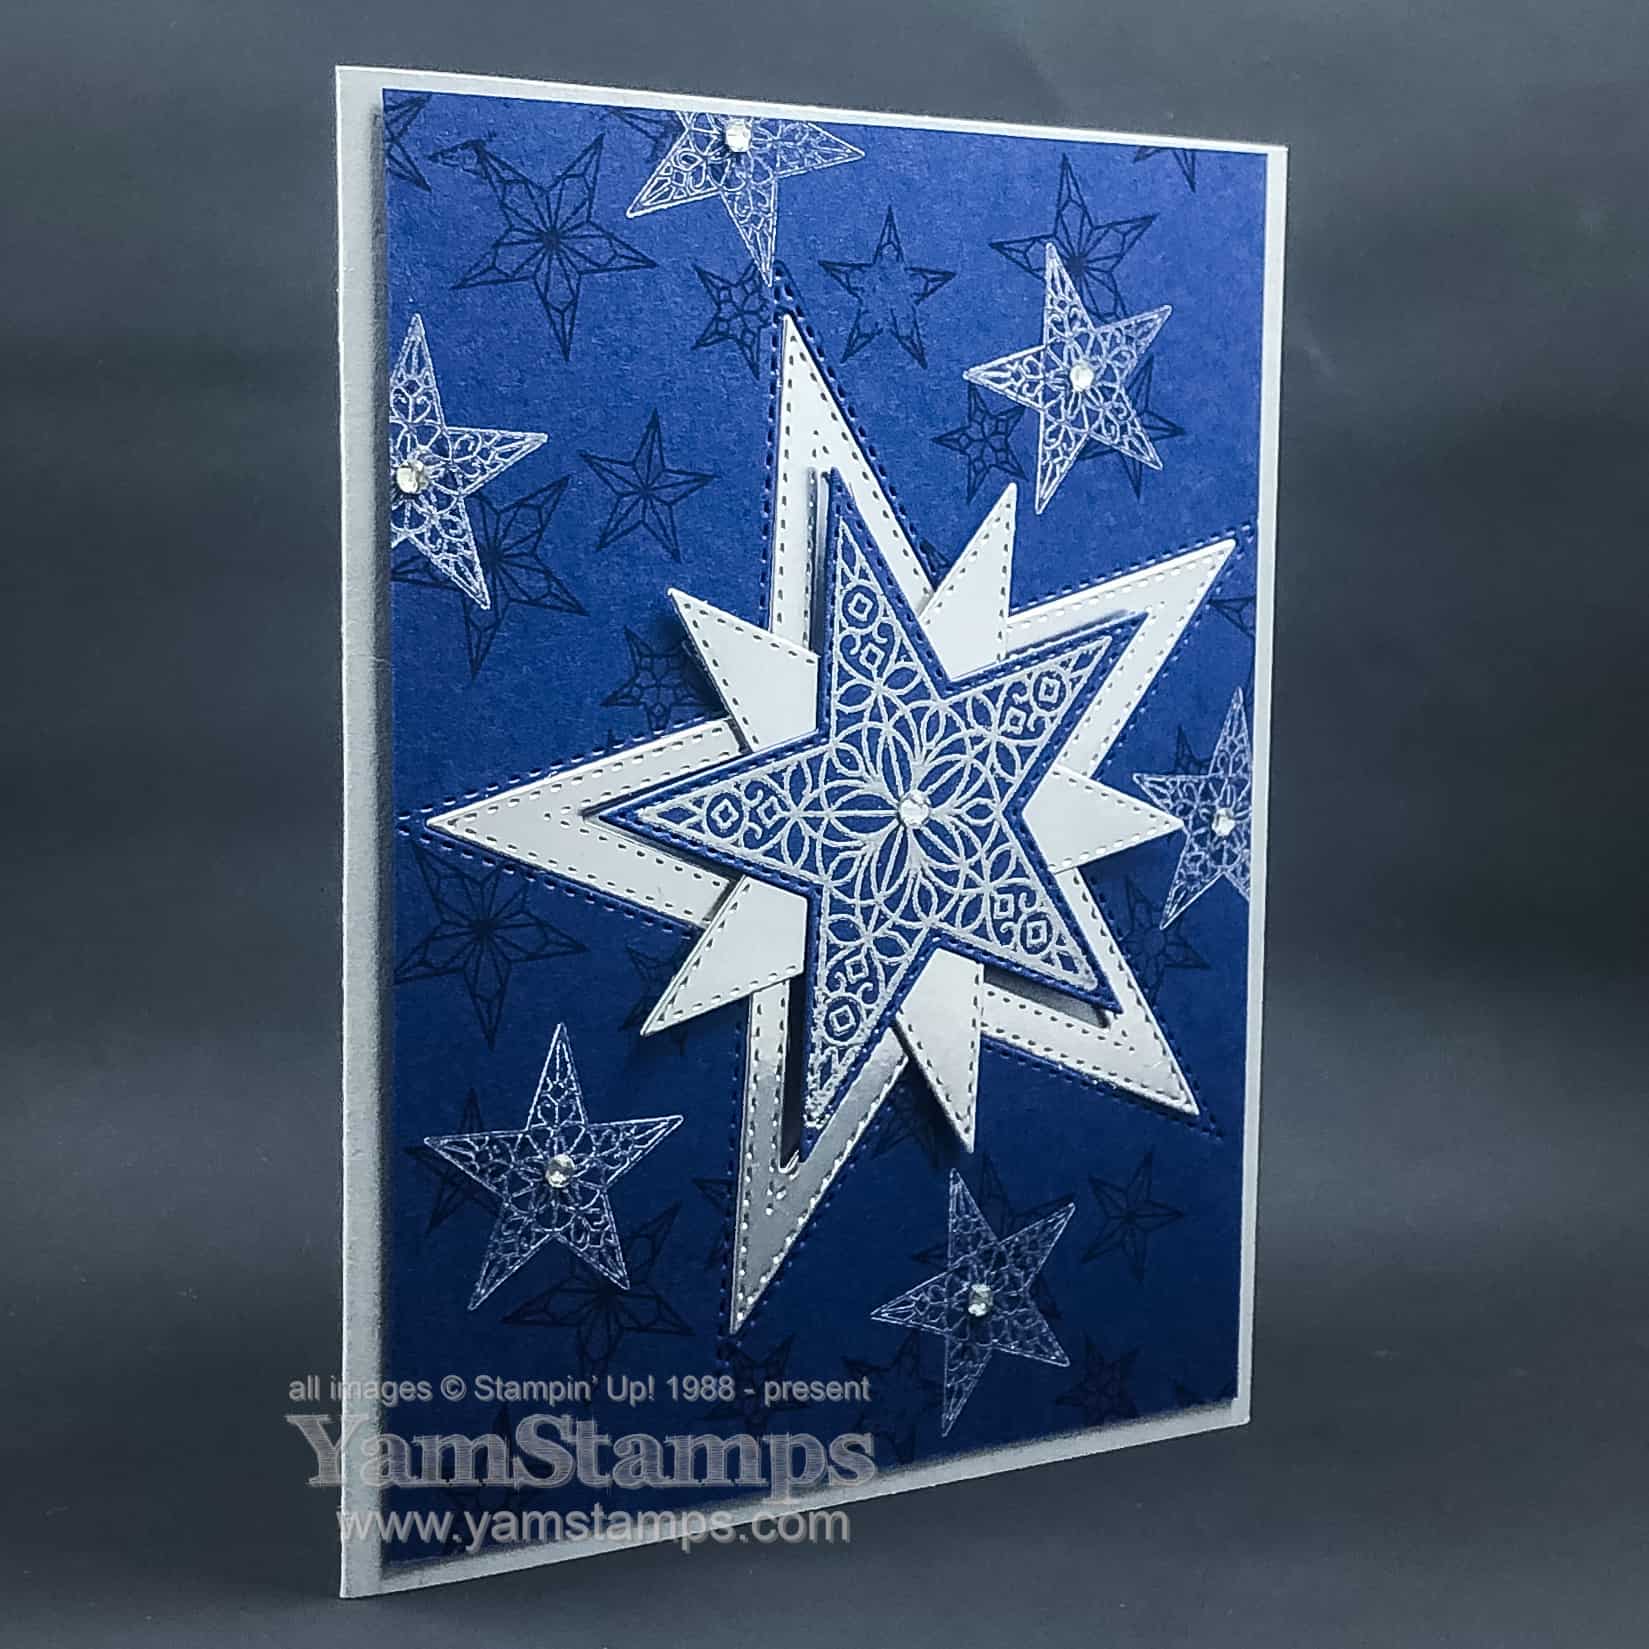
One of the perks of being a Stampin’ Up! Demonstrator is early access to catalogue product. This die cut star card was made using products from the Holiday Catalogue. I created this for a swap with fellow demonstrators while the summer heat was still in full effect!
I love the combination of navy and silver, so chose to use it for these starry cards. On this card, I did silver heat embossing, but you could also use the new Silvery Shimmer Delicata Metallic Ink Pad. The Night of Navy star is die cut from the background, and layering stars were cut from Silver Foil Sheets. The largest silver star is fitted into the opening in the Night of Navy cardstock, and the the other stars are turned and layered in place. A little bling from rhinestones also helps to make thisdie cut star cardeven shinier.
While there was a fair bit of die cutting involved in this card, it was actually not to bad to do assembly-line style. I did all the die cutting at one time, then I did the stamping and assembling. Last was the bling. I found the Take Your Pick Tool “spatula” helpful in picking up and placing the rhinestones. I usually just use my finger nails if I’m only doing one or two, but doing a whole bunch of rhinestones on a whole bunch of cards was a different story.
While the Stitched Stars are great for the holidays, they can also be used for other card giving occasions! This month’s card classes feature a fun birthday card created with these dies. I want to keep some of the surprise for class and Stampers Club members, so I’ll share that version a little later this month.
There are a few spots still available for September’s Christmas Card Class – Wednesday September 18th at 1pm or 7pm. Cost is $30 and includes a package of the Brightly Gleaming Foil Elements. We’ll use some for our in class projects and you’ll take the rest home! Contact me to reserve your spot. You can see the other upcoming Christmas Card Class Dates on the YamStamps Events Page.
If you need a copy of the Holiday Catalogue, live in Canada and don’t have a demonstrator that you work with already, please contact me to arrange to get a copy! In the meantime, if you prefer, you can download the digital version here, or see the items in the online store here, including the So Many Stars Bundle used to create today’s Die Cut Star Card. Happy Shopping!
Good luck to all starting school today! I thought I’d get us all back to school by doing a Tutorial Tuesday! This Circles Card tutorial is an example of what you’ll get when you subscribe to the YamStamps Newsletter. Each week brings paper crafting information and inspiration – whether it be a heads up about current promotions, upcoming events or ideas that you can use in your crafting.
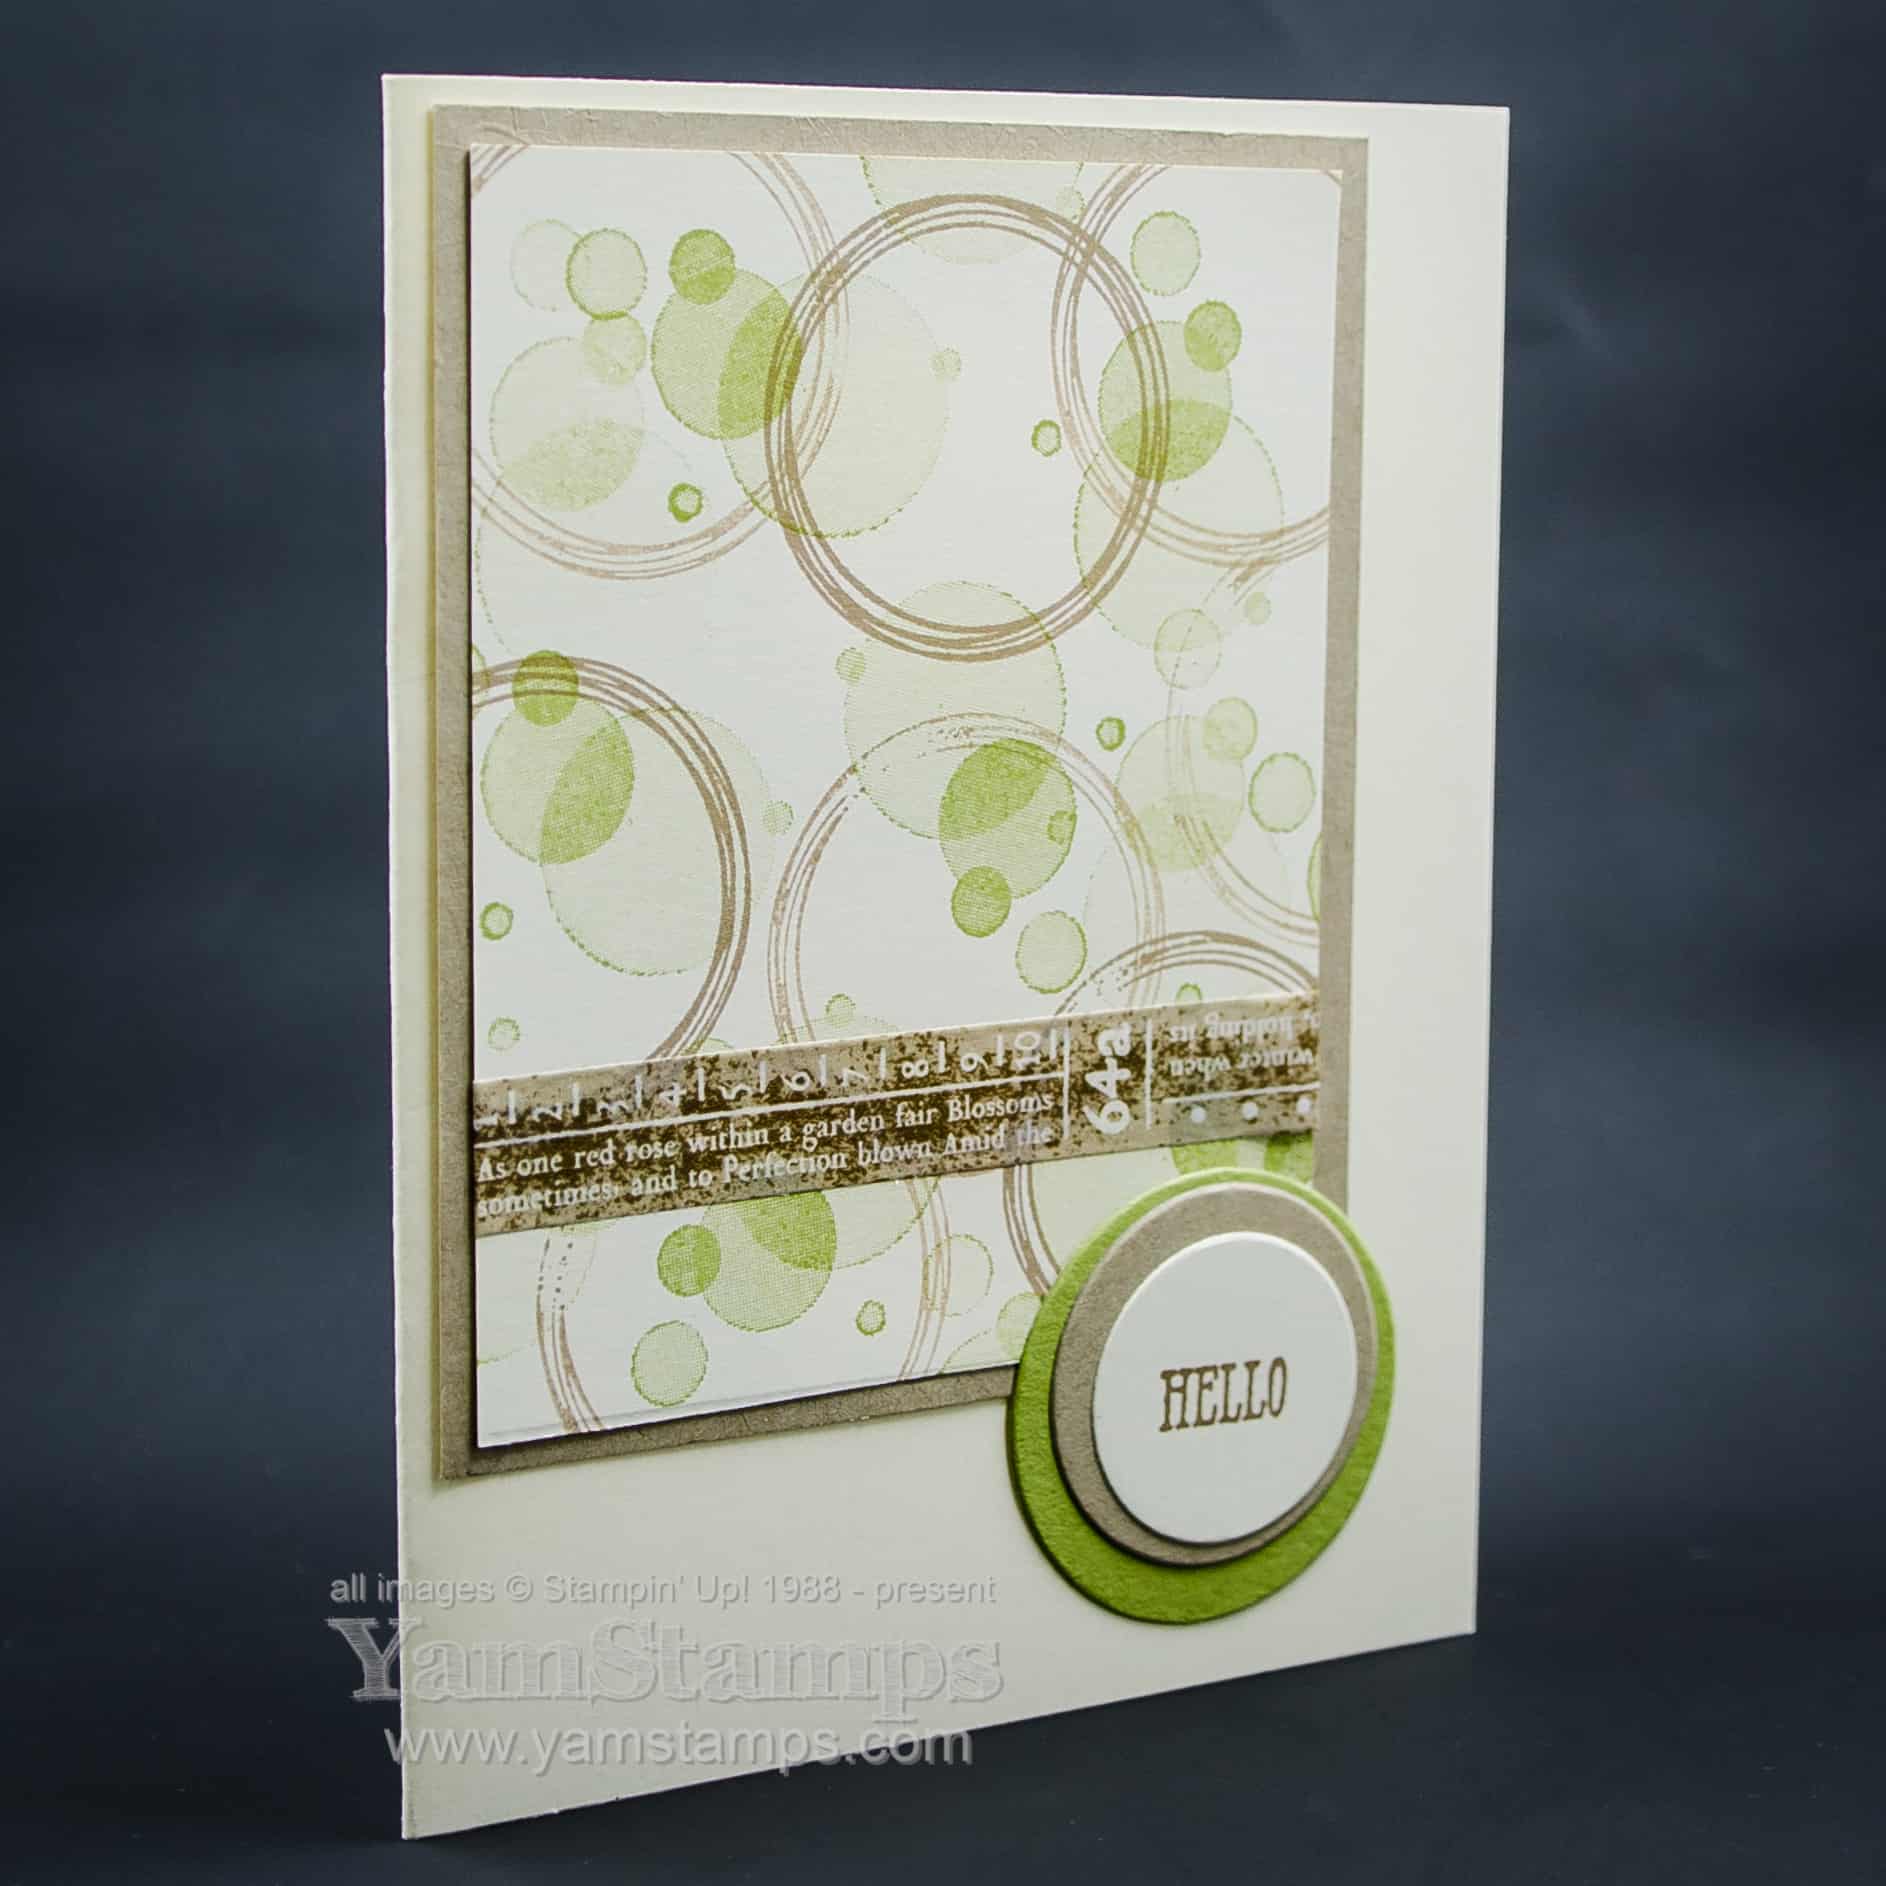
First of all the tutorial will have a photo – here’s the Circles Card photo
Next, there will be a list of supplies and measurements in some format or another…LOL. The Item numbers are beside the item description and are usually links to see the item in the online YamStamps Stampin’ Up! Canada store.
Stamp Sets: Beauty Abounds (148726) Swirly Frames (146519) Well Said (148796)
Ink: Pear Pizzazz Ink Pad (147104) Crumb Cake Ink Pad (147116)
Paper: Very Vanilla Cardstock (101650) – 5.5″ x 8.5″, 3.25″ x 4″, scrap Pear Pizzazz Cardstock (131201) – scrap Crumb Cake Cardstock (120953) – 3.5″ x 4.25″
Accessories & Tools: Layering Circles Dies (141705) Pressed Petals Specialty Washi Tape (149585) SNAIL Adhesive (104332) Die Cutting Machine
Then step by step instructions: 1) Fold larger piece of Very Vanilla Cardstock in half to create cardbase, set aside 2) Diecut the 1-3/8″ diameter circle from the centre of the Crumb Cake cardstock, set both pieces aside for now 3) Stamp the smaller, solid circles in Pear Pizzazz randomly over the smaller piece of Very Vanilla Cardstock 4) Stamp the larger outline circles in Crumb Cake randomly over the smaller piece of Very Vanilla Cardstock 5) Adhere a piece of Pressed Petals Specialty Washi Tape along the lower portion of the Cardstock 6) Adhere the cardstock onto the Crumb Cake Cardstock (covering the hole from the die cut) then to the cardfront. 7) Stamp “hello” in Crumb Cake onto scrap Very Vanilla cardstock and die cut with 1-1/8″ diameter circle 8) Diecut 1-5/8″ circle from scrap Pear Pizzazz cardstock 9) Adhere the circles together, then to cardfront.
So then you can recreate the project on your own – or change it up and customize it to suit your needs.
The first newsletter of each month is the biggest one – with a variety of projects/techniques and news, and each week following usually focuses on one project or news item. The newsletter projects are not shared elsewhere in the YamStamps media world – so only subscribers see them! The first September newsletter is due to come out TODAY at 1pm Eastern, so be subscribed before that time to receive it! Starting in October subscribers will receive an additional bonus newsletter with an exclusive holiday project tutorial!
Hope you enjoyed this Circles Card Tutorial! Any questions or feedback – please leave a comment below or message me!
It’s that time of year when I see all the Facebook updates from my friends with kids of similar ages – we’re empty nesting (again)! Last minute shopping and prepping to send our offspring (back) to university has been happening this week. I laughed because last year I did so much research and preparing ahead of time for my son’s first year, and this year it was more like – oh my gosh, you’re leaving this weekend – maybe we should go grab stuff for your apartment….?!!
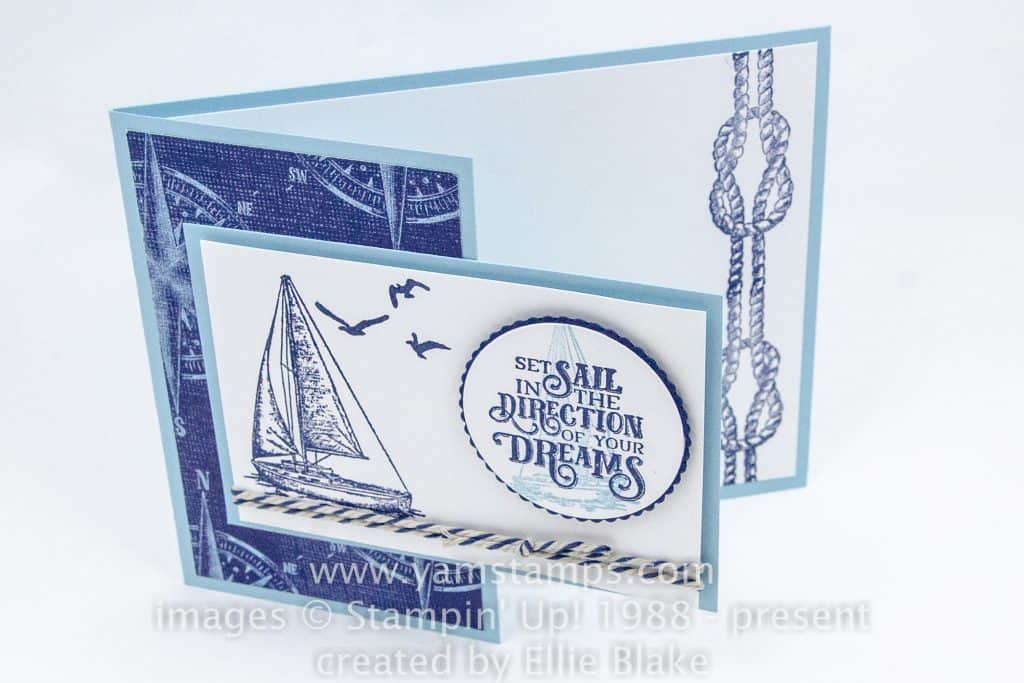
Anyway – here’s a wonderful sentiment for everyone heading off to school this week – or to new adventures. This is the Sunday Swap Share – created by Ellie Blake.
She’s featured the Sailing Home stamp set and the Come Sail Away Designer Series Paper, along with the nautical looking Night of Navy/Sahara Sand Baker’s Twine. I love this fancy cut/fold card. Frugal Crafter Alert! I’m pretty sure that Ellie’s cardstock is 4.25″ x 11″ and then she’s cut a portion from half the card – which is then used as the background for her image on the the front panel!
I love this sentiment, and it’s so appropriate for this month. September is a great time to set new goals and directions! My personal goal is to up my water intake (well okay, it’s been a goal for a little while now – but I’m buckling down about it this month!!).
You’ll want to check back on the YamStamps blog and get on my mailing list to be sure that you get to hear about all the upcoming specials and events happening in the YamStamps / Stampin’ Up! world – there’s some starting in the next few days!