Oct 1, 2015 | cards, Christmas, Events, Stampin' Up!
A reminder that TODAY is the deadline to register and pay for the October 15th Christmas Card Class! Your $30 fee will include a package of Seasons of Cheer Designer Series Paper (see above) and a package of Rhinestone Basic Jewels. We’ll make four cards using a tiny portion of your product and you take the rest home – to either duplicate the cards or come up with your own designs! Start time is 7pm. If you can’t make it that day – consider having a private Seasons of Cheer Christmas Card Class – same idea, but you can host in your own home with your friends on a date that better suits you. See the YamStamps Events page for the PayPal link to complete your payment and registration, or contact me for details on booking your own class!
Sep 24, 2015 | cards, Christmas, Stampin' Up!
Yes, it’s almost time for the Twelve Weeks of Christmas!! Each year, in the weeks before Christmas, I send out an exclusive Christmas project to the YamStamps subscribers. These projects are not shared anywhere else – you won’t see them on the YamStamps blog, the Facebook page, Twitter, Instagram, Pinterest…well, you get the idea. They will start NEXT WEEK so be sure to be signed up to the YamStamps list by Wednesday at 1pm when the first mailing goes out. As a bonus, new subscribers get an exclusive paper crafting video tutorial. By the way, there will be no “re-sends” of the special emails, so if you want all 12 projects, you need to be in from the beginning.
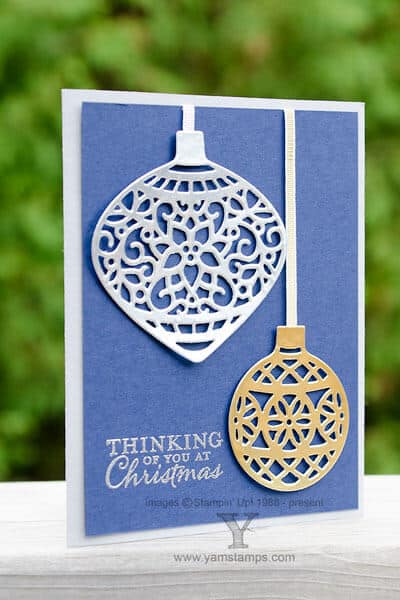
To get you into the spirit, I’m sharing a recent card featuring the beautiful Embellished Ornaments set and Delicate Ornament dies. Combined with the Gold and Silver Foil sheets, they make for an elegant card. I used Silver and Gold ribbon and silver embossed the sentiment. Smoky Slate is a great cardstock to play up the silver tones. I used the new Precision Base Plate to cut these ornaments – it’s great because it will never warp…but you do get a bit of a work out winding it through the Big Shot. I found that I didn’t need to use the dryer sheet to get these die cuts to pop out, but I did have to spend a bit of time getting the little bits to punch out of the ornament. I’m going to experiment a bit to see the most effective way to die cut the ornaments and will be sure to share my results here.
Don’t forget a couple of deadlines coming up! Registration for the October Christmas Card Class closes on October 1st – payment is due at that time so that I can place the order for the product that you get with your class fee. As well, the next Monthly Card Class will be Wednesday, October 7th. You can take a look at the YamStamps Events page for registration links or contact me to register. I look forward to seeing you in class soon!
Sep 1, 2015 | Announcements, Christmas, Seasonal Catalogue, specials, Stampin' Up!
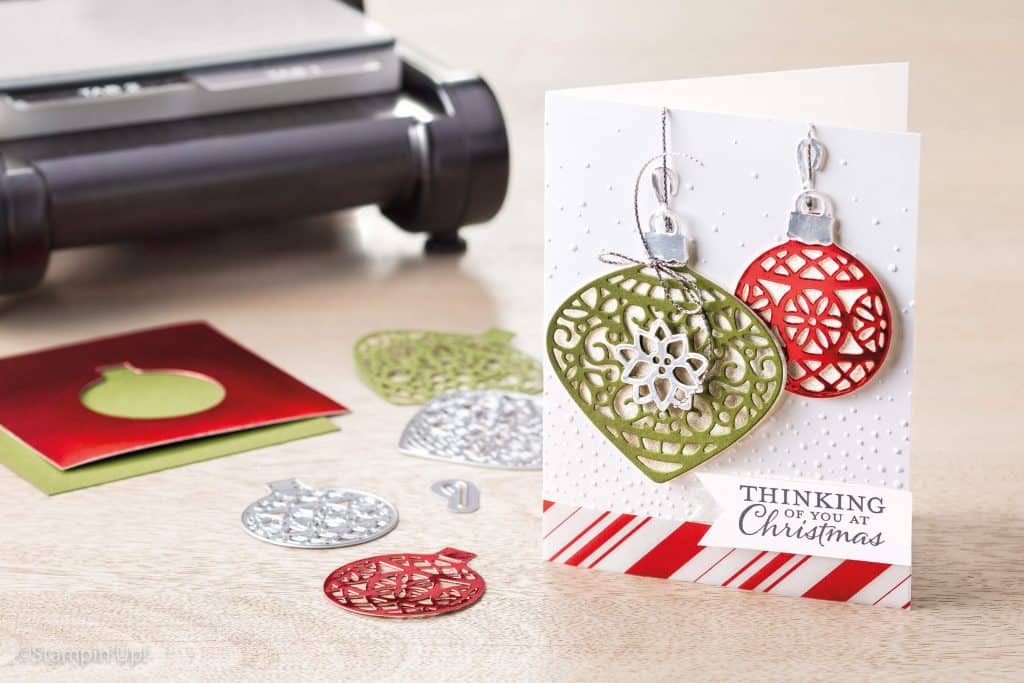
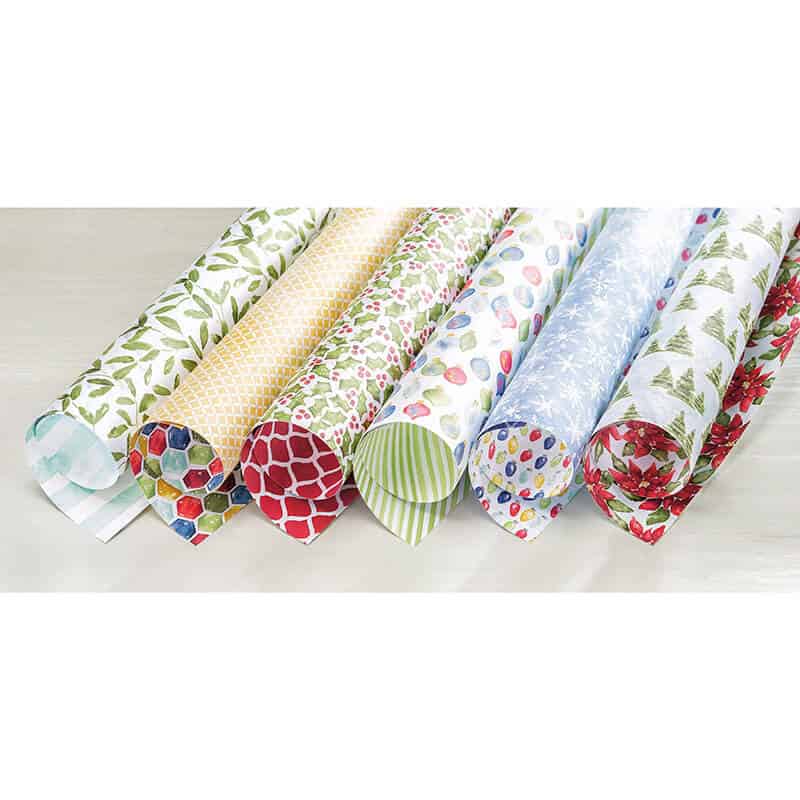
Yes! The Stampin’ Up! Canada Holiday Catalogue is now live! This is one of my favourite items from the new catalogue – aren’t the ornaments so gorgeous? When you cut from the foil papers it’s so impressive. (We are using this thinlit set in tomorrow’s Monthly Card Class…still seats available if you want to register!) So many exciting things in the Stampin’ Up / YamStamps world this week, and especially today! Holiday Catalogue is live, registration deadline for the Tin of Cards Class and impending deadline for September’s Christmas Card Class, Weekly Deals PLUS the September newsletter goes out today.
Click on the catalogue image to download a digital copy. If you still need a hard copy of the catalogue and live in Canada, please fill out this form and I will see about getting one to you ASAP.
Here are the Weekly Deals – remember that the number of specially priced items is limited, and once that number is gone, the product reverts to regular pricing. 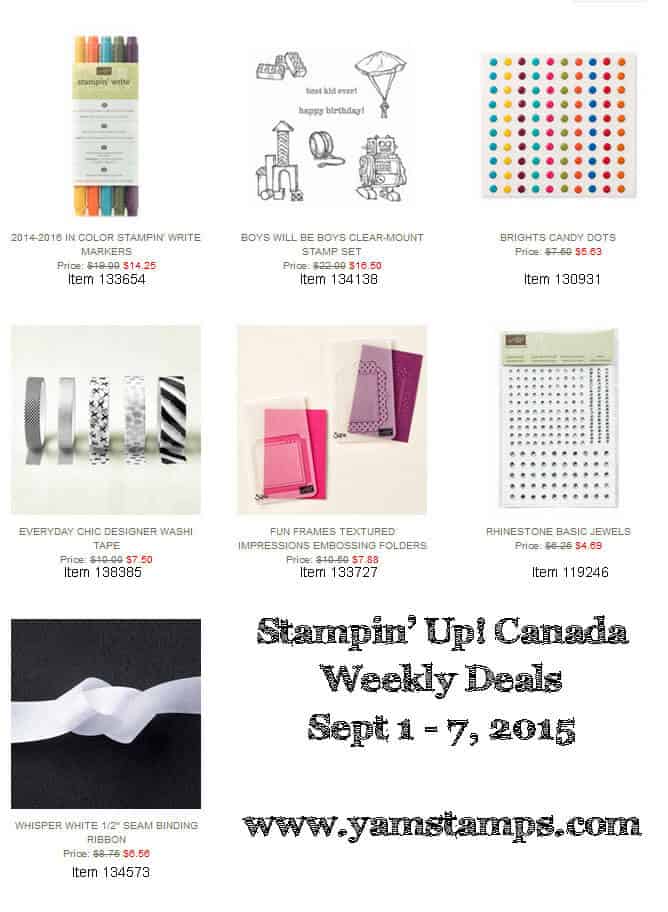
I think my faves this week are the washi tape (you can never go wrong with basic black & white!) and the stamp set. It can be hard to find good “boy” themed images!
Last but not least, the YamStamps September newsletter goes out today around 1pm Eastern. Please subscribe by using the sign up box at the top of the blog, or go here to find out more about the newsletter. *phew*
Jul 30, 2015 | cards, Christmas, Stampin' Up!
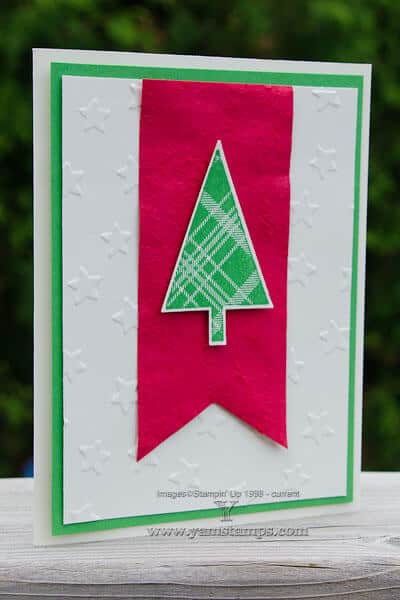
Yes, we have started Christmas Card preparation at YamStamps! I threw in a Christmas card at our last Class & Club just to get people ready for the biggest card sending occasion! If this card throws you into a bit of a tizzy, I did just post details of the Christmas Card Class series I’ll be doing starting in August. Each class will include a bundle of product that you will use to create your cards that evening, and you’ll have plenty remaining to take home as well to continue your crafting (holiday projects and non-holiday projects alike).
This card uses Stampin’ Up!’s new set Lots of Joy (available in wood or clear mount, also in French); and the new In Colour Cucumber Crush – a bright green colour that combines with Real Red to scream CHRISTMAS! The Lucky Stars (am I the only one who starts singing Madonna when I see that embossing folder’s name?!) Embossing Folder adds texture to the background, contrasting with the faux velvet technique on the Real Red banner.
Please check the YamStamps Event page for all the information on the upcoming Christmas Classes, or consider doing the online Holiday Punch Art Class if you’re looking to get a jump on your holiday cards!
Dec 19, 2014 | cards, Christmas, Tutorial
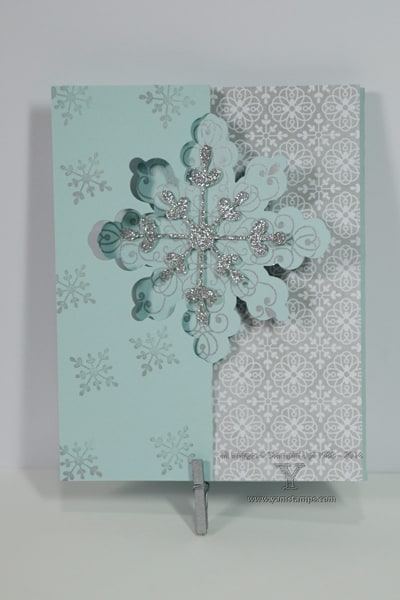 The Twelve Weeks of Christmas mailings are finished now – but why is it that I’m still surprised by how quickly time has passed? (Note – this would be the heads up that I have not really finished my own cards…LOL). Stampin’ Up!’s Snowflake Card Thinlits die does make for a fairly quick and impressive card, though! Of course, everything also looks more impressive when you add some bling – in this case, a snowflake from the Silver Glimmer Paper. The All Is Calm Designer Series Paper covers the back flap of the card, and the small snowflake from the Letterpress Winter Photopolymer set is on the front of the card, with the large snowflake taking centre stage.
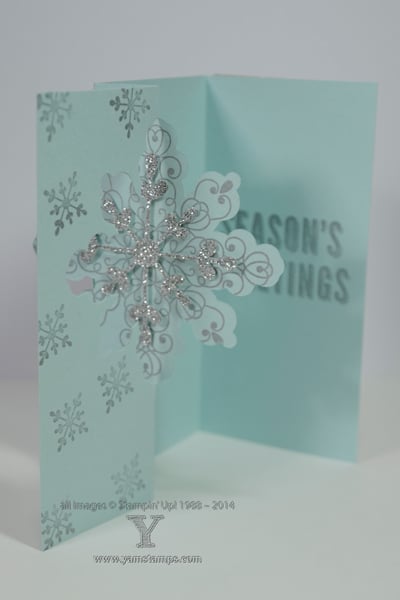
The next shot shows the open card. You can make your card long like this one by cutting your cardstock to 5-3/8″ x 8.5″ and having the one end of the cardstock on top of the die (at the end farthest from the snowflake), rather than underneath it. This allows the snowflake end to be die cut/embossed, while not chopping off the other end of the cardstock. Then you simply fold the long end inwards and you have an extra area that will let you write on the inside of the card without having it exposed when the card is closed. (The last photo shows how to position the cardstock.
 I hope you have the chance to try this out! In the meantime…off to finish preparing for the big family party this weekend…
Dec 12, 2014 | cards, Christmas, Stampin' Up!
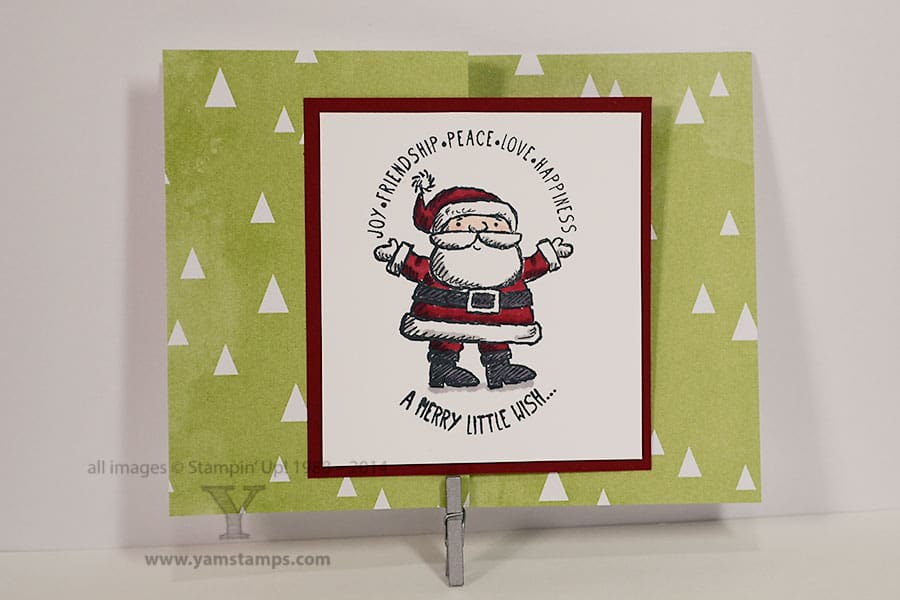
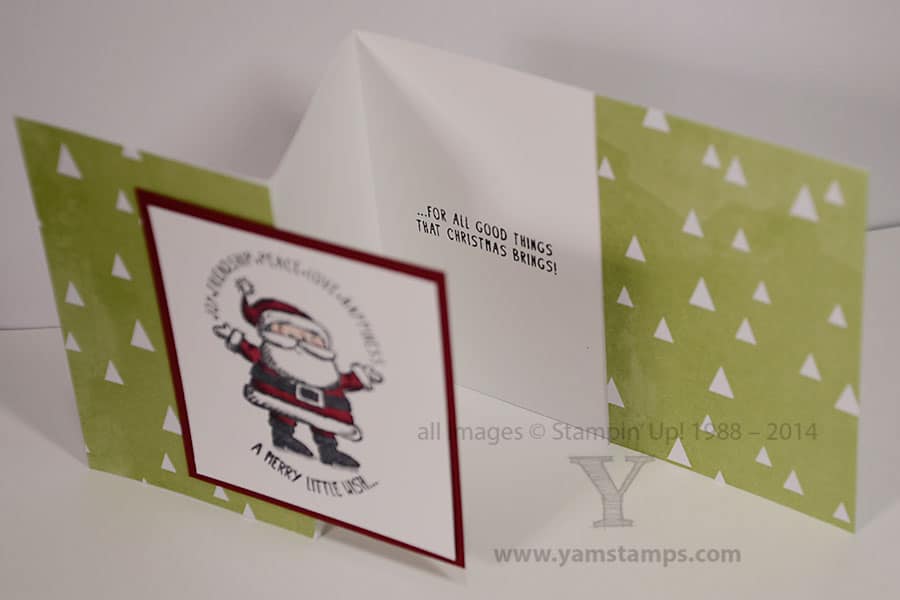
A fun way to make your cards stand out is to vary the fold a little bit. This “Z” fold card adds interest without adding a lot of time to your crafting! (Handy when you’re mass producing). Cut your cardstock to 4.25″ x 11″, score and fold in half, then fold back one side so the edge of the cardstock meets your fold. (You may want to score it again, or just use your bone folder to ensure a neat fold. I did a quick video tutorial on cutting and basic card folds in this blog post: http://yamstamps.com/2013/10/cardmaking-basics-tutorial
For this Santa card, there’s a piece of the All Is Calm Designer Series Paper on the front flap and back edge so the closed card reads like a more unified front. The Santa is from Get Your Santa On and was coloured with Blendabilities. Love those alcohol based markers (and if you do as well, just wait until the new Occasions and Sale-a-Bration catalogues – hint hint!). The other fun thing about this card is because the stamp set is photopolymer, I could curve the “A Merry Little Wish” stamp on the block (granted it may need to be reapplied a few times, because it’s really a straight line) – but it ties in with the curved greeting above Santa.
This weekend my choir (OK not MY choir, but the choir with which I sing…) has two concerts so it’s going to be a busy one! If you’re looking to hear some holiday music, please join us! We’re in Ancaster on Saturday evening and Guelph on Sunday afternoon and tickets are available at the door.


