Nov 21, 2014 | cards, Christmas, specials, Stampin' Up!
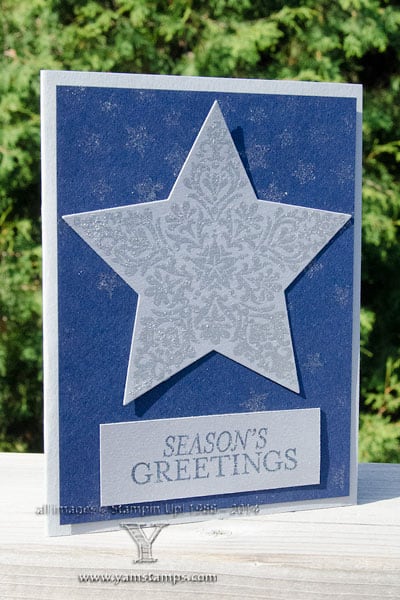
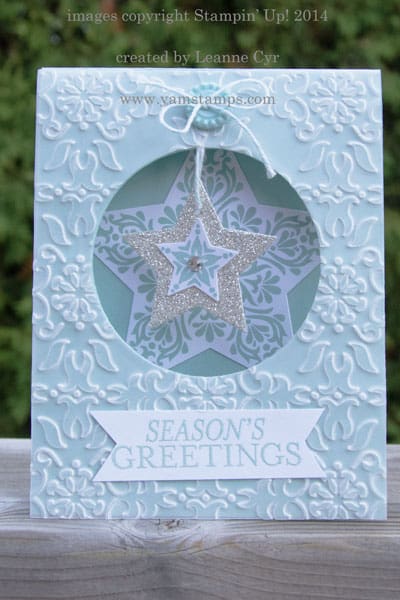 and not just “of the season”! Though I thought that was a nice tie in to feature this card created by Leanne Cyr (a member of my demonstrator group the “Eh” Team and part of the swap I participate in). I love the soft colours and how the embossed vellum on the front of the card adds texture but also ties in with the pattern on the stars. It’s gorgeous.
So other things to anticipate – Stampin’ Up! will be having some special sales starting MONDAY. Click to download the list HERE – or if you’re on my email list, you’ll receive a full copy in your inbox of the different items on sale on different days…plus I will have my own offering on Friday. “Black” Friday which was a totally American phenomenon (being that it occurs the day after US Thanksgiving) seems to have spread into Canada as well – so might as well jump in!
Plus – if you’ve been looking for a way to supplement your income or pay for your hobby (*cough*), there is a Starter Kit special as well! The kit (which is comprised of items that YOU select), will be 25% off, and you’ll earn an additional 5% income on commissionable sales in December! (*5% income will be paid in January) Check out great reasons to become a demonstrator with my group, and be ready to take the plunge on Monday – because this special is on for ONE WEEK only. If you have any questions, please contact me.
Nov 1, 2014 | cards, Christmas, Seasonal Catalogue, Stampin' Up!, Tutorial, TV/Video/Web/Tech
One of the fun opportunities I’ve had of late is the chance to be creative for Stampin’ Up! Saturday on the Scrapbook and Cards Today Blog. This is the blog for the Canadian produced magazine that also features contributions by Ali Edwards and Cathy Zielske, two of my scrapbooking idols, so I’m thrilled to be able to say that we’re published in the same space… well, kind of… (as close as I’m going to get at this point anyway LOL!). I had a lot of fun with the latest set of projects featuring the Watercolour Winter Simply Created Kit (ok, I know it’s actually Watercolor Winter in the catalogue, but I can’t help including the “u” – it looks like a spelling error to me otherwise). I’m so grateful for the opportunity.
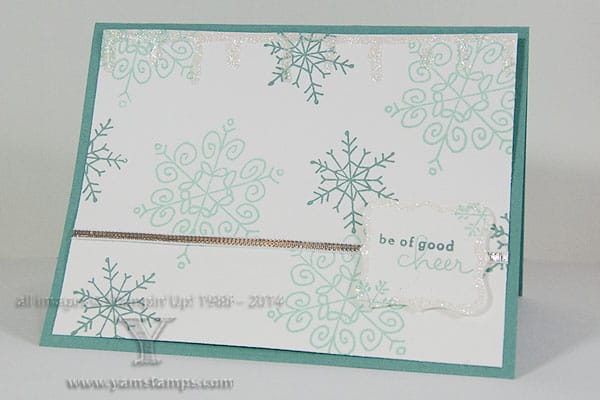
I managed to do a new video for you all! I know it’s been a while since I’ve done one – I apologize – between decluttering/selling/packing/moving a household, it’s been one of those things that fell by the wayside a bit. However, time to get back at it, and no time like the present! Today’s video shows you how to create the fun icicle accents that decorate this quick and easy card featuring the set Endless Wishes from the Holiday Catalogue. Enjoy! If you can’t see the video embedded below (if you’re seeing this in a reader) – please come directly to this post on the YamStamps site or subscribe to the YamStamps YouTube Channel.
Oct 3, 2014 | cards, Christmas, specials, Stampin' Up!
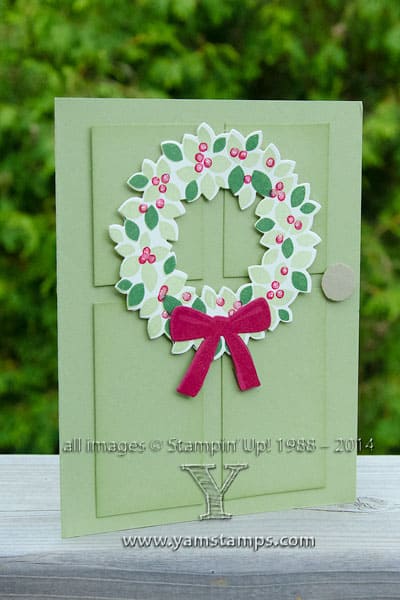 Two step stamping is what first drew me to Stampin’ Up! – I loved that I could have different colours on the same image without a lot of fuss. Recently, Stampin’ Up! has started producing more photopolymer sets which makes it easier to line up the components, and on the set on this card, Wonderous Wreath, there’s actually a “tab” on each stamp and the coordinating framelits! All I have to do is line the tab up the same way each time and it’s pretty no fuss – plus photopolymer is see through so it also helps to line things up. I personally put the tab at “6 o’clock” each time to make it easier to remember (as long as I don’t rotate my paper LOL). These items are available together at a discount – I love this bundle!
This is a fun card that I put together – I used it for Stampers Club and then added a bit more “bling” to it with Dazzling Details and used it for a card swap. If I was really clever (and really did have every item in the catalogue) – I should have used the CHERRY COBBLER Dazzling Details. Ah well, the cards are done now, so I will leave that little extra detail to YOU when you recreate this card! (Please send me a photo!). I used Pear Pizzazz as the base, with Garden Green on top for the darker leaves, and Cherry Cobbler for the berries and bow.
Don’t forget about the Stamp Stock and Save sale going on until Monday – and use the hostess code KEH4WRUB so it will flag me to send you a set of instructions for 3 fun projects! I will be sending them all out via email next week. Happy Friday!!
Sep 25, 2014 | Announcements, Christmas
 Less than a week to go until the start of my annual Twelve Weeks of Christmas mailings! (yes, I’m shocked too). Each week you’ll receive an exclusive holiday project – card, gift, wrapping/tag ideas, complete with photo and instructions…but only if you’re on my mailing list by October 1st at 1pm!! What are you waiting for? When you sign up, you’ll also receive access to a paper crafting video tutorial as an additional thank you!
Aug 21, 2014 | Announcements, cards, Christmas, Events, Stampin' Up!
 This is a card we made at Stampers Club this month, featuring the Bright & Beautiful Stars Bundle that’s part of the Big Shot Bundle special this month. I love how the stamp images coordinate with the framelits so it’s super easy to cut them out (and centre the image perfectly!).
As for the title of this post, yes, frightening but true – 18 weeks today is CHRISTMAS! So yay for Club members who now have one card done for the season 😉 If you are looking to get going on your holiday cards, I have good news! September brings the first Christmas Stamp a Stack! Sunday, September 14 from 1-4 pm – attendees will make 10 Christmas cards (2 of 5 different designs) – all supplies and envelopes are included.
Registration is now open; space is limited and registration will close September 12th. Click on the link to pay using Paypal.
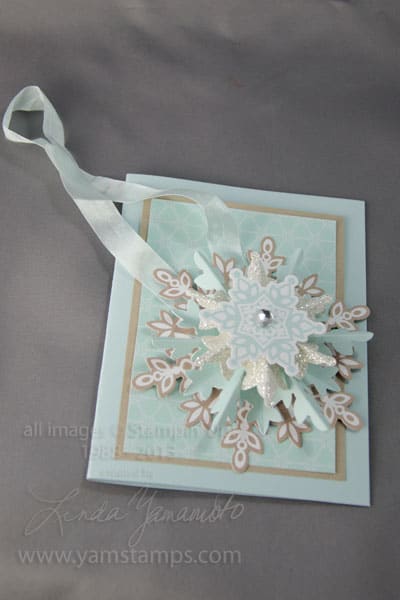
Dec 7, 2013 | 3D samples, cards, Christmas, Stampin' Up!
 Have I mentioned how much I like the Stampin’ Up! Festive Flurry Ornament kit?! This card is a great way to present an ornament to someone special. The Winter Frost Designer Series Paper layer is actually popped up a bit at the top using some Stampin’ Dimensionals. After creating the ornament, the ribbon is tucked in behind that layer to anchor it in place. It makes a beautiful looking presentation, and then afterwards, the recipient can pull out the ornament and use it on their tree! This could be a great family project – and the kids can sign their names to the back of the ornament with the date as a keepsake.
The next photo shows the ornament separate from the card. We created this in the last of the Christmas Card Class Series….talk about going out with a bang! Just a reminder that January’s Monthly Card Class will be held the SECOND Wednesday of the month, since the first Wednesday is January 1st so people might still be recovering from all the festivities. OK. I might still be recovering from being forced to stay up past midnight. Whatever.
Anyway – check out my Events schedule or try one of my online classes! The next online class will be released early in the new year so stay tuned for the announcement.