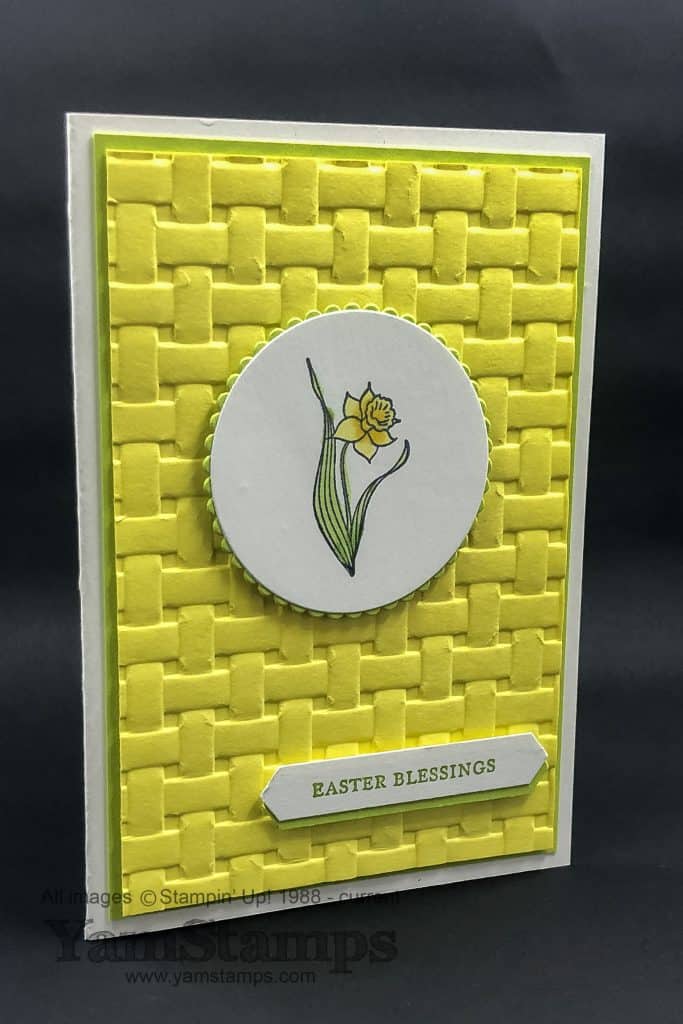
Thought I’d share thiseasy springtime card or Easter card – depending on whether or not you use the Easter sentiment!
If you stopped by the YamStamps booth at Kitchener Scrapfest this past weekend, you may have seen a version of this card on my display board! It’s one of April’s class cards.
One of the things I love about making cards is that I have the fun of making the card, and the recipient has the fun of receiving a handmade card. Anne, of the demonstrators in my group, told a story about how a family member still has a handmade Christmas card displayed on her fridge because it reminds her how much Anne loves her! I think that’s a fantastic sentiment.
This card was particularly fun because the flower is coloured with Stampin’ Blends – I do enjoy a bit of colouring, and this was fast and easy because the image is not too big! Just remember to use Memento Ink if you’re reproducing this card – so that your image won’t smear when you use the Blends. The daffodil and the combination of Lemon Lime Twist Cardstock (grab it before it’s all gone…) and Daffodil Delight Cardstock help make this a truespringtime card!
I also wanted to say THANK YOU to everyone who stopped by my booth at the Kitchener Scrapfest! Huge thanks to Anne and Mary who helped me out at my booth….and to my mother who did a quick round trip to drop off some items I accidentally left at home – true story!! I hope all the croppers, shoppers and vendors had a relaxing day today recovering!
If you filled out one of the door prize draw entries, I’ll be making the draw for the winner of the shopping spree tomorrow – I’ll do a Facebook Live on the YamStamps Page if all goes according to plan (and there’s not some weird outage like there was early today!). Maybe I’ll get someone at Stampers Club to help me out… I’ll also post links to the official Stampin’ Up! retiring list as soon as I’m able – so stay tuned!
In my Monthly Card Classes and Stampers Club, I always try to include a variety of cards in the class. Usually there will be one appropriate for the month – for example in February there was a “love” card that could be used as a Valentine, and this month there’s an Easter card. I also try to do one that is more “gender neutral”. Often when I do a hosted event the host will ask for a certain type of card, and I do my best to accomodate! It’s a way for me to stretch my creative muscle a bit, otherwise I tend to fall into a bit of a creative rut. These demonstrator card swaps are another great way to stretch my creativity – usually there are guidelines for materials, number of layers, accessories etc, and I actually find it can be easier for me to come up with something when I’m given these “rules”.
The Stampers Club meets on the third Monday of each month (in general, depending on stat holidays!) and each member signs up for six consecutive months. Once the six months are up, the member can either continue on for another six, or take a break. We have some members that join for certain seasons, based on work or travel, and some that enjoy a more consistent creative outlet. Check the YamStamps Events page for upcoming dates and information, or you can always contact me. Can’t make those dates? Get a group together and contact me to set up a private class date! No excuses – set aside some me time and get crafty!!
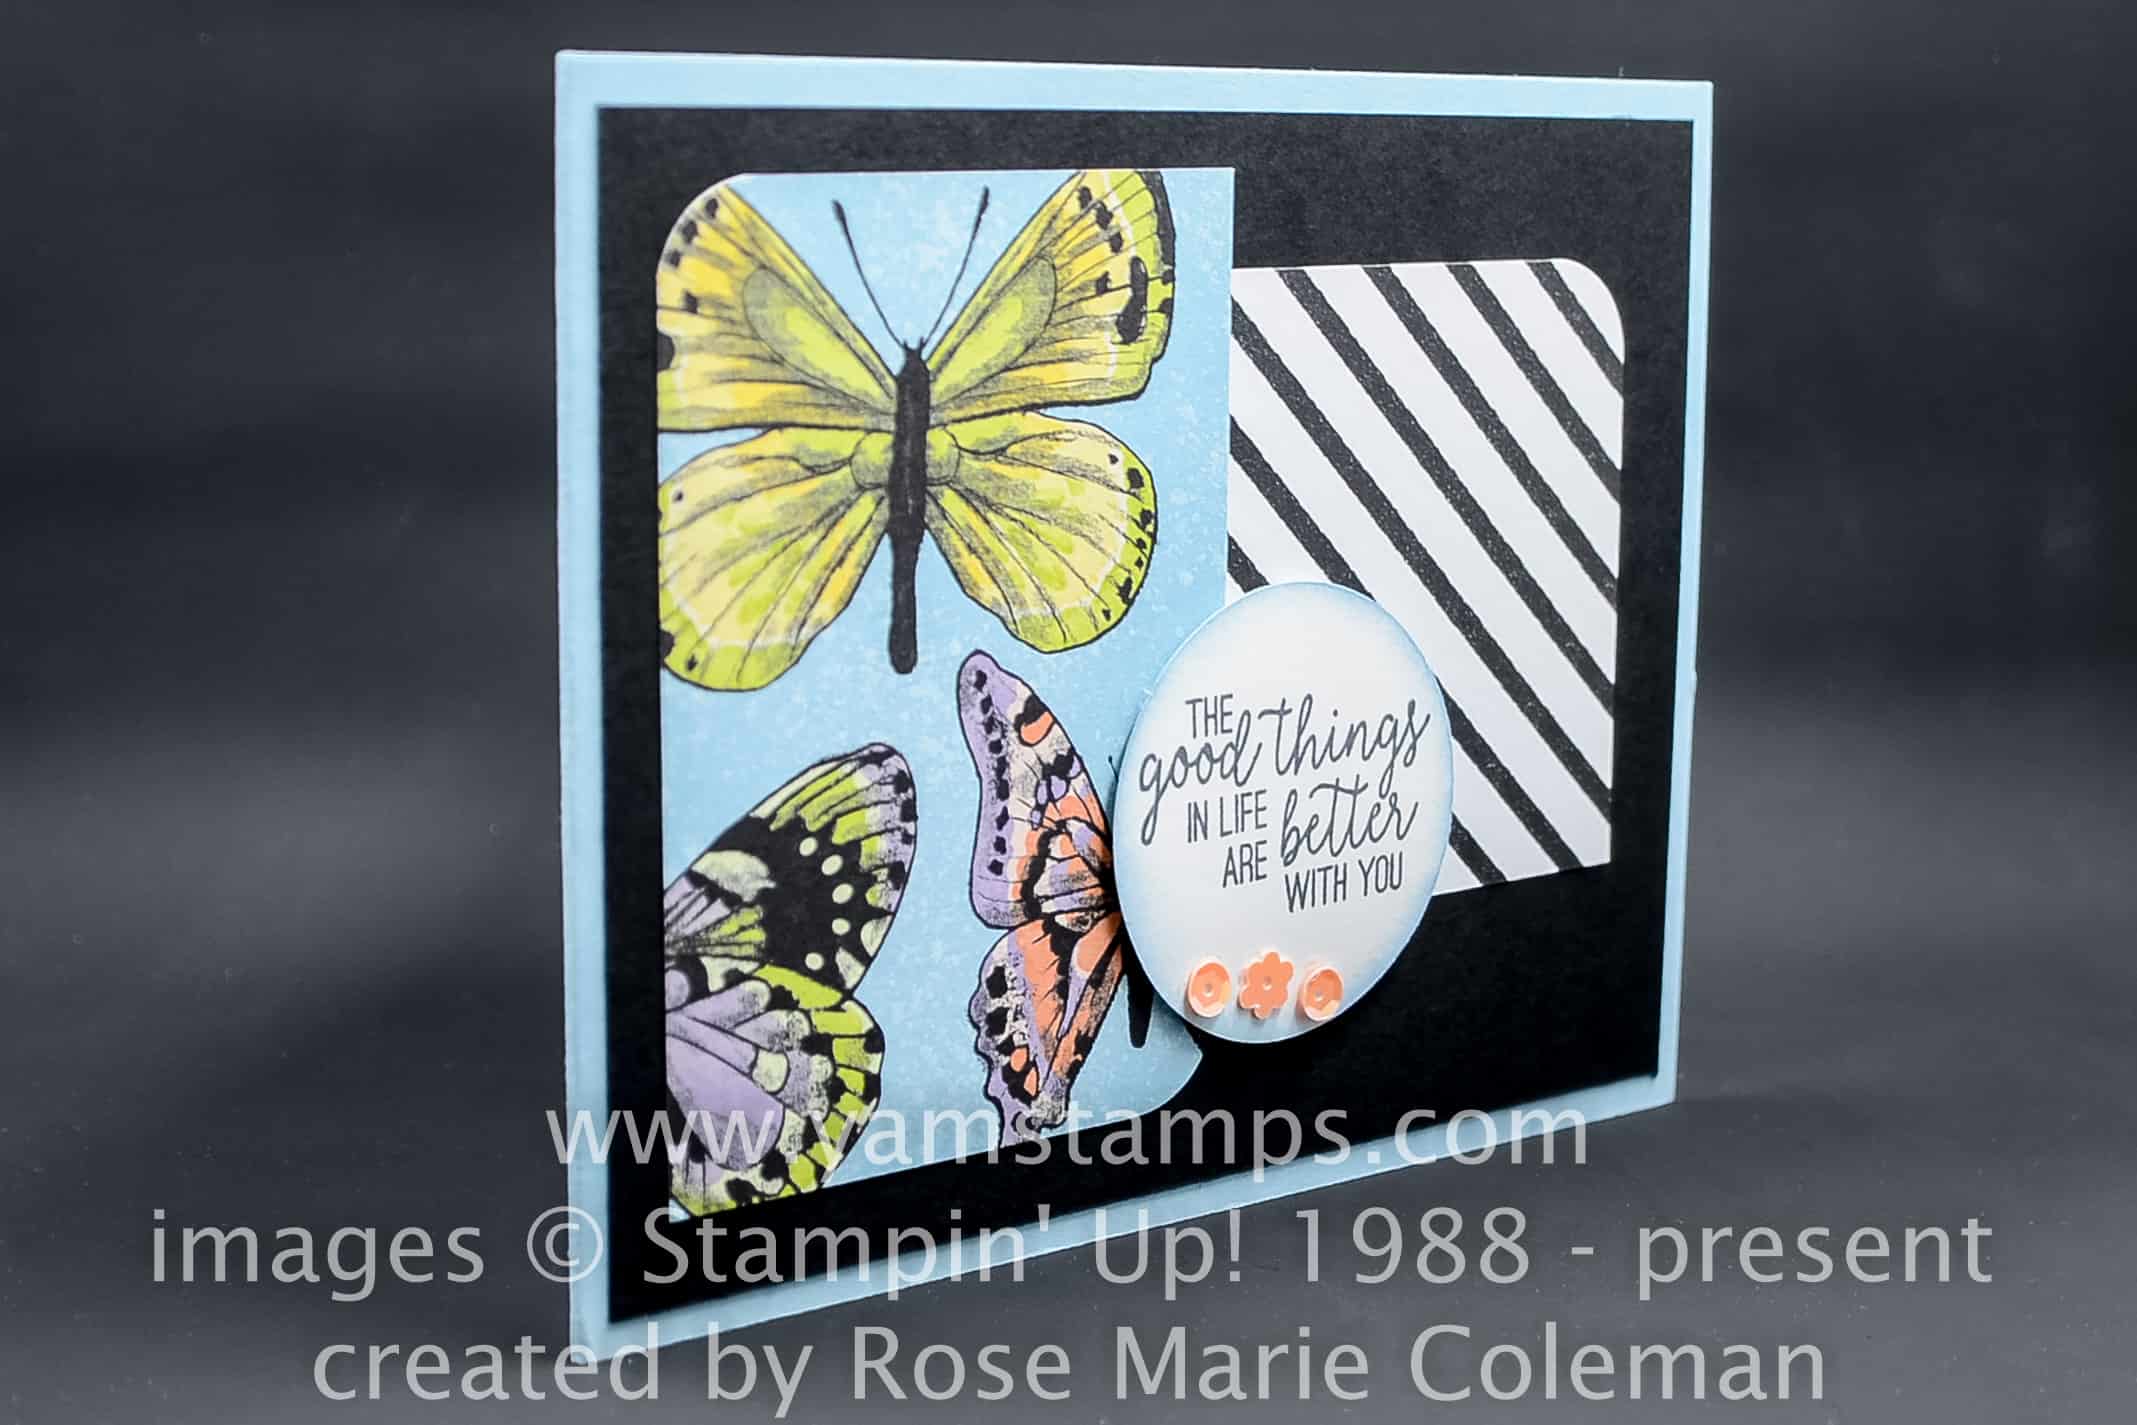
Stampin’ Up!’s Designer Series Papers are great for scrapbooking – but they’re also great for cards! Check out this easy patterned paper card design – by Rose Marie Coleman, today’s Sunday Swap Share.
This card uses the Botanical Butterfly Designer Series Paper (Level 1 Sale-a-Bration reward – free with $60CAD product order) for the main visual elements. I love how rounding only a couple of the corners of the paper give it a different effect. There’s a corner rounder on the Detailed Trio Punch, or you can use Stampin’ Up!’s Envelope Punch Board to round corners – it’s built in to the board!
Corner Rounder Punch portion is at the top of the board, above the “button”
The card sentiment is from the Butterfly Gala Stamp Set, which is available for purchase. The Butterfly Duet punch unfortunately is still unorderable at this time (which also means that the Butterfly Gala Bundle is also unorderable), so we will continue to wait patiently until they let us know it’s available again! You’ll notice that you won’t need it for this card anyway!
The accents on this card are the Gingham Gala Adhesive Back Sequins, which are getting low in inventory, so I’d suggest if you need to get them, you order them soon!!
This easy patterned paper card design is clean and simple, and you could easily change out the Desginer Series Paper and sentiment and have a whole different look! These are the kinds of cards that make my crafting so much easier, especially when I need an impressive card in a hurry!
If you need to build up your stash of patterned paper, I’ve put out a LAST CALL for my Occasions Catalogue Designer Series Paper Share. If you’d like to purchase a share, which includes a 6″ x 12″ of each of the sheets from each 12″ x 12″ package, and full 6″ x 6″ sheets from the two 6″ x 6″ packages in the catalogue (NOT including the Specialty Papers), please contact me by March 10th, or click below to order and pay via PayPal. The shares also include the Botanical Butterfly Designer Series Paper as well!!
As always, if you have any questions, please feel free to send me a message or – leave me a comment below – BECAUSE COMMENTS ARE WORKING AGAIN! YAY!!!
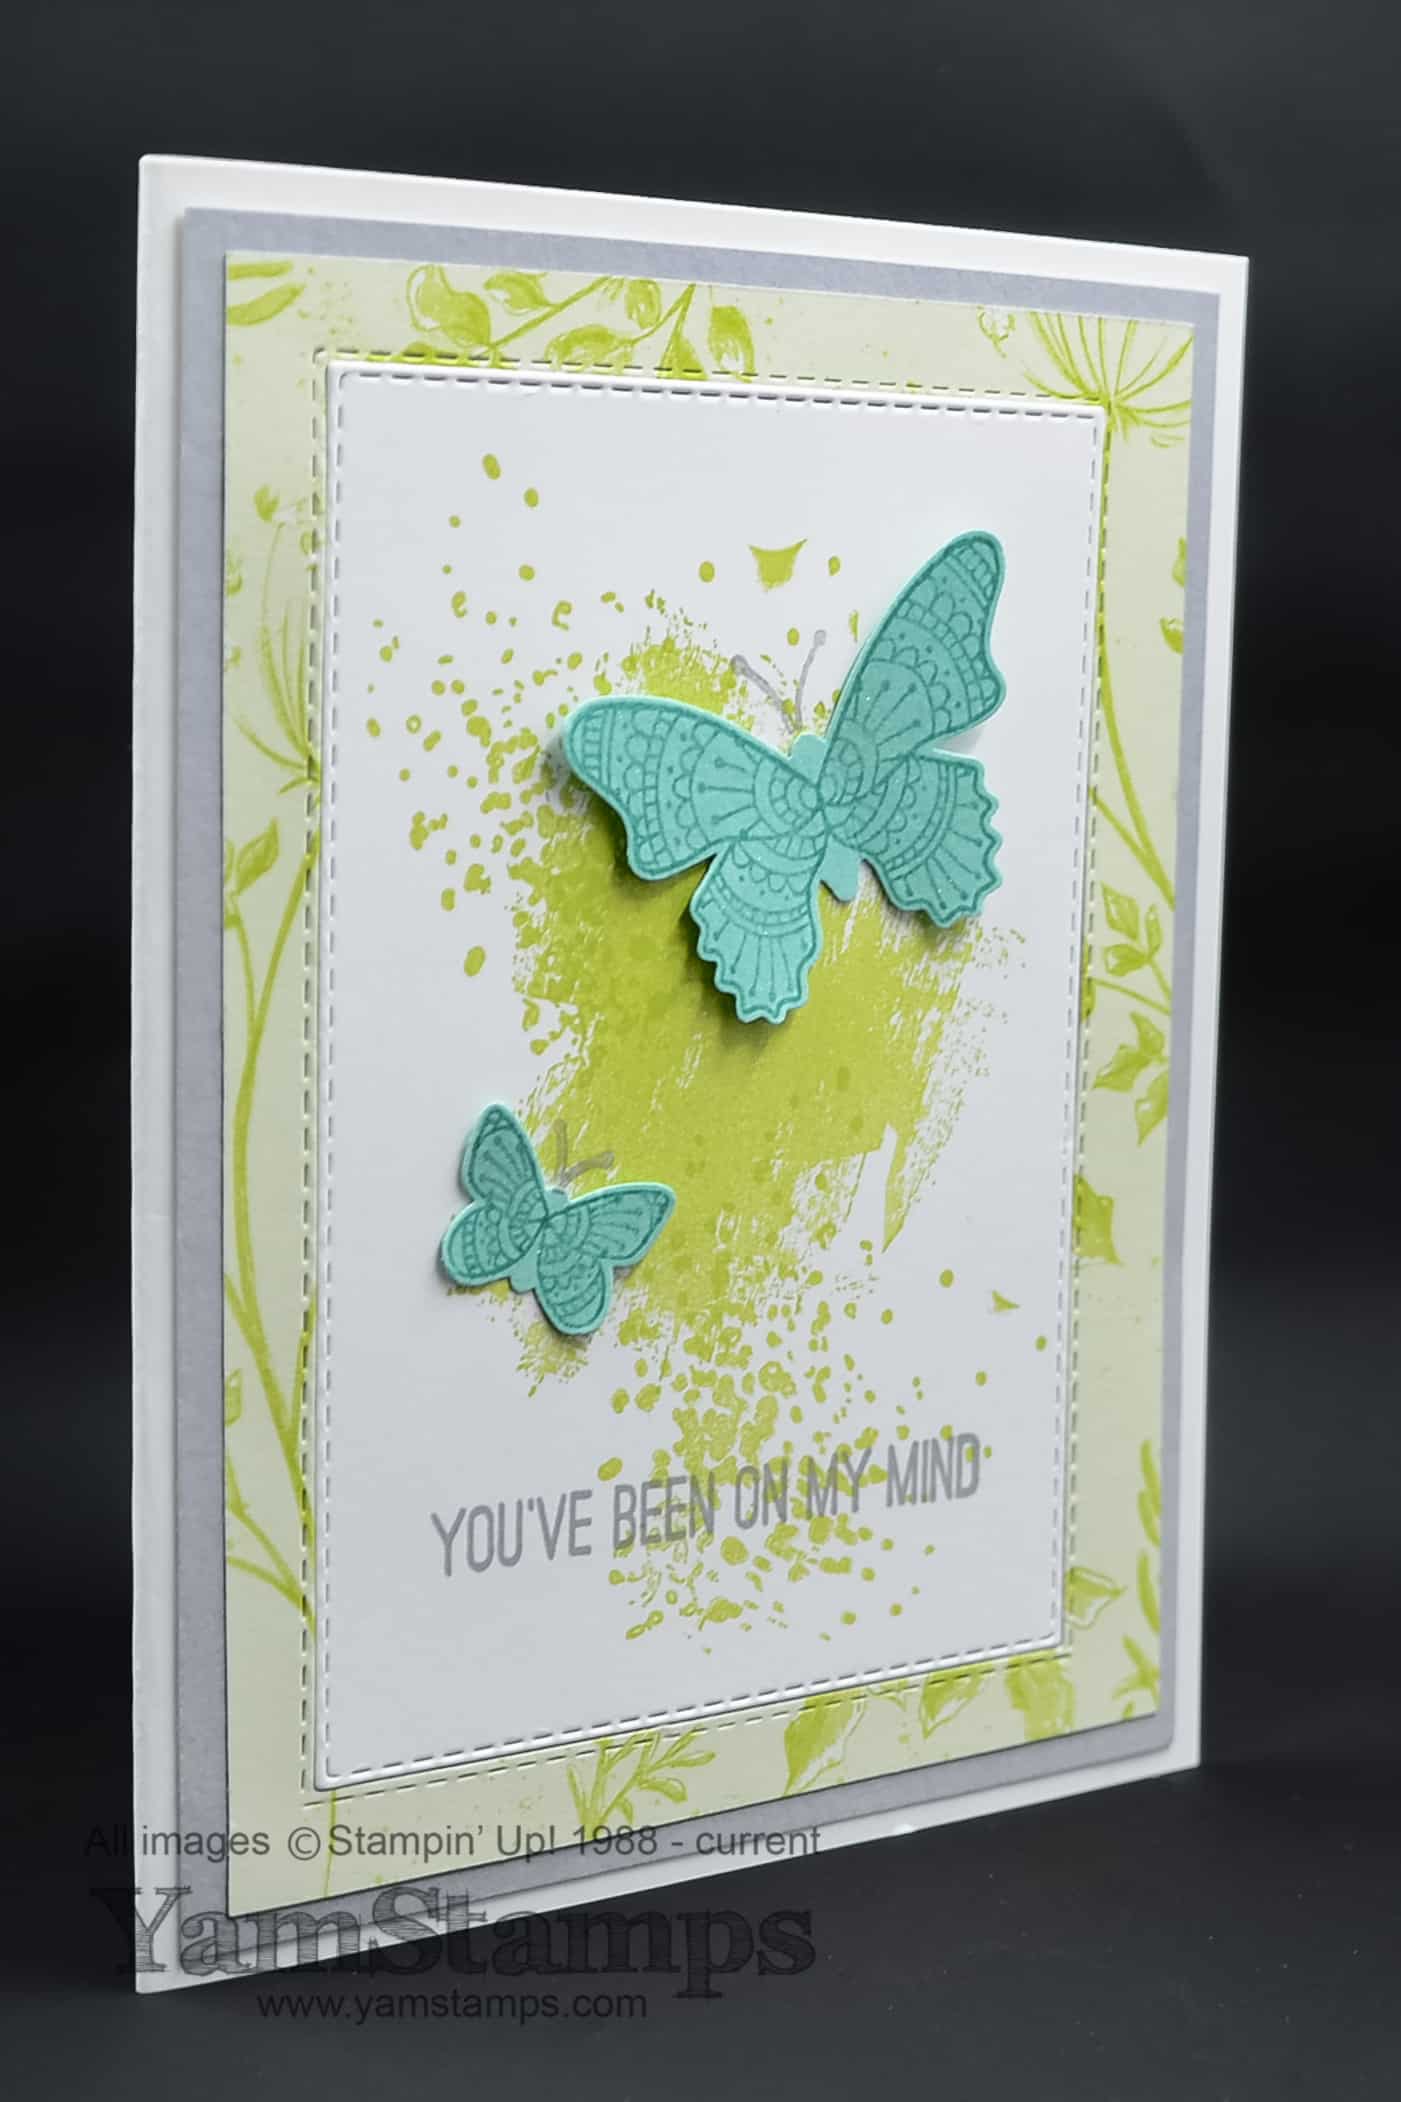
I always have great intentions of sending out a lot of cards…and then end up having to be happy I sent out “some”. I just did a bit of a catch up on mailing a little while ago, and so I’m keen to get back on track with my card sending! This is a great thinking of you card – perfect for someone like me! You’ve been on my mind is the ideal sentiment for a lot of the cards I want to send to friends and family – because they HAVE been on my mind – but I haven’t always been able to reach out and let them know that personally. If you’re like me, you’ll want this set so you can do a bit of card catchup too!
Do you remember that I mentioned that I apparently have a thing for butterflies?! More proof here… This thinking of you card features the Butterfly Gala photopolymer stamp set, which pairs perfectly with the Butterfly Duet punch. You can purchase the items separately, or together in a discounted bundle. I used the Artisan Textures stamp set to create the background – the smoosh and splatter images are great to add texture and interest to any background or image. The set is available in red rubber wood mountand red rubber clear mount. Since I figure I’ll be sending this to someone I feel like I’ve “owed” a card to, I wanted to add some more detail to this thinking of you card! The Whisper White cardstock piece is cut with a Rectangle Stitched Framelit. I used the same framelit to cut the middle out of a piece of the Botanical Butterfly Designer Series Paper as well. The framelit adds a stitched effect on BOTH sides of the cut line. So the centre piece of the DSP gets saved for another project later on, and the outer piece is used to frame the Whisper White piece. You can get this DSP for free as a Level 1 Sale-a-Bration reward with a $60 product order until March 31, or you’ll get a half sheet of each of the double sided designs as part of the YamStamps Occasions Catalogue Designer Series Paper share.
One last little detail for the butterflies. I stamped the butterfly image in Bermuda Bay ink onto Bermuda Bay cardstock, and after they were punched out, added some Clear Wink of Stella Glitter Brush to the wings (which may not be totally visible in the picture…). That’s one of my most favourite card making hacks – add some Wink of Stella to add some “wow” to the project quickly and easily!
I’m off to finish up prep for Susan’s private cardmaking class this weekend – we’ll be doing a variety of cards with her friends and family. It’s a great way to spend a wintery weekend afternoon! If you are looking to get some quality time in with friends, contact me to book a private cardmaking class! I bring ALL the crafting supplies you’ll need for the projects we’ll be making. It’s a great way to get together, catch up and maybe learn something new – plus you’ll end up with four handmade cards that you’ll have ready to give to someone special!
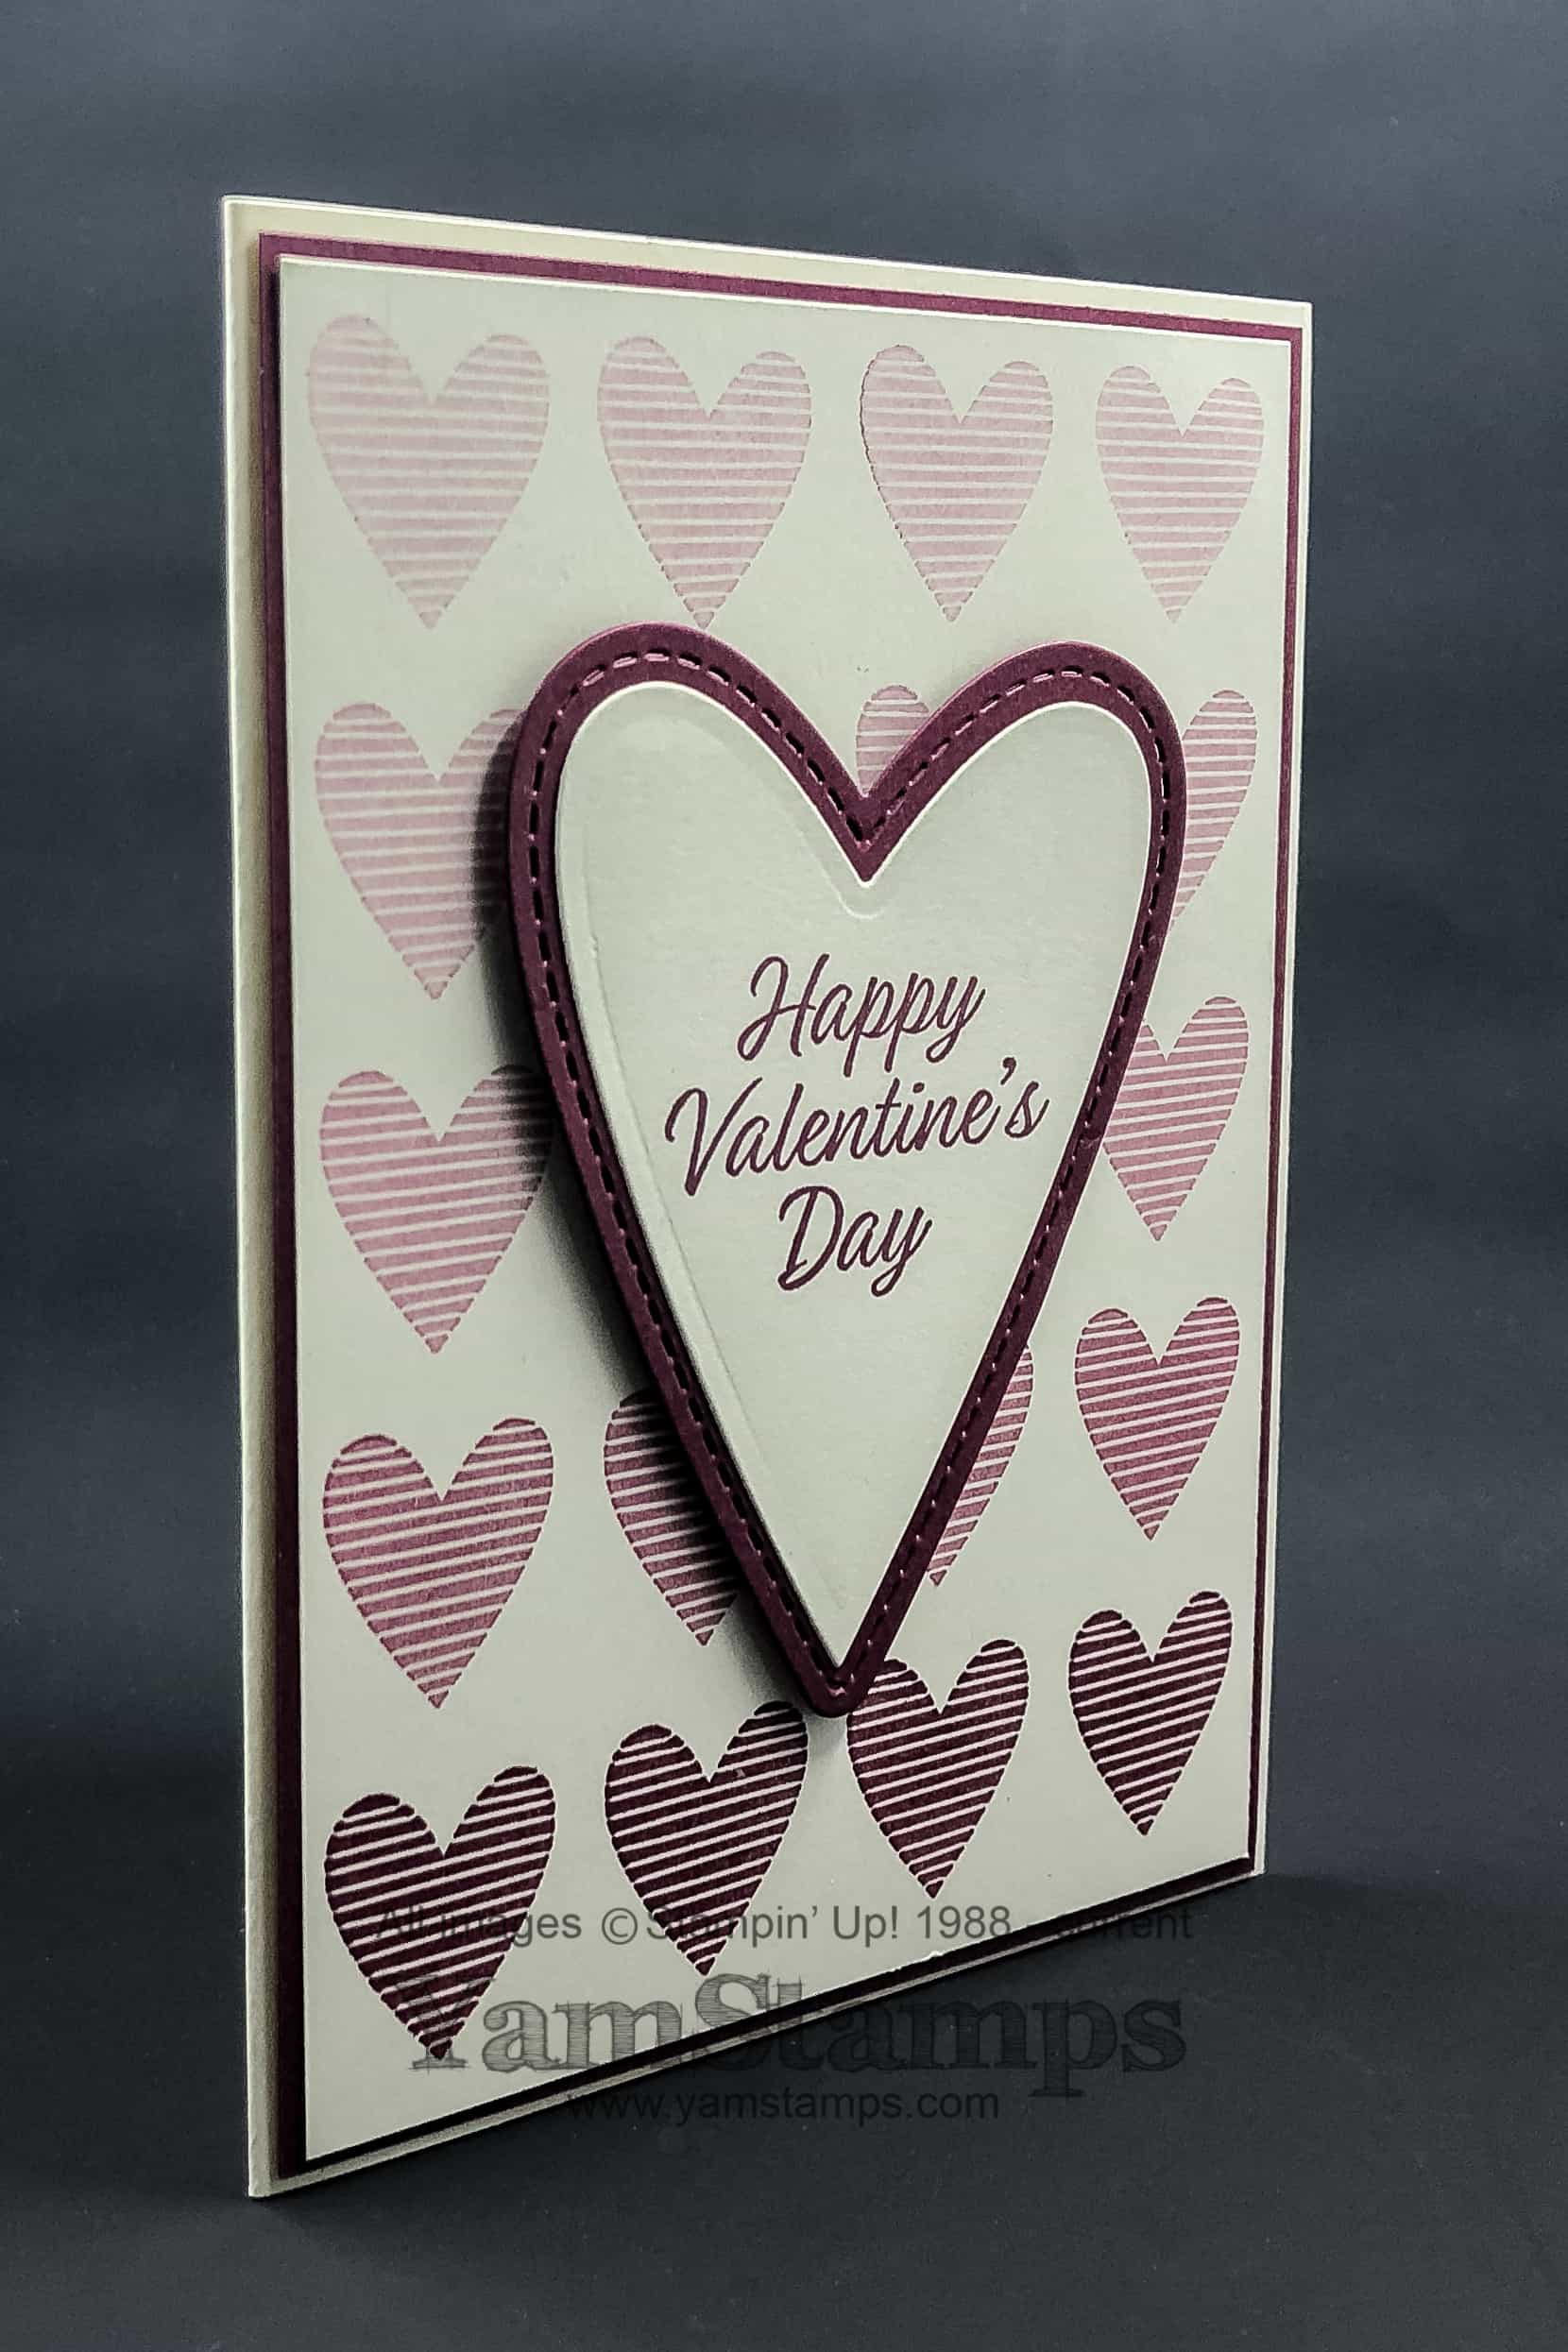
One of my issues with Valentine’s Day Cards is that they tend to be all flowery, frilly and over the top, and that’s not really my style. Most of my class attendees are females, and most of them are giving these cards to males, so I thought I’d come up with a more Masculine Valentine’s Day Card design to use in my January classes. More gender neutral or suitable for someone who appreciates more streamlined designs without too much fuss. Sorry. Likely a bad description for a good card, so perhaps I should just go ahead and share it?!
So this masculine Valentine’s Day Card uses the Stamparatus – which makes the ombré pattern sooooooo easy. I wanted the darkest heart at the bottom of the card, so I actually stamped the cardfront upside down – that is, I positioned the heart upside down so that when I did the hinge technique, the hearts faded out so the palest heart was at the top. The hinge technique is where you stamp the image, and then move the Stamparatus plate down one (or more) hinge spots, and restamp the image. You can see how this works in this YamStamps Facebook LiveI did in November.
I used the Occasions Catalogue Meant to Be Bundle for this card. The bundle includes the Be Mine Stitched Framelits Dies, and the Meant to Be stamp set, which is one of the new CLING stamp sets from Stampin’ Up! These red rubber stamps have a new and improved sticker system which means your stamps will really cling to your clear blocks or Stamparatus. Some of the images and framelits are the traditional more flowery type of images, and scallop border edges, but for a Masculine Valentine’s Day Card, I stuck to the more linear look image, the stitched edge heart, and the deeper colour of Merry Merlot.
We made this card at the Monthly Card Class, and I’ll bring it out again for Stamper’s Club, because I like it so much! If you’d like to make this masculine Valentine’s Day card, you can join the Stamper’s Club, or host a card making party with friends before Valentine’s Day (we could do all valentines, or a mix of occasions)! This is a GREAT time to host a card class – because it’s Sale-a-Bration! If you place a $60 product order, you can select a Sale-a-Bration item for free – and hosts can earn more free product with qualifying total party sales. Contact me to book a date! You can host your friends and family class at your place or mine – whichever is easier. Please contact me as soon as possible so you have the best choice of available dates. Looking forward to hearing from you!!
Happy New Catalogue! Today is the first day for Sale-a-Bration and the Occasions Catalogue! So before we do anything else, here is the link for the Occasions Catalogueand here is the link for the Sale-a-Bration Catalogue. I did use the mailing service from Stampin’ Up! to send out a whole whack of the catalogues (so if you purchased something from me in the last year, you were likely on that list…), but I do know that it seems that they are still en route…so patience (and worst case scenario, we try again….)…I will be following up in the next week or so. Before I forget, here is the link to the Holiday Catalogue carryover list for items that are still available to order.
If Sale-a-Bration is new to you, or you want a refresher on what all the fuss is about – here’s the lowdown. Sale-a-Bration runs from January 3 to March 31, 2019, and during that time period you can select free items with qualifying orders!
How to Get Free Stuff:
1)Order $60 of product in a single order, receive a Level 1 Item of your choice from the Sale-a-Bration catalogue for FREE. If you order $120 of product in a single order, you can select ONE Level 2 item or TWO Level 1 items! (and so on, and so on). You can shop online at yamstamps.com/shop or contact mefor assistance.
2)Host a party with $300 CAD product sales or more and receive an ADDITIONAL $30 in host dollars to spend, on top of what you would regularly earn (minimum $20). A reminder that you can host at yours, mine or somewhere in between, including online. Contact me to book a date before my calendar is full!
3)Purchase a Demonstrator Starter kit. This year, you have TWO choices – select $225 of product of your choice and pay only $135, OR select $225 of product PLUS get the exclusive Craft & Carry Tote Bag ($68 value) for just $175! (see images below, product not included blah blah blah). Your starter kit will also contain basic business supplies like catalogues and order forms, so you’re ready to go! Plus you’ll get the support of being part of my “Eh” Team of Stampers!