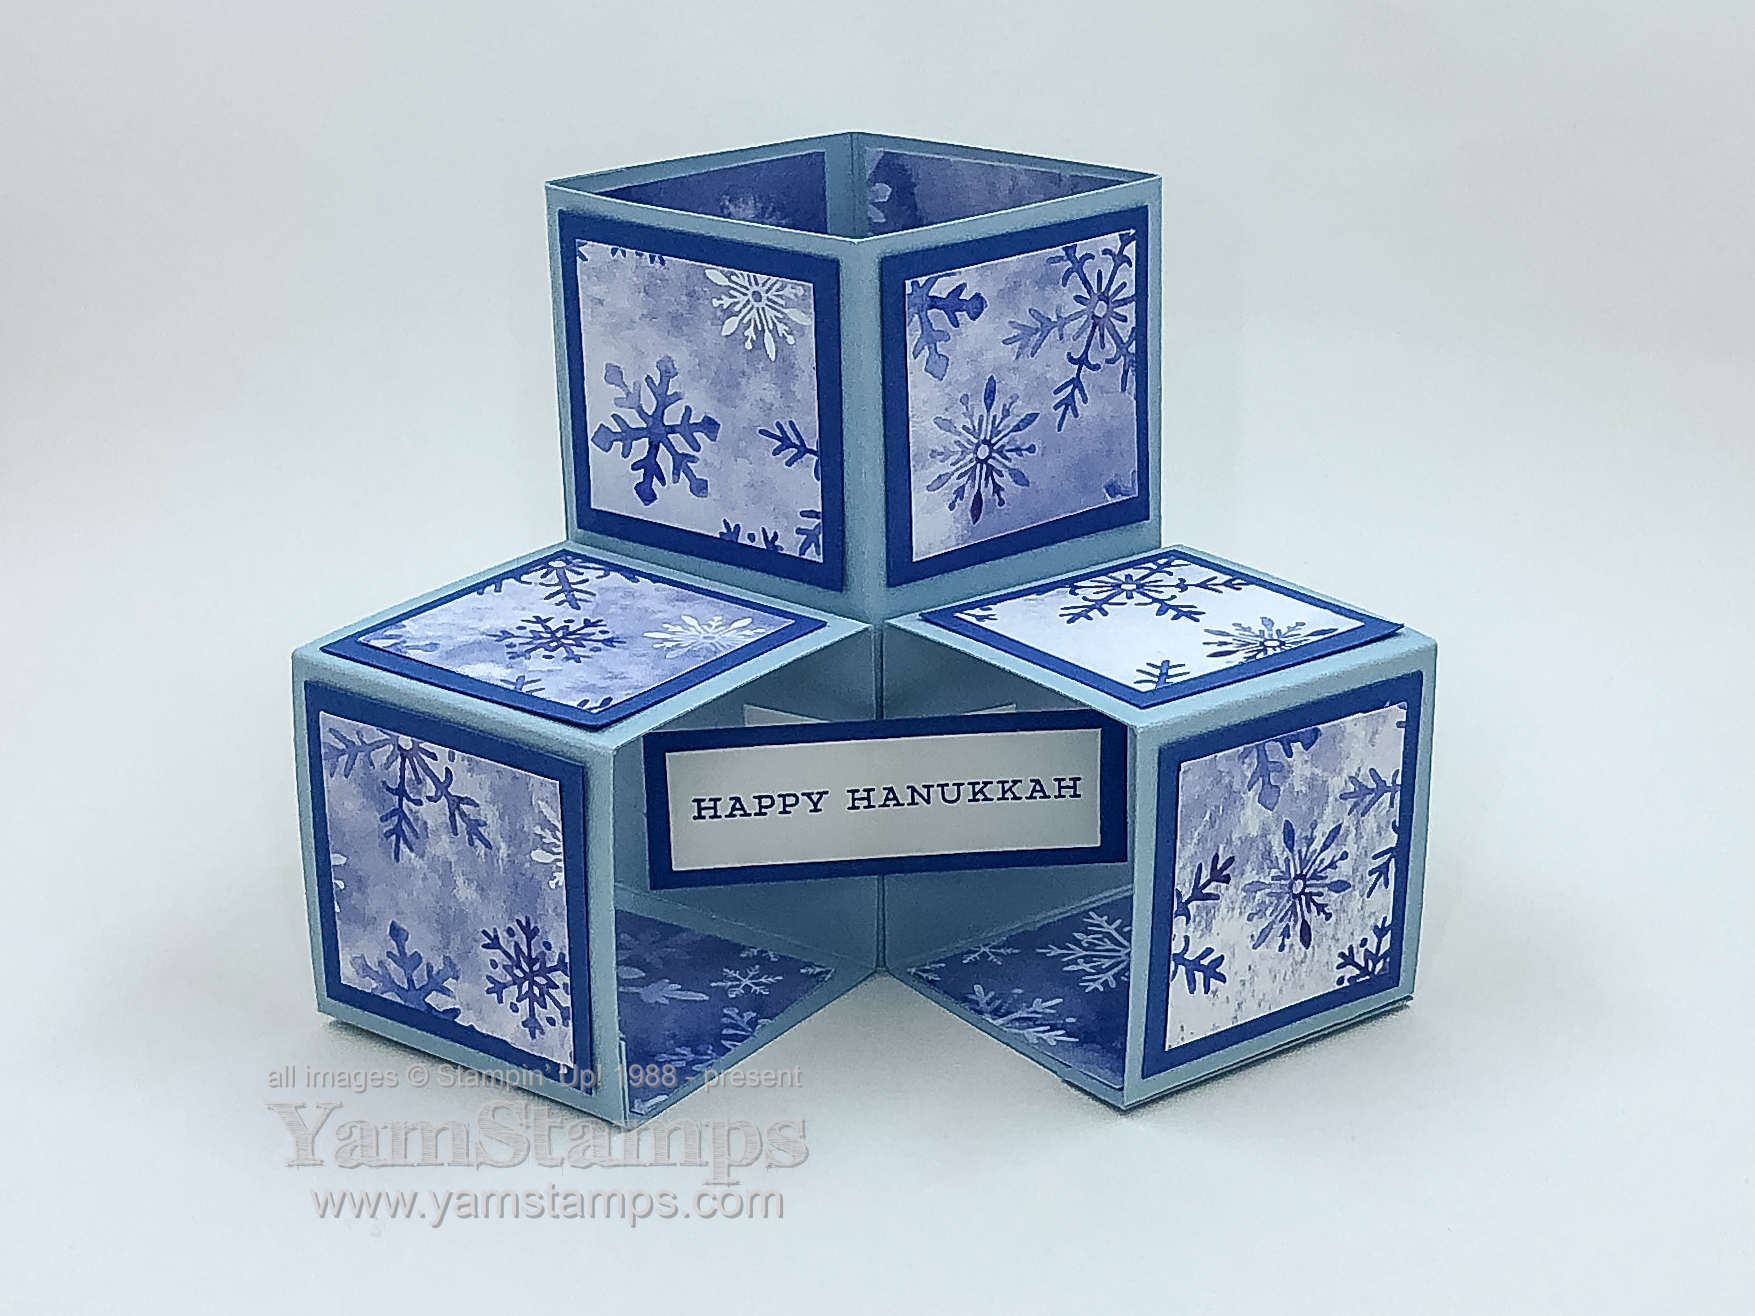
Sharing a version of a triple cube card that we made in Stampers Club and Card Class to Go. This is a fun 3D pattern, and once you’ve made one, it’s pretty straightforward (really!). I used this sentiment from the Snowflake Wishes stamp set to create a Hanukkah Card.
Hanukkah Card
The lovely thing about this design is that if you fold/flatten the bottom cubes upward, the card will fit in a medium Stampin’ Up! envelope for easy mailing! If you were at Stampers Club, you will remember that it had to be pointed out to me… LOL. I thought I’d messed it up because it didn’t fit in the card, but I was flattening the bottom boxes down vs up – so that the flat card was 6″ long rather than 4″….*sigh* If you’ve been around the Stampin’ Up! / cardmaking world for a while, this is a variation on the “2-4-6-8″ box design (your cardstock is scored at 2” increments, then folded to create a box/cube).
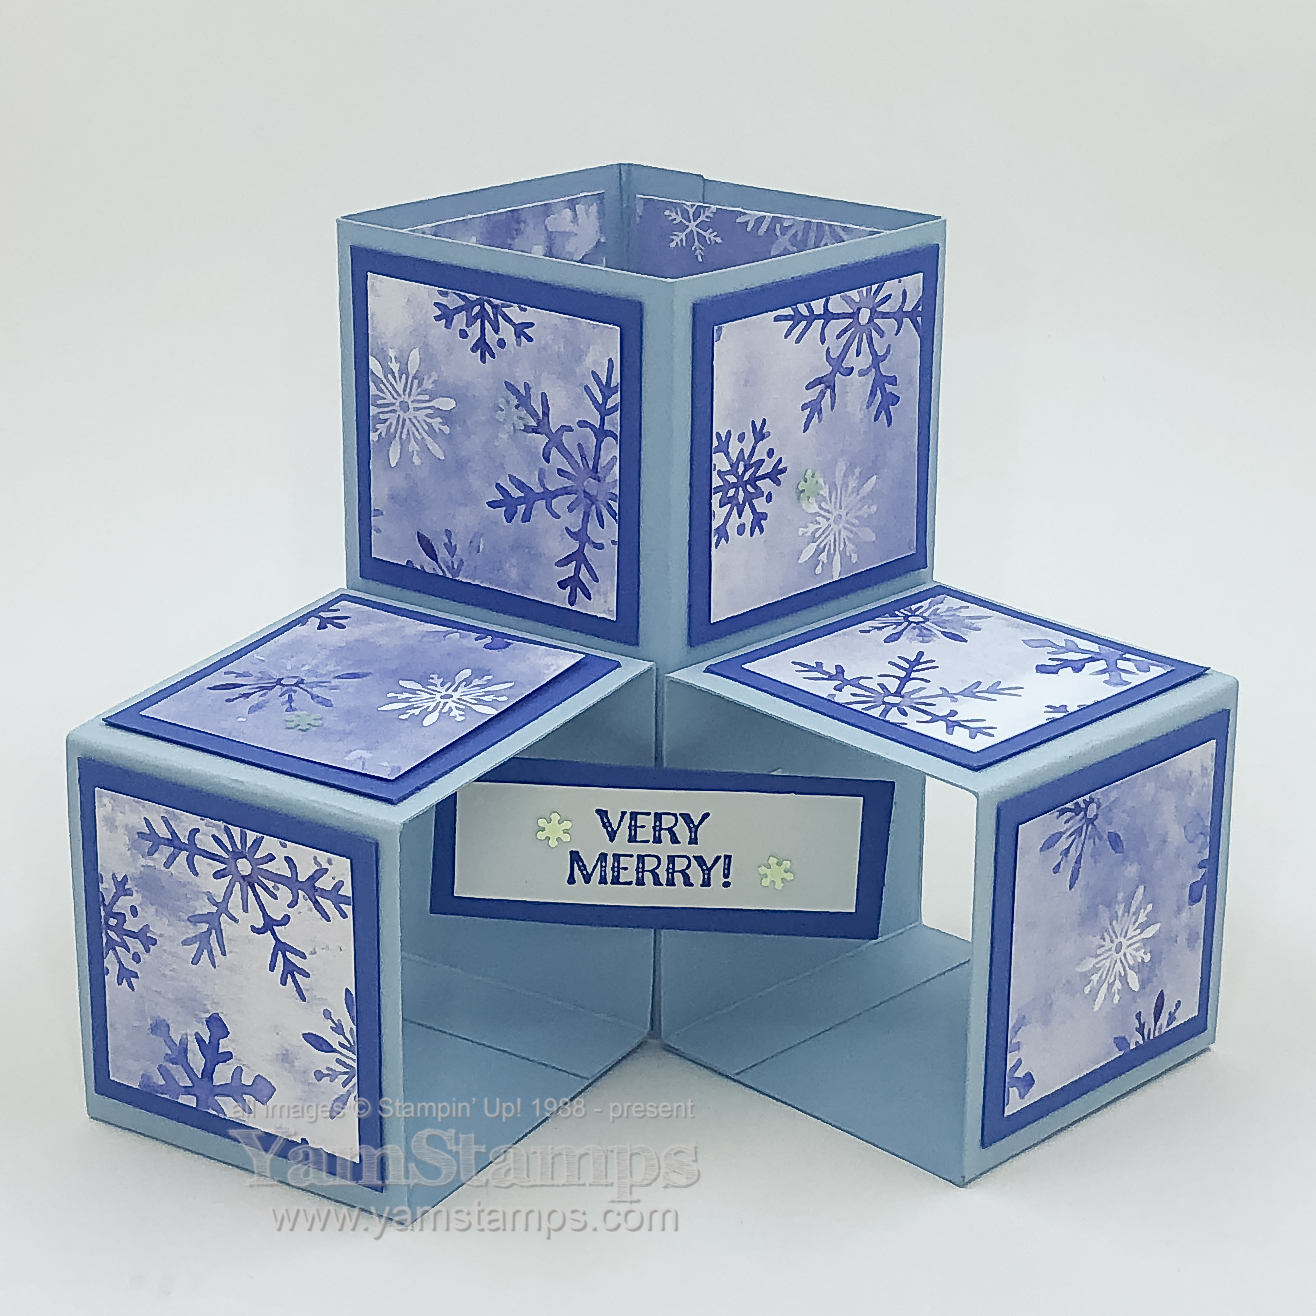
Here’s one where you just change out the sentiment…
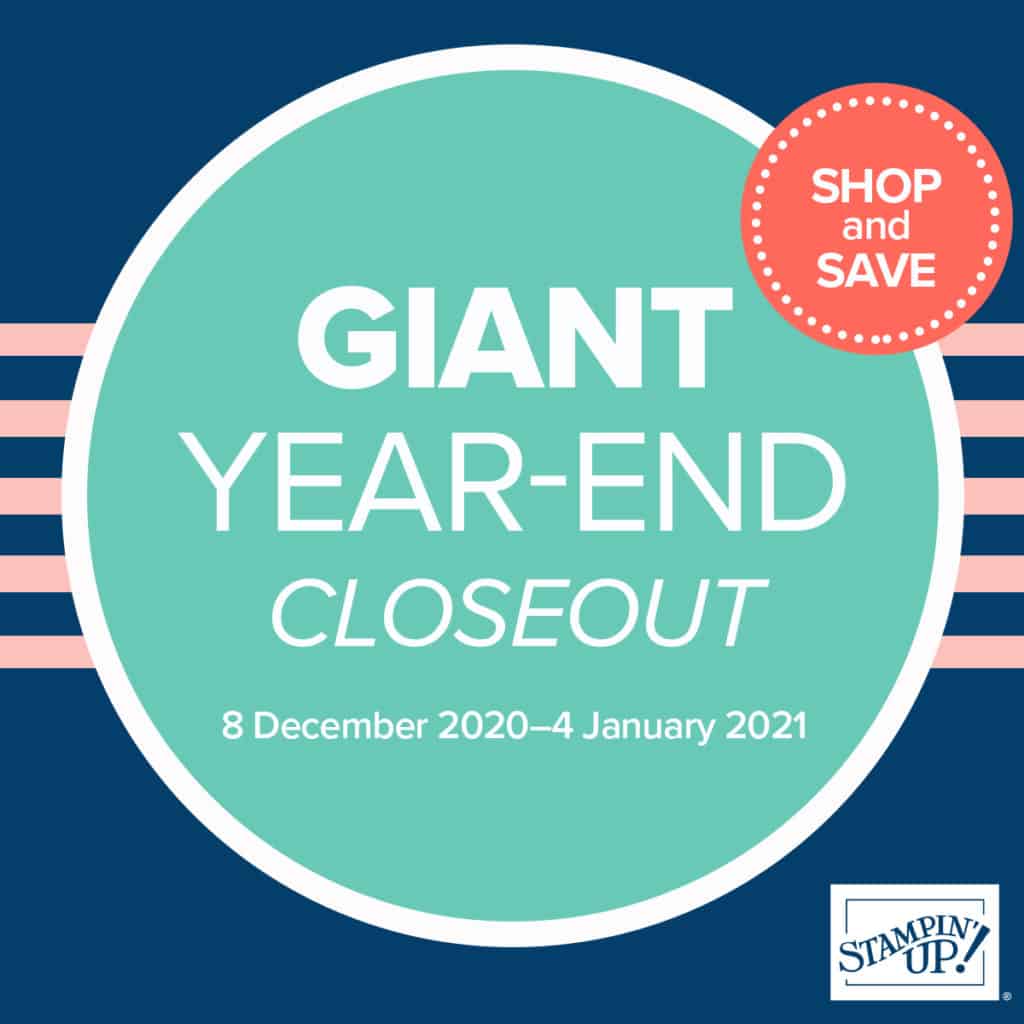
I love the Snowflake Splendo(u)r Designer Series Paper that’s decorating this card, and it’s part of the Year End Closeout Sale – so it’s on sale until the end of the August-December Catalogue sales period (January 4) or while supplies last – whichever comes first.
So probably the only thing I’d change on this Hanukkah Card is the placement of the Designer Series Paper in the bottom boxes. I put it on the bottom portion – but next time I would put it on the “back” portion, to cover the little “legs” that hold the sentiment in the centre. The things you notice when you go to take photos of your projects…LOL. (Either that or next time I take the photo from a different angle…).
As well as the Year End Closeout Sale, the Clearance Rack has been refreshed – so there’s plenty of bargains to be had right now. I noticed that there are some individual Stampin’ Blends Markers up for grabs – because they’re currently only sold in pairs – so if you need a replacement or really like a certain colour you should get it while supplies last! As always, please contact me if you have any questions, or need assistance placing an order. Sometimes technology does not play nicely – believe me, I know – so if you’re having issues trying to complete an order at YamStamps.com/shop , please contact me. I can often enter orders from the “back end” of the Stampin’ Up! system for you, and still have it shipped directly to your door.
In the meantime – stay warm, happy shopping and Happy Hanukkah!
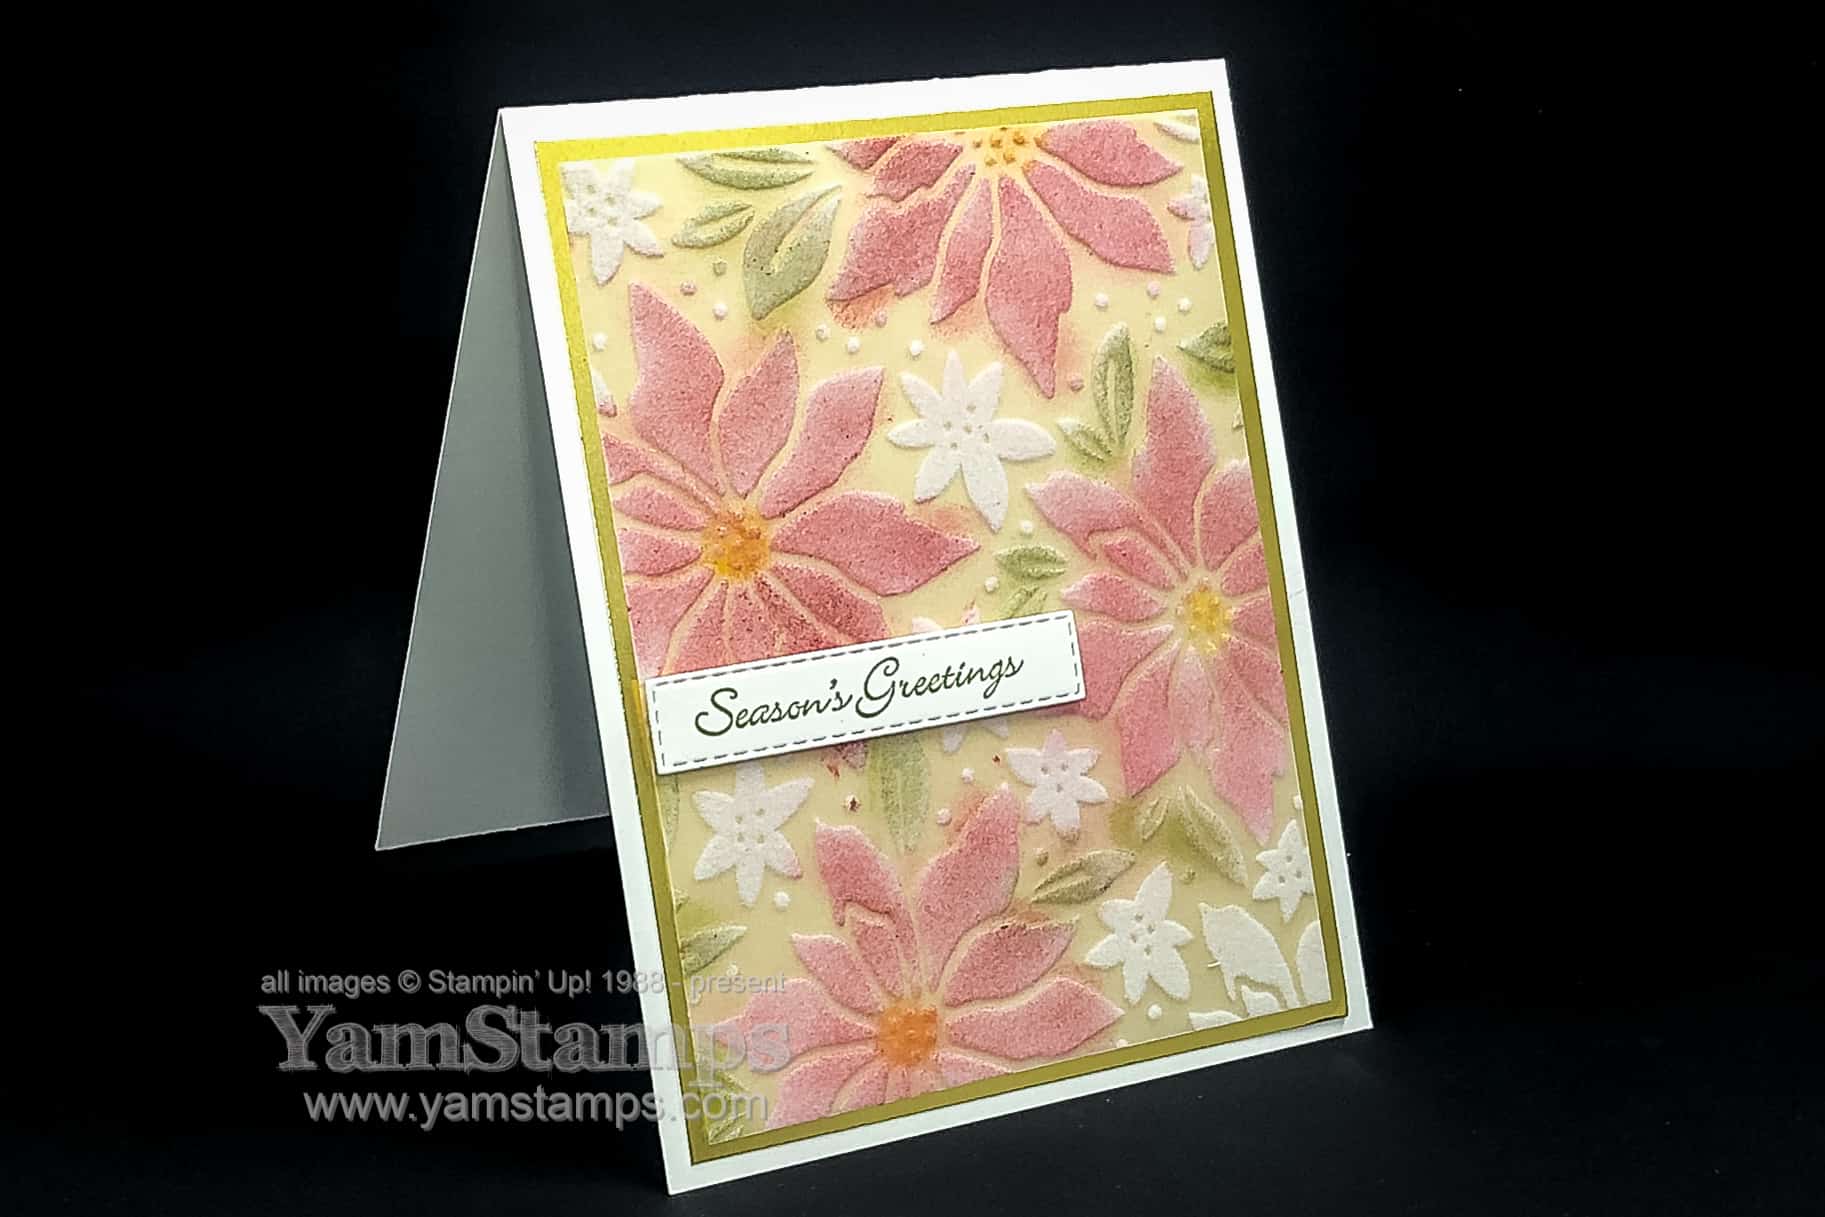
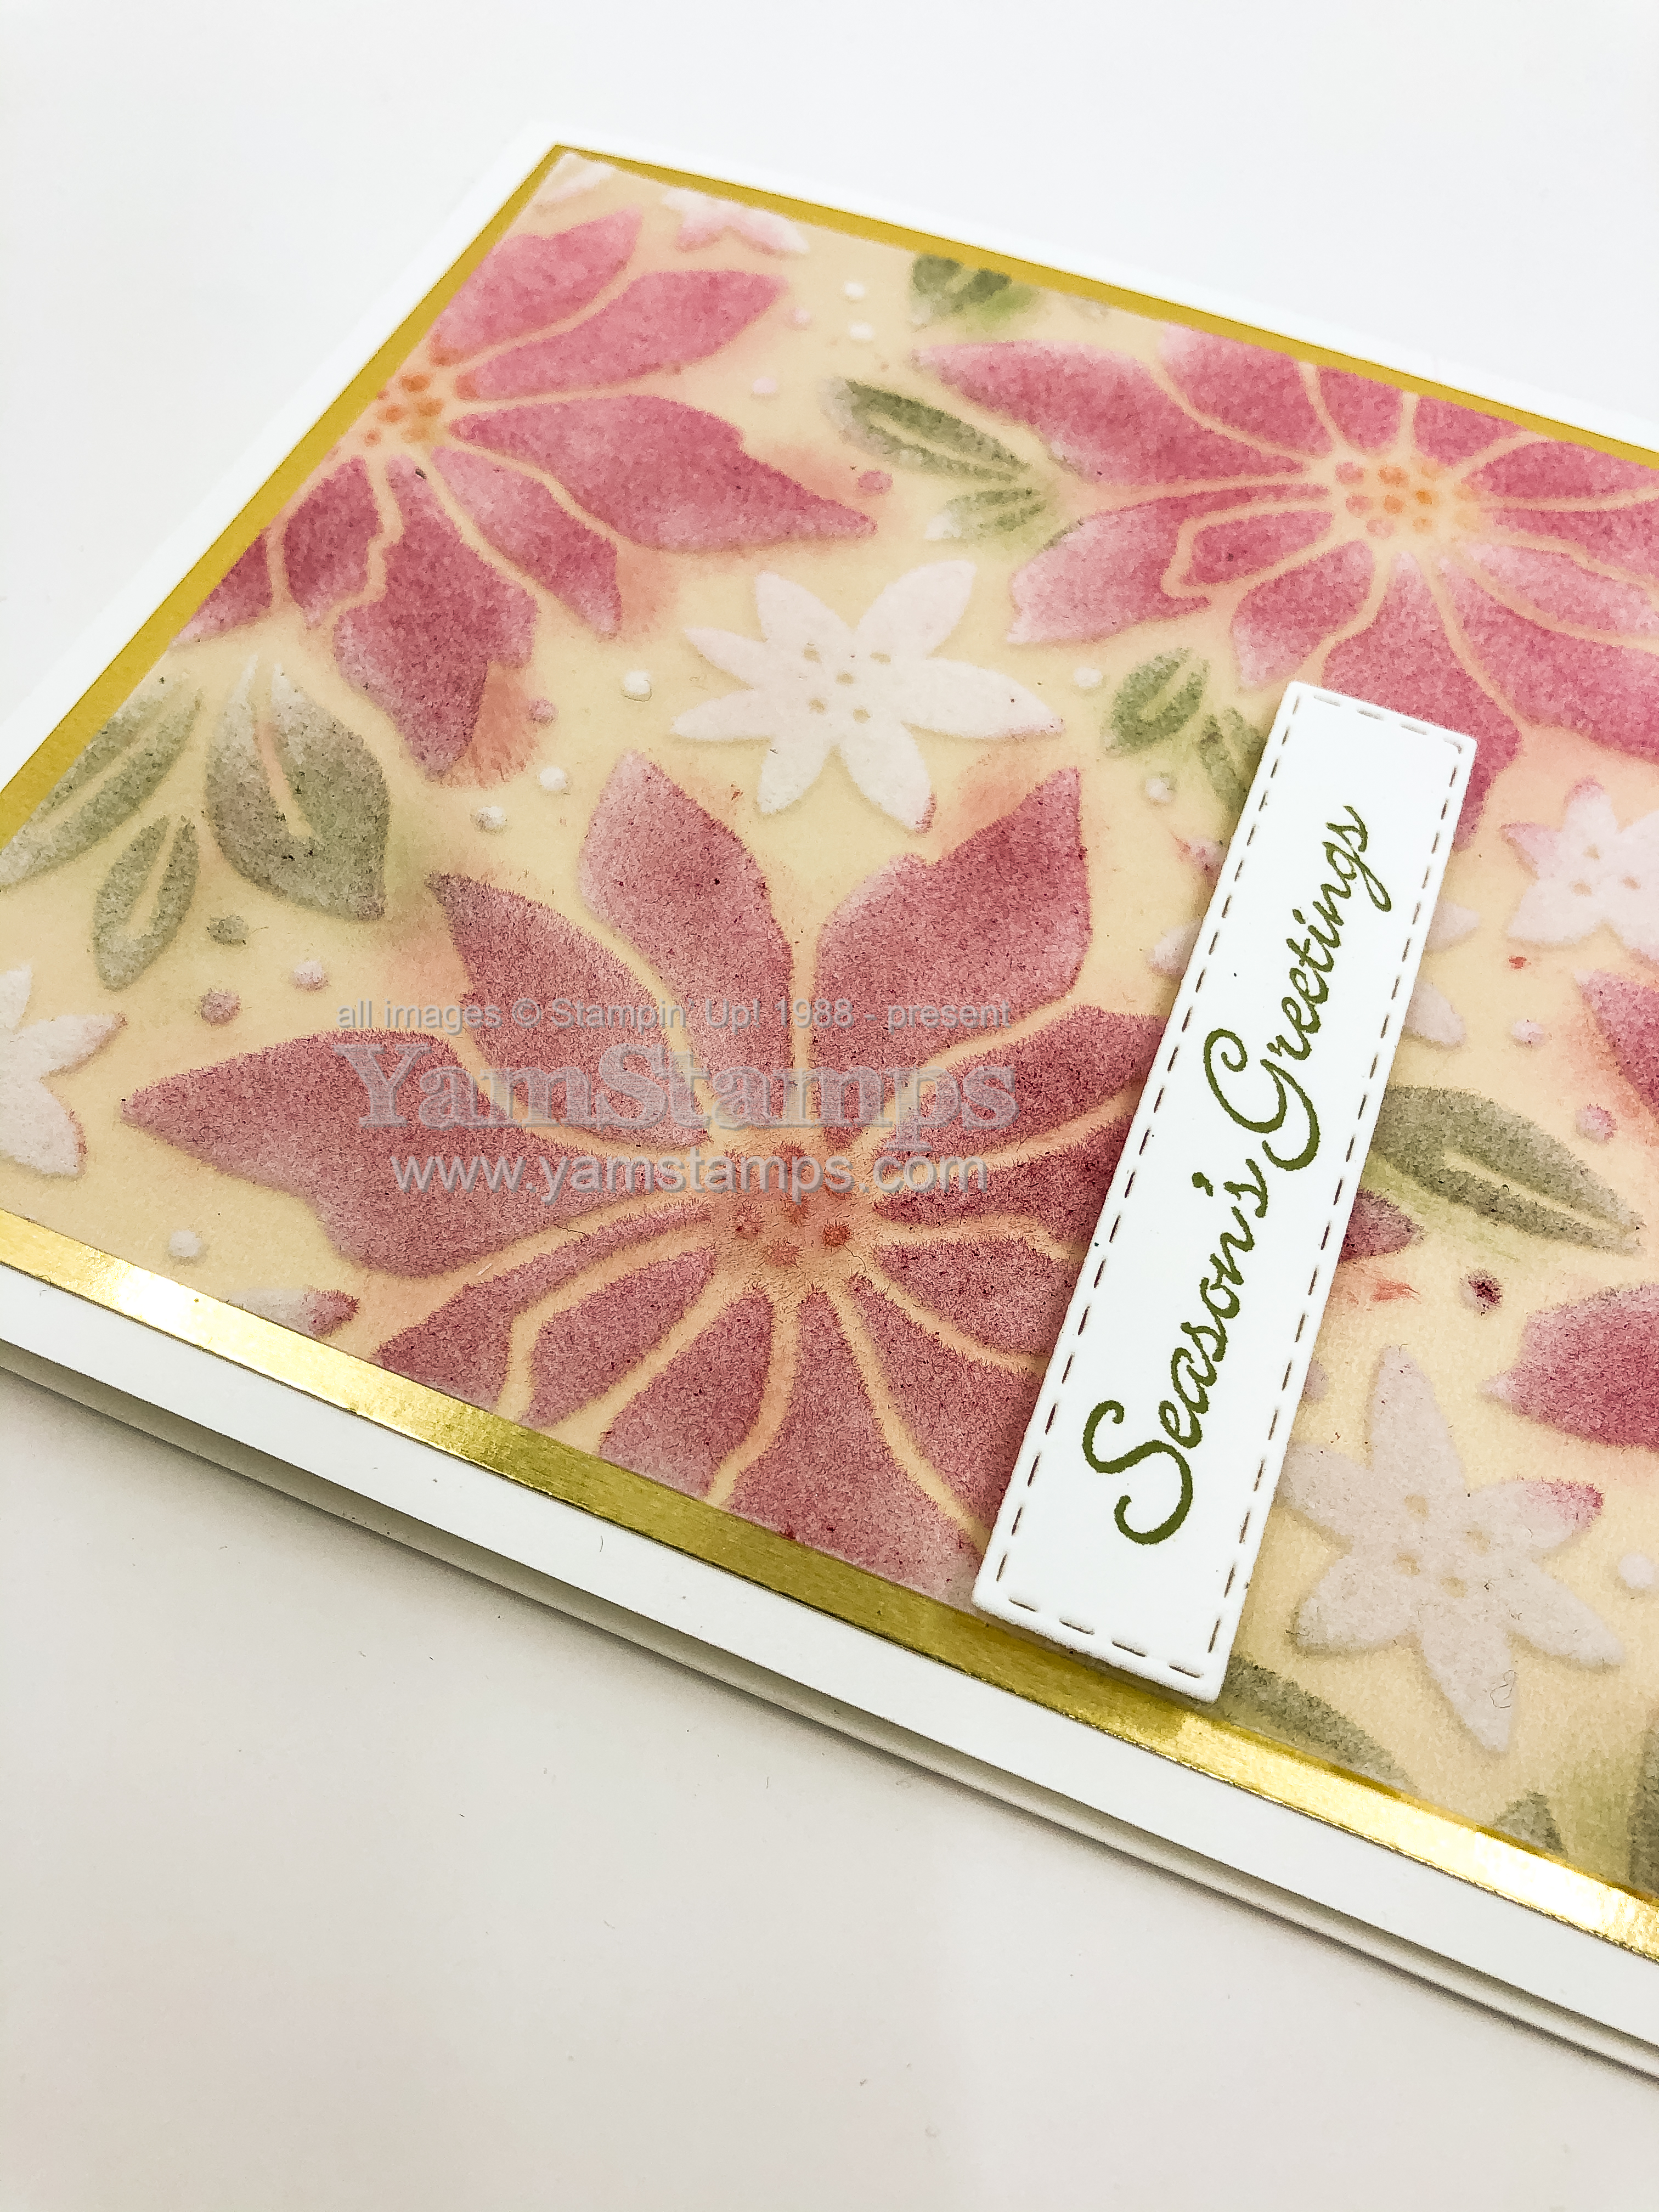
I love how easy this Poinsettia Card was to make – using Stampin’ Up!’s Plush Poinsettia Specialty Paper from the August-December 2020 Mini Catalogue.
Poinsettia Card
I coloured the plush portions of the vellum using a sponge dauber, and then adhered it onto a Gold Foil sheet and added the sentiment from Itty Bitty Christmas die cut with a Stitched Rectangle die. When I was colouring, I tried to stay mostly on the plush portions but didn’t get too fussed if it was off a little bit – I figure it’s more artistic that way LOL.
Poinsettia Card
If you’ve been loving the products from the August-December Mini Catalogue, you’ll also maybe realize that they will be leaving us soon! Stampin’ Up! has let us know which products will make another appearance – either in the next Annual Catalogue OR the next “holiday” Mini Catalogue – which will actually be July– December (an extra month vs this year!). You can download the spreadsheet here for the returning products. NOTE that on the returning products spreadsheet there are tabs indicating which catalogue they will be appearing in.
In terms of items that are retiring – Stampin’ Up! has announced a Year End Sale on selected retiring August-December Mini Catalogue products. REMEMBER that “Bundles” typically “retire”, though the individual elements may return in a future catalogue – just not as part of the discounted bundle. Selected retiring products are on sale from December 8 – January 4 – and all items are WHILE SUPPLIES LAST. Here’s a spreadsheet of retiring items; here’s a pdf version if you prefer.
Your best bet is to place your order online at YamStamps.com/shop – it can be delivered directly to you in Canada – or if you need assistance placing an order or prefer me to place the order for you, I’d recommend contacting me ASAP – if you can send me a message by 8pm on Monday December 7th, I’ll do my best to get things organized so that I can place the orders early on the 8th for best possibility of getting things before they’re gone.
If you’re looking to purchase a gift for the paper crafter in your life, or you’re a paper crafter looking to drop hints to your friends and family, look no further! I present my 2020 Paper Crafter’s Gift Guide! I’ve compiled this list with some of my favourite Stampin’ Up! tools to make your gift giving (and receiving) a little easier. I’m not including stamps, inks or papers…that’s a whole other list in itself! LOL.
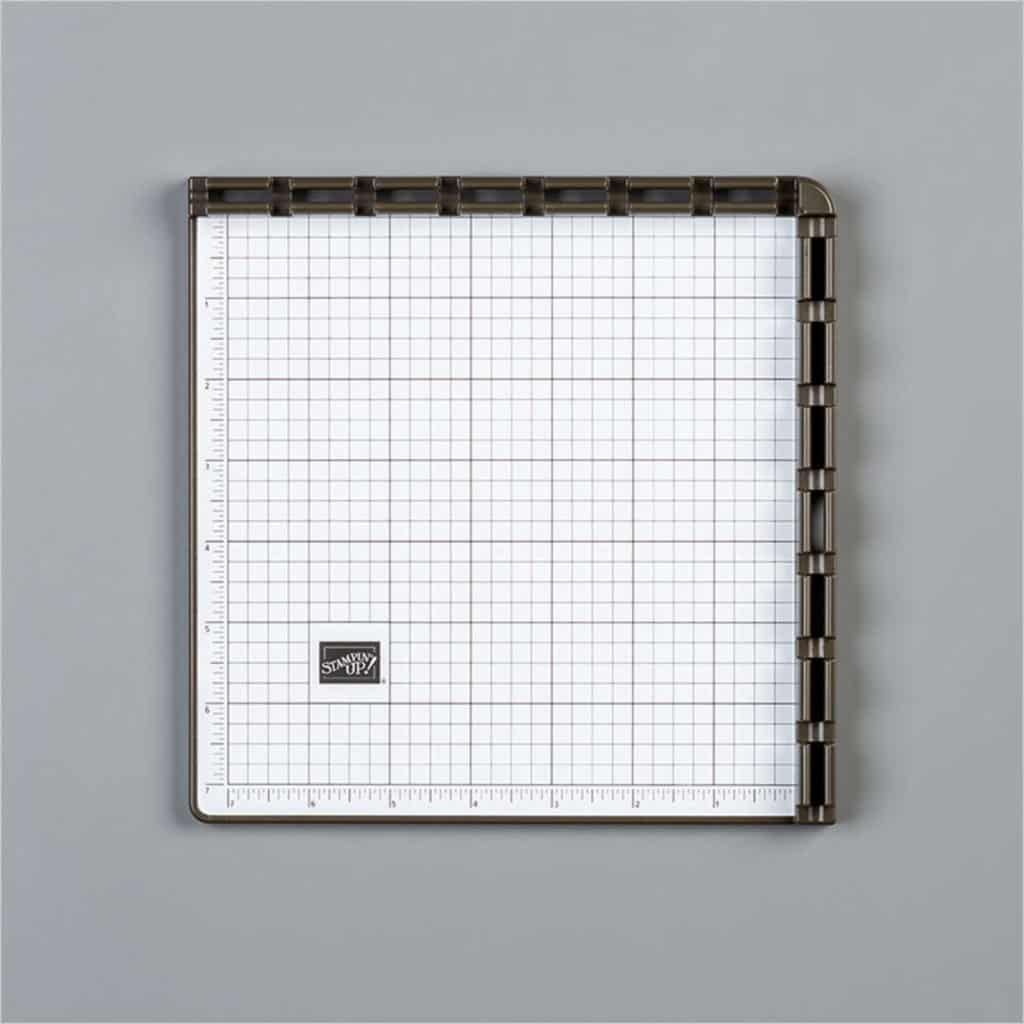
I tend to call this my craft mat, so pardon my inaccuracies in using its proper name…but whatever it’s called, I think it’s one of the most useful tools to have on hand!! WHY IT’S A GREAT GIFT FOR A PAPER CRAFTER: – it’s inexpensive (you could get multiples!) – projects won’t stick to it when applying adhesive (even if it’s a bit messy) – it rinses clean and is ready for the next project quickly – it can act as an extra layer to help get better stamped images – either with clear blocks or Stamparatus – protects the crafter’s work surface – from adhesives or ink
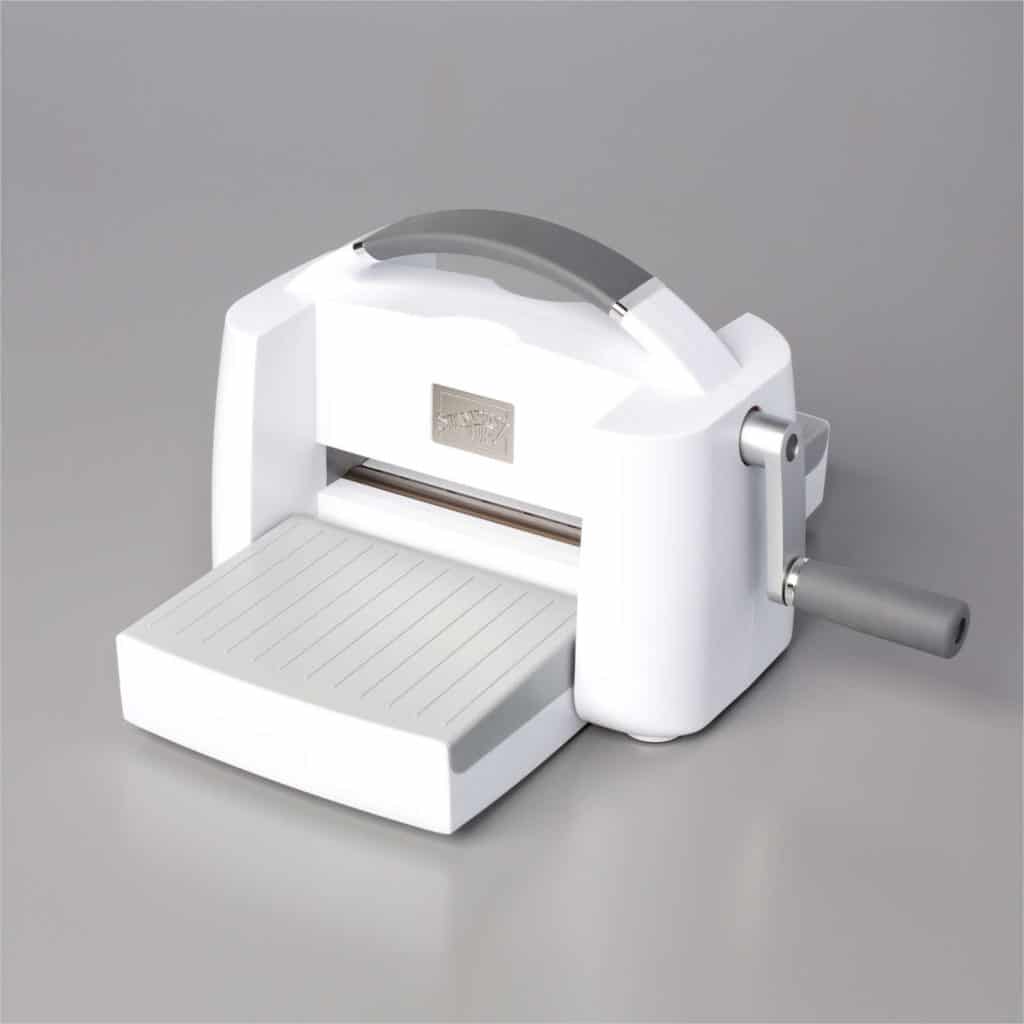
NEXT Paper Crafter’s Gift Guide Suggestion: The Stamparatus
Stamparatus
WHY IT’S A GREAT GIFT FOR A PAPER CRAFTER: – makes stamping easy, and makes image alignment easier – great for crafters who are particular about straight stamping or who do a lot of repetitive stamping – perfect for those who have trouble holding the blocks or holding blocks steady for stamping – one tool for all your stamping needs – no figuring out which blocks will fit which stamps – removable plate means you can move the stamped image for some neat techniques or change them out quickly – comes with 2 plates, additional plates available
WHY IT’S A GREAT GIFT FOR A PAPER CRAFTER: – folds for easy storage/portability – opening is slightly wider than the included cutting plates and platform so it’s easy to run projects through the opening – allows use of dies and embossing folders (sold separately) for easy, expert looking crafting and “stepped up” projects – perfect for someone who has been crafting for a little while and wants to make their crafting more polished looking
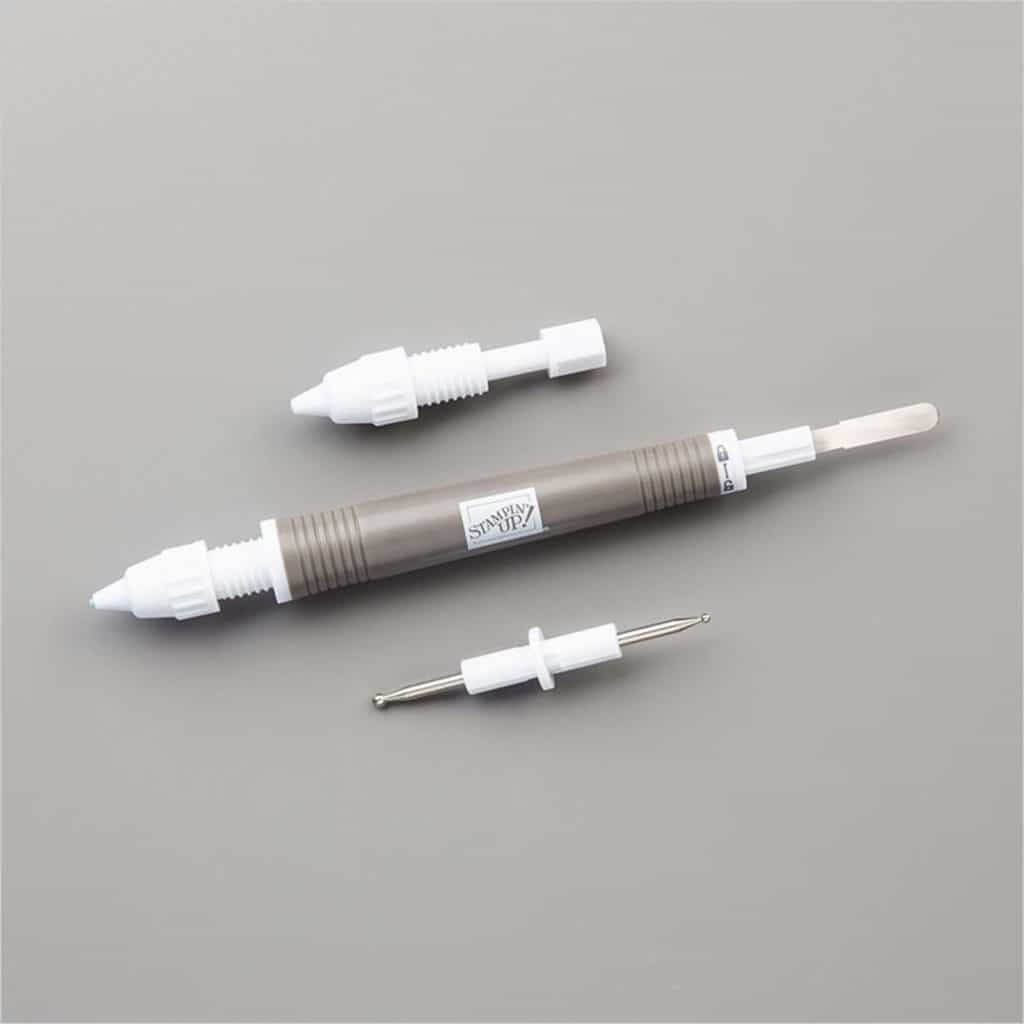
WHY IT’S A GREAT GIFT FOR A PAPER CRAFTER: – interchangeable ends mean you have scoring tools, a spatula and putty tip easily accessible – time and sanity saver: easily pick up and apply small pieces and embellishments – Brush Tip is great add on – and perfect for removing small pieces from intricate dies/die cuts – inexpensive multipurpose tool
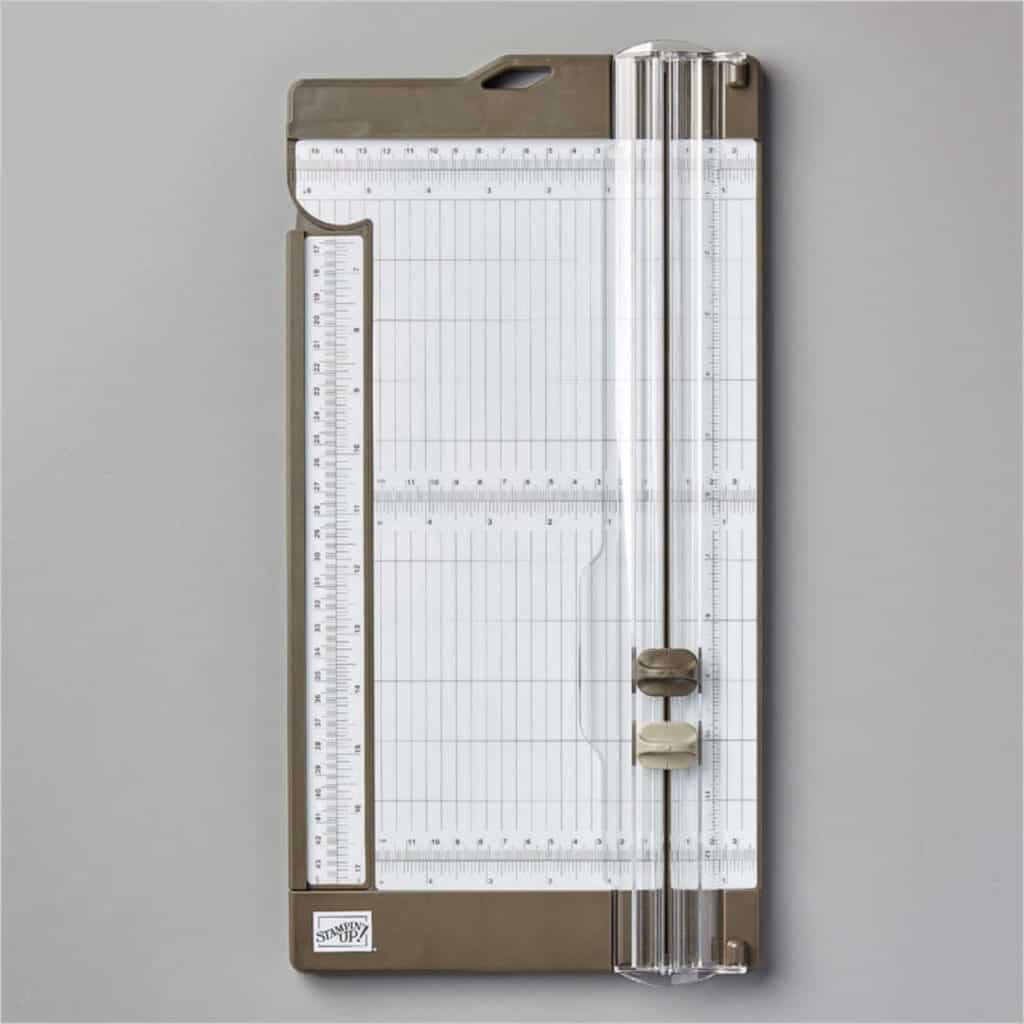
WHY IT’S A GREAT GIFT FOR A PAPER CRAFTER: – Makes straight cuts and score lines easily – so projects are neat and expert looking – Great for scrapbooking or cardmaking – manages 12″ x 12″ sized sheets – slightly raised edge makes it easy to ensure that the paper is in the cutter straight – every paper crafter needs a good cutter for their projects
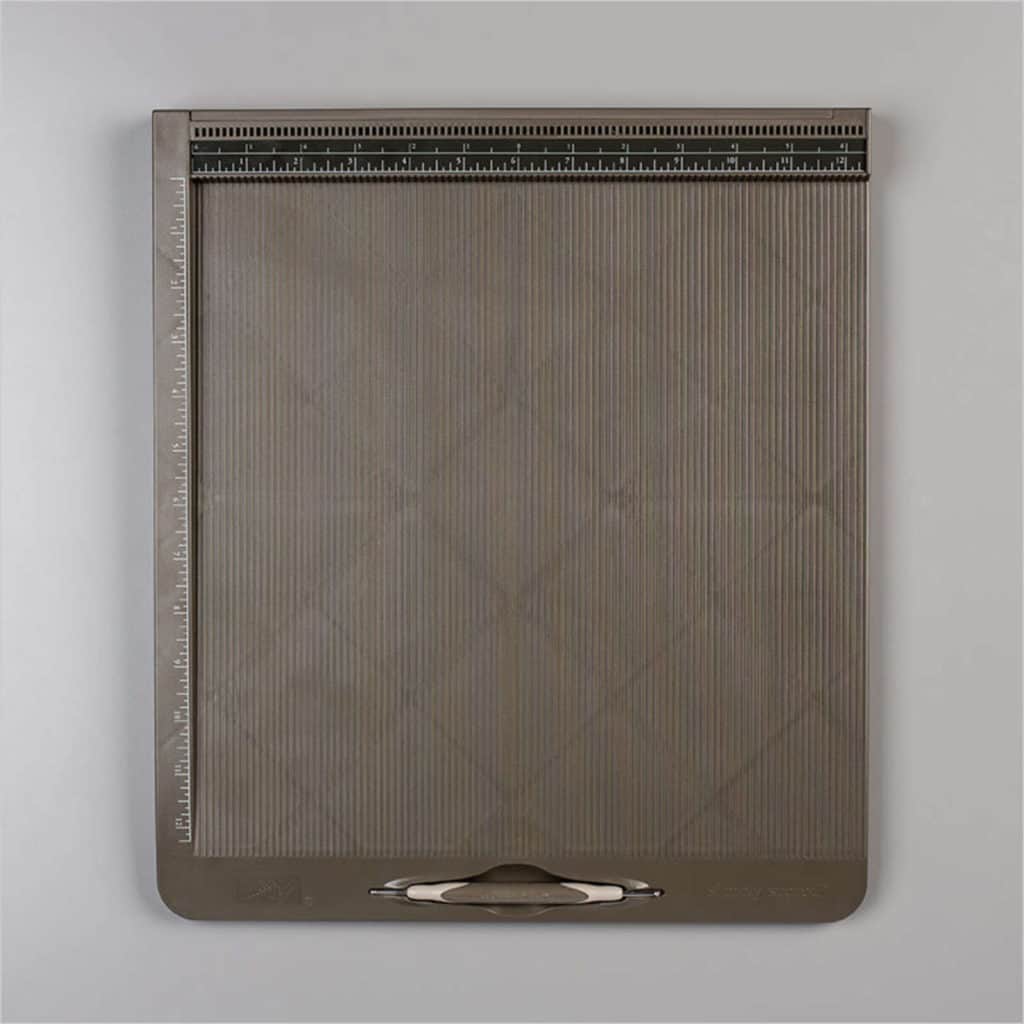
WHY IT’S A GREAT GIFT FOR A PAPER CRAFTER: – easily score multiple lines on a project to make folds crisper and cleaner – great for crafters who like to make more intricate projects with multiple scores/folds – great for crafters who make multiples of a project – easy to change out the cardstock pieces quickly – large base easily accommodates 12″ x 12″ sheets for scrapbookers or 3D project makers
LAST BUT NOT LEAST
Gift Certificate
WHY IT’S A GREAT GIFT FOR PAPER CRAFTERS: – can be emailed and printed off – perfect for when you aren’t sure what they want – can be in any denomination – can be used for Stampin’ Up! product or classes (online/in person once they start up again) Gift certificates are only valid in Canada and are only redeemable for purchases and classes with me. Please contact me to arrange purchase.
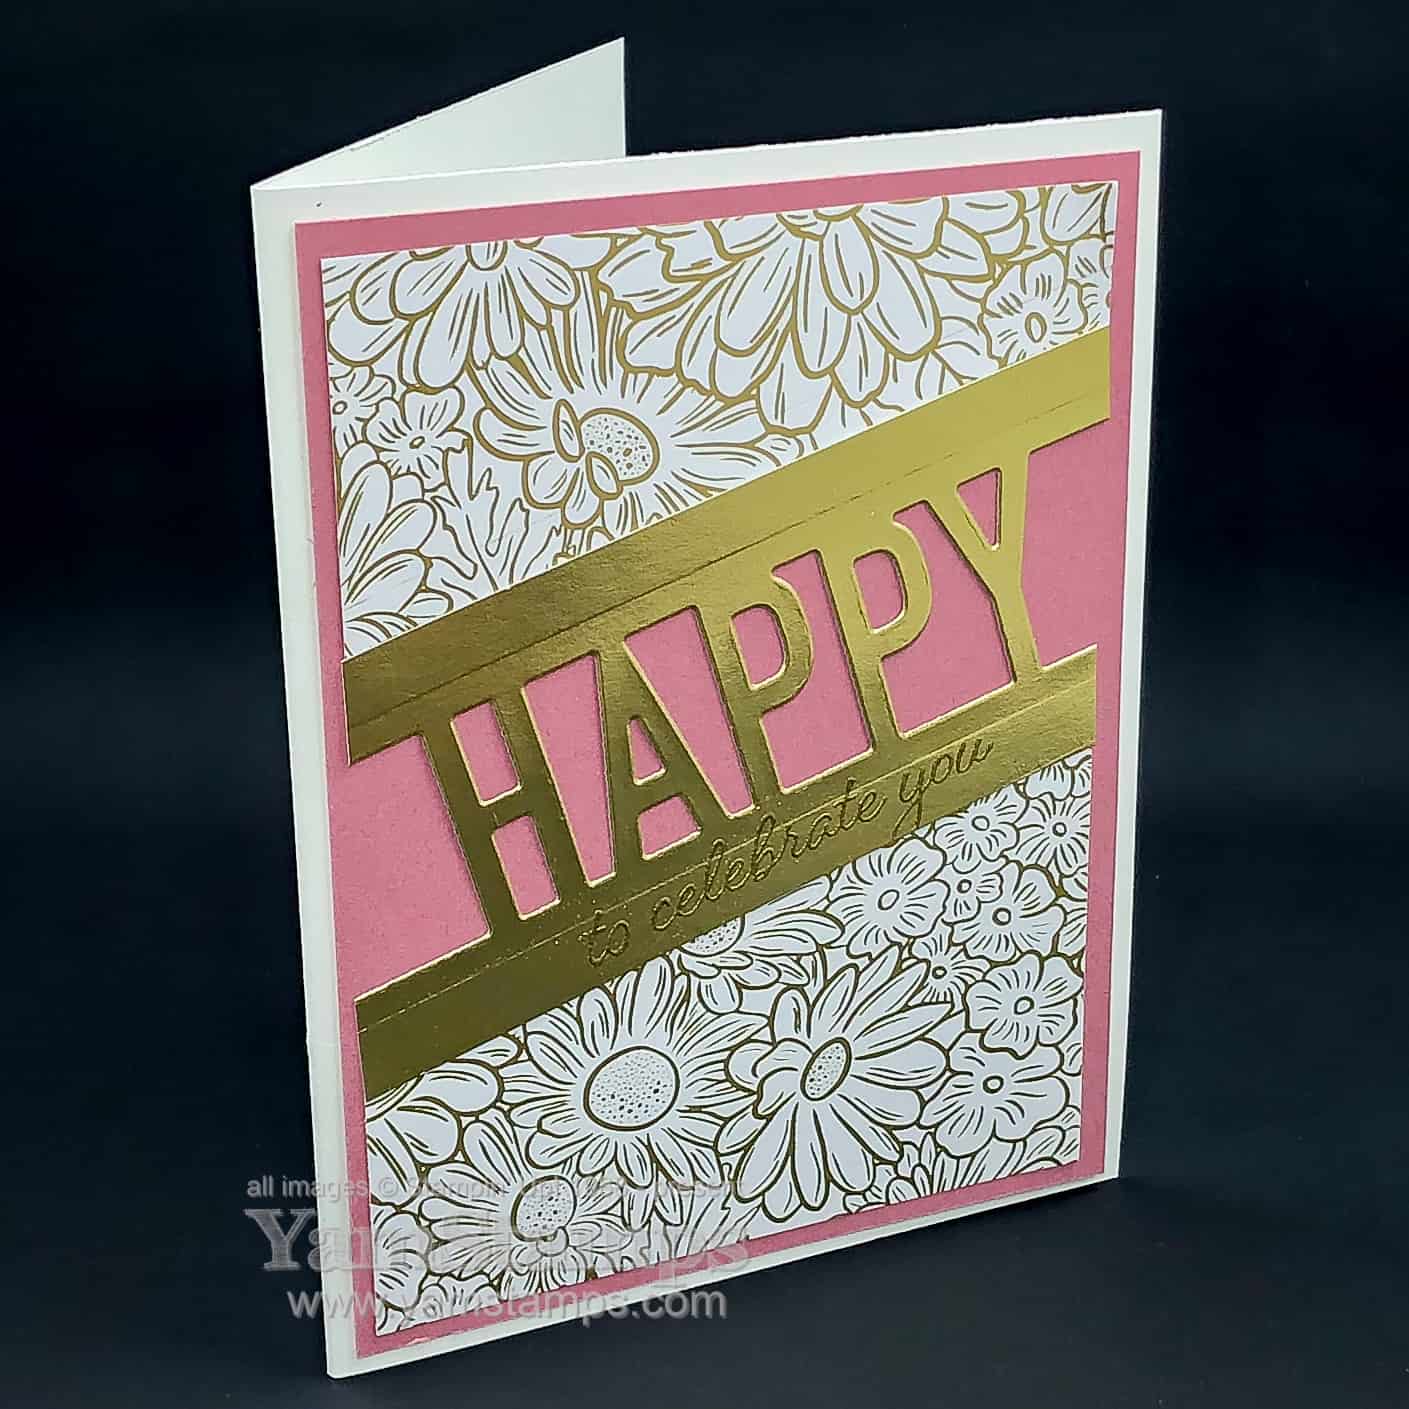
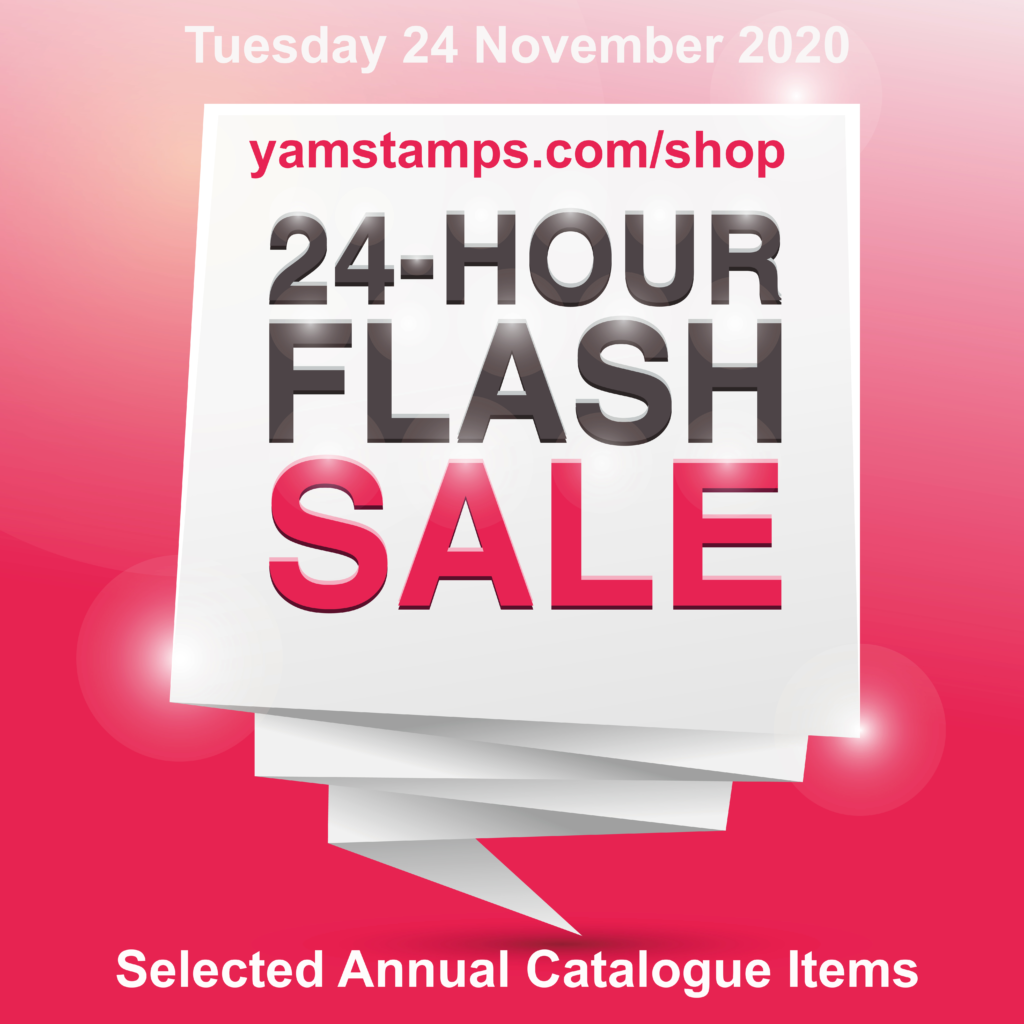
I hope that you had a good weekend! I spent some time crafting, so that always qualifies as a good weekend in my books. Today I’m sharing a Happy Celebration Card – because I really like this So Much Happy bundle…and because it’s going to be on sale tomorrow, Tuesday November 24th as part of the Merry & Bright Online Sale!
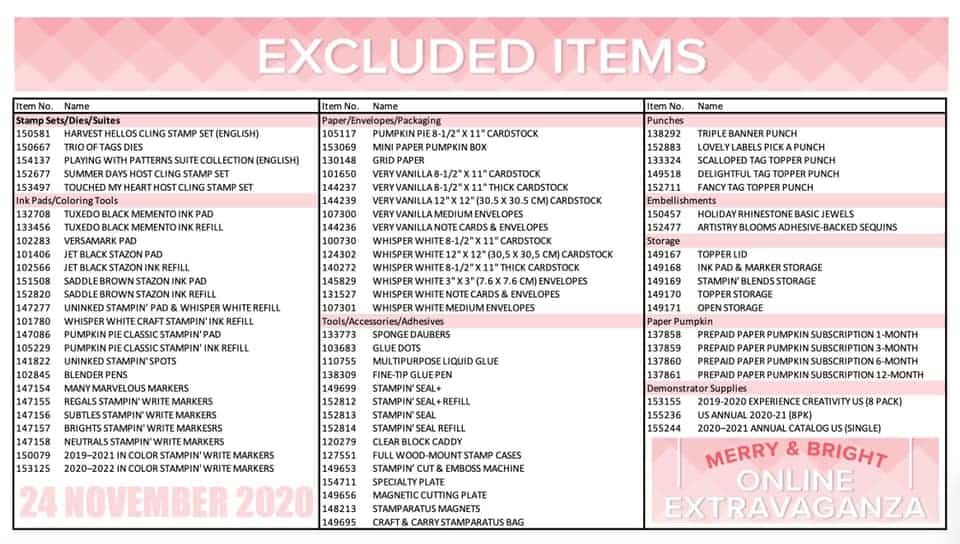
The Merry & Bright Online Sale is going to feature select products from the Annual Catalogue at a 10% discount – but only for 24 hours! It starts at 1201 AM and runs until 1159 PM Mountain Time. So if you’re in Ontario like me, it starts at 201AM Eastern Time and runs until 159AM on the 25th, in case you have insomnia and need to online shop in the middle of the night. No August-December catalogue product will be involved in this sale, and this is the list of exceptions from the Annual Catalogue – you can download a pdf or spreadsheet version, or check out the picture below.
Merry & Bright Sale – Excluded Items
So pretty much if it’s in the Annual Catalogue (the big book) and NOT on this list – it’s included! I think the best deals will be any of the stamp and tool bundles (like the So Much Happy Bundle used for the Happy Celebration Card above) – because they’re already discounted, so you’ll earn a discount on the already discounted price!
So start making your list – and be ready to go shopping tomorrow – Tuesday 24 November! Click here to go shopping in the YamStamps Online Stampin’ Up! Canada store – shortcut is yamstamps.com/shop. Or – you can email me with your order and I can place it for you – and have it delivered directly to you (Canadian residents only due to Stampin’ Up! regulations). Happy Shopping!
Here’s a Curvy Christmas Card that we made the other evening in Stampers Club. It’s also available as part of the current Card Class to Go(message me for purchase information). I think that 2020 is going to be the year of the resurgence of the mailed holiday card! With that in mind, I’m trying to get going on producing more cards right now – how about you?
Curvy Christmas Card
For this card, I used the Quite Curvy Variety Bundle, which is available until January 4, 2021. It includes the Quite Curvy Bundle (Quite Curvy stamp set and Curvy Dies), the Curvy Christmas stamp set and the Classic Christmas Designer Series Paper. The Quite Curvy Bundle (and the individual components of the bundle) will be available in the January-June Mini Catalogue, but the Curvy Christmas set and paper will not be available after January 5th.
The colours in the Classic Christmas Designer Series Paper are Sahara Sand, Shaded Spruce and Cherry Cobbler. For this card, I die cut the Cherry Cobbler and Shaded Spruce pieces of patterned paper with the Curvy Dies. From the Curvy Christmas stamp set, the evergreen boughs are stamped in Shaded Spruce and the sentiment is stamped in Early Espresso, which is also the backing cardstock. I used Crumb Cake cardstock for the cardbase itself because that was what was closest to hand LOL.
For Stampers Club and Card Class to Go, all the pieces are precut, and participants adhere them together and add their own stamps and ink (since we’re assembling in the comfort of our own separate homes). For this card, if people didn’t have the Curvy Christmas stamp set, another holiday themed stamp set would do. If it’s a photopolymer (clear) stamp set, you can also manipulate the stamp when you adhere it to the clear block to get a curved sentiment as well!
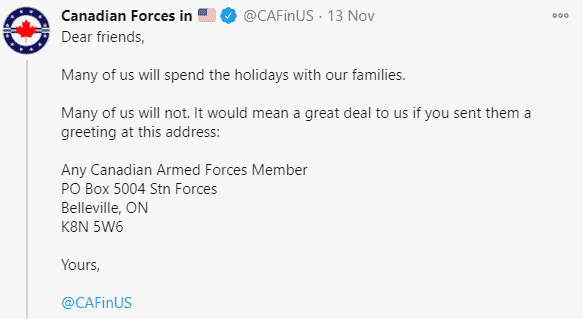
If you are making a bunch of cards, and have extras, you might consider sending some on to others – like those in Retirement or Long Term Care Homes, or Armed Forces members – as noted in this tweet:
Armed Forces Request
Any Canadian Armed Forces Member PO Box 5004 Stn Forces Belleville ON K8N 5W6
Cards will require appropriate postage (to Canada). It was mentioned by a friend that glitter and other sparkly embellishments are best avoided – they can set off the security detectors for one thing, and we all know how glitter spreads and sticks and would not help someone trying to be camoflauged.
I have a couple of these Curvy Christmas Card samples, so I think I’ll be sending a few on to share the holiday spirit. Join me in this mailing effort?! Happy Crafting.
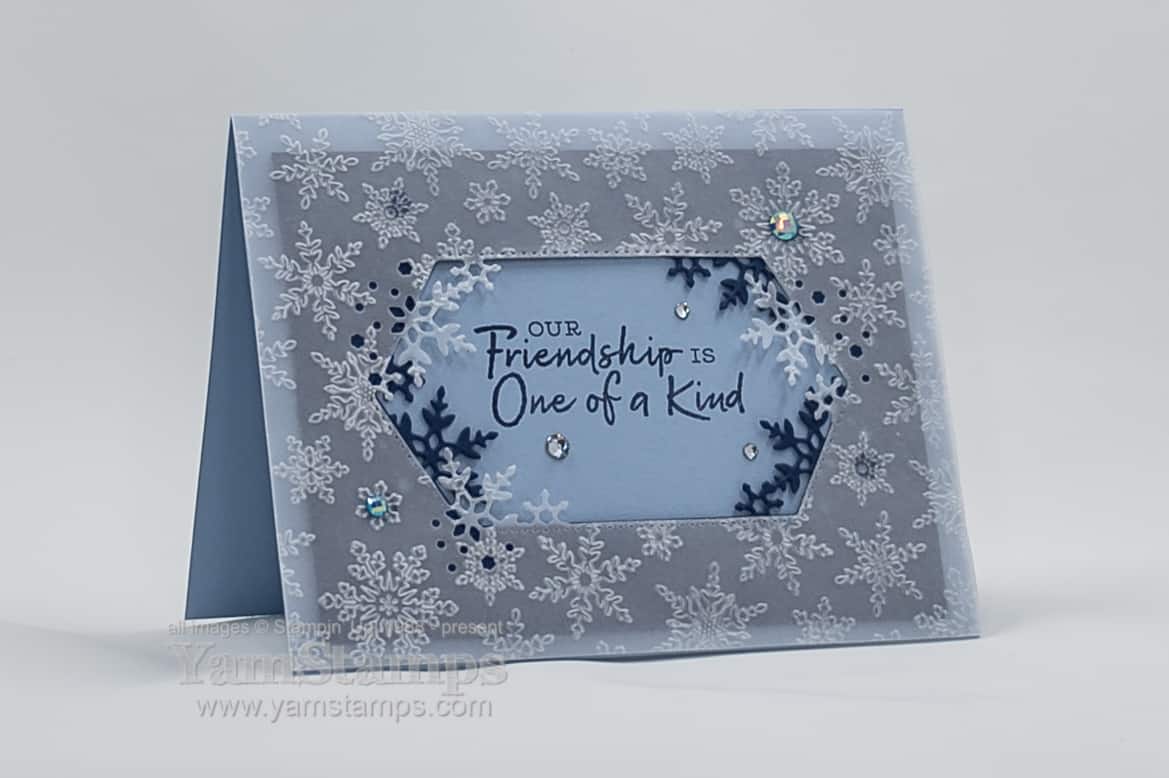
While I know that I’ve been doing the Twelve Weeks of Christmas Projects for YamStamps subscribers, I’m still caught off guard with the fact that Christmas is a month and a half away! Today’s snowflake card for a friend was one that I created for a Stampin’ Up! Demonstrator only swap featuring products from the August-December 2020 Mini Catalogue. Snowflakes are one of my favourite “themes” for seasonal and holiday cards.
I adhered the Vellum to the cardfront with Glue Dots and tried to place them behind snowflakes so they weren’t quite as visible. I hid a couple of them with the gems, and now that I look at this photo, could have added a few more gems?!
I love the fact that this snowflake card for a friendcould be a holiday card but could also be a birthday card, friendship card or just because card during this season. Burlington is entering “Red Zone Status” for the pandemic as of Monday, so I think it’s an important time to keep in touch with people while keeping socially distanced.
If you’re looking for ways to keep busy, consider purchasing one of my Card Classes to Go – the “regular” versions feature a variety of projects, and the Holiday Card Class to Go focuses on holiday cards only. Each class has the precut materials for four different cards, plus a printout with a photo of the completed project and step by step instructions. You can add sentiments from your own stash or shop the YamStamps Online Stampin’ Up! Canada store (shortcut:YamStamps.com/shop) for the ones I use in the samples. Contact me for payment links and more information. Each class cost is $20 and includes postage within Canada.