Happy Sept-Dec 2024 Mini Catalogue Day!
Start your shopping carts now….
You can view the digital copy here. or
Happy Shopping! As always,feel free to contact me if you need assistance placing your order or want to pay by etransfer.


Start your shopping carts now….
You can view the digital copy here. or
Happy Shopping! As always,feel free to contact me if you need assistance placing your order or want to pay by etransfer.
Stampin’ Up! is expanding it’s scrapbooking and memory keeping options – with the new Scrapbooking Brochure! It’s an online only publication, designed to be a supplement to the September-December Mini Catalogue. Sales start Wednesday 4 September, but you can look at this one now!
You can download it here
Sales from this brochure start on Wednesday, September 4th. Unlike other Stampin’ Up! releases, demonstrators didn’t get a pre-order period for this publication because SU was working on getting this out as quickly as possible! I’m not a huge scrapbooker, but I have been known to make a spread or two…. I’m most looking forward to the two toned paper! I think that will be a fantastic product for both cardmaking AND scrapbooking! While it’s only available in a few colours right now, more are coming. I do love that Pool Party is one of the first colours they released, though.
As always, you can shop online 24/7 in the YamStamps Online Stampin’ Up! Canada store (shortcut is yamstamps.com/shop) – or you can message me with your order if you’d like to pay by etransfer or would like me to enter the order for you. Happy to help!
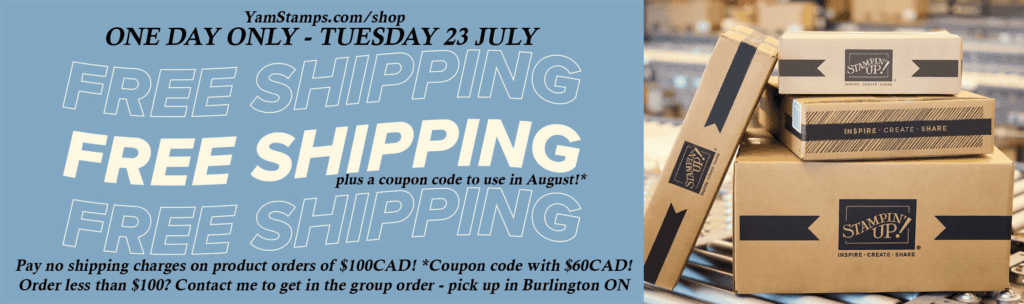
Place an order for $100CAD and get FREE shipping this Tuesday – 23 July! PLUS you’ll get a coupon code for $6CAD with each $60CAD of product! You can shop online at YamStamps.com/shop
Q: What if I don’t have a $100CAD product order?
A: First….check again! Don’t forget that there are online exclusive products that are available while supplies last and aren’t listed in any catalogue. (shortcut to see them is YamStamps.com/OLEX ). Second….if you can arrange to pick up your items in Burlington ON, you can get in on the group order I’m placing!
How to get in on the GROUP ORDER
Email me with the items you’d like to order by Tuesday at 8am. I will get back to you with the amount owing, and you can pay by etransfer or we’ll get your CC information securely. I will place group orders once the accumulated total hits $100. Once the order is delivered, I’ll let you know and we can make arrangements for a porch pick up.
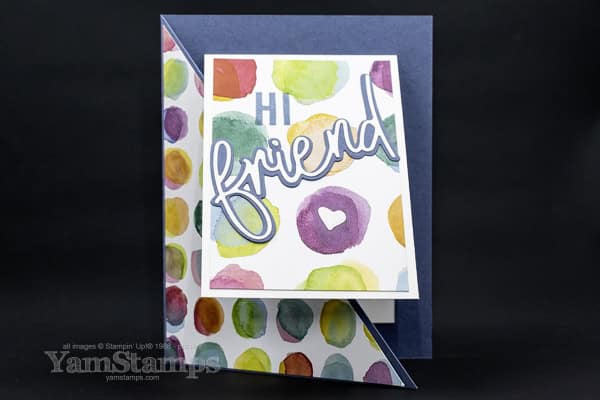
I think Stampin’ Up! Canada’s Friends for Life bundle is one of my favourites right now. I used it along with the Country Woods Designer Series Paper to create this Friends For Life Card – and it’s easy to re-create! I’ll share a couple of tips that might make this card a bit easier as well.
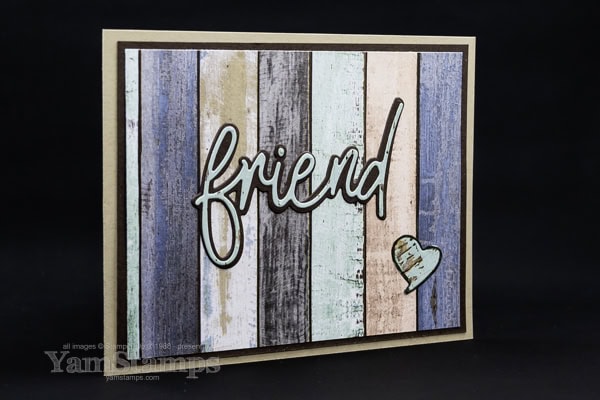
First off, the Country Woods Paper has some gorgeous wood grain / painted wood grain images including this multicoloured/striped one. That makes for an easy background for my Friends For Life Card! I used Early Espresso Cardstock for the backdrop, but before I stuck everything down, I cut the backing die for the word “friend” from the centre of that cardstock. I love that thrifty trick. The hole was then covered by the patterned paper and noone’s the wiser. I chose to die cut the detailed text and the heart from another sheet of the paper that had the lighter blue toned “paint”.
The trickiest part about this Friends for Life card is not losing the dot for the “i” when you pop everything out of the die!! If I am sending out die cut pieces like this to my Card Club Members, I fold some Press ‘n Seal in half around the pieces to encase everything safely. The other thing that the Press ‘n Seal can do is to hold the die cut in the original shape. Sometimes when I pull a thinner die cut word out of the die, it will stretch/spread, so I have to smush it back into the original orientation to fit onto the background. I hold the die horizontally, close to my work surface (covered in a bit of Press n’ Seal), use the brush tip for my Take Your Pick tool, and run it over the die to push out the die cut shape and drop it directly onto the Press ‘n Seal (or with as little handling as possible) to keep it in the original ratio/shape.
One other thing to make it easier with thinner or more detailed die cuts – I often will use an Adhesive Sheet on the backside of the paper – so that I just have to peel off the liner and it’s ready to attach. The other option is to use Multipurpose Liquid Glue – small dots, and it’s good to let it dry just a bit so that it doesn’t “smoosh” out everywhere.
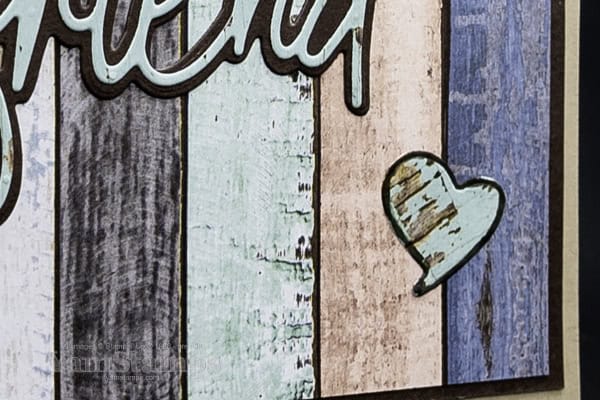
To tie everything together and add a finishing touch to my Friends for Life Card, I took the brush end of my Early Espresso Stampin’ Write Marker (part of the Neutrals Stampin’ Write Markers set) and ran it around the edge of the heart so that it matched the word “friend” and the general design of the card. Put everything onto a Crumb Cake Card and it’s done!
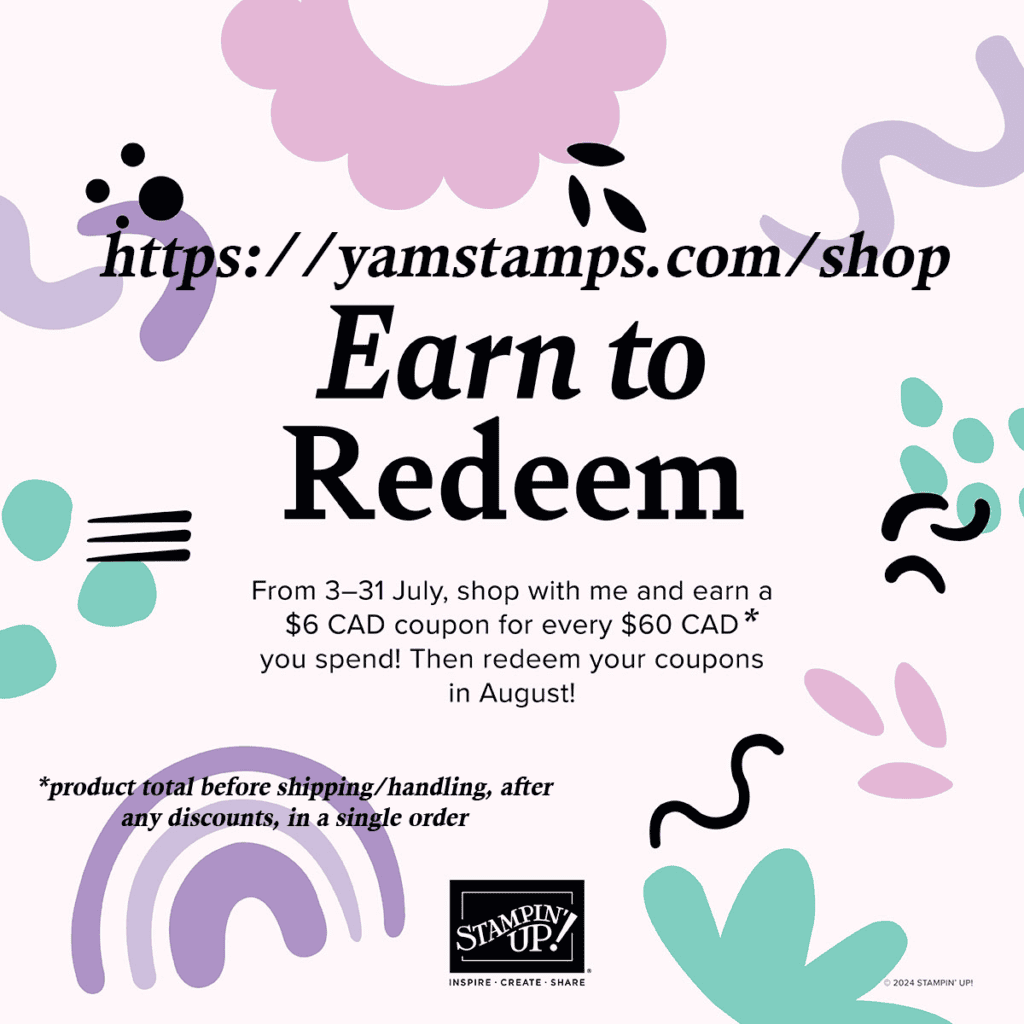
Starting today and running until the end of July, it’s Stampin’ Up!’s BONUS DAYS! For each $60CAD in product that you order, you’ll earn a $6CAD coupon that you can spend in August! Product total must be before shipping/taxes and after any discounts or codes are applied. It’s a great way to get an extra reward for making sure you’ve got crafty supplies on hand! Shortcut to shop in Canada is YamStamps.com/shop or you can message me with your order if you’d like to pay by etransfer or if you need assistance placing your order. Happy Shopping, and Happy Bonus Days!!
I am all about the quick and easy crafting – I love when something looks more difficult than it actually is – so this simple colourful card fits the bill!
Use your patterned paper as the main focus and you can create so many cards – add a bit of stamping for customization, and it’s ready to pop into the mail! For this card, the main focus is the Full of Life Designer Series Paper. This is a 6″ x 6″ set of papers, and you get four of each double sided design (there’s 12 different designs, so 48 sheets all together). Depending on how you cut your paper, you can have a majority of one colour tone over another. In this case, I chose the yellow/orange tones and used the blue/greens as a bit of an accent colour.
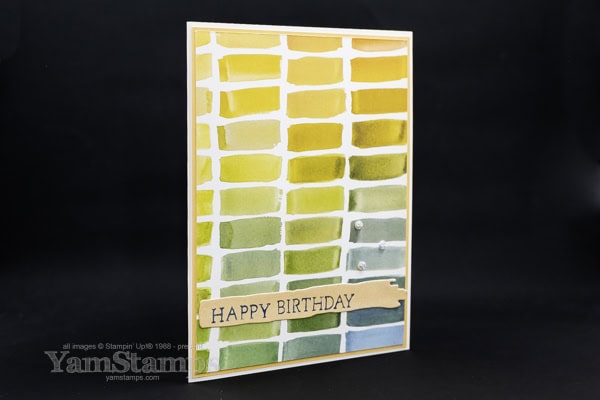
So you could call this a simple colourful watercolour card – since the original designs for the paper were hand painted by one of SU’s artists! (So yes, watercoloured, though not by me…!) For the sentiment, I used the Friends for Life bundle which includes a stamp set and dies. (It’s an extra 10% off the already discounted price if you purchase it before the end of June!). I added the die cut brush stroke strip, and managed to fit the greeting onto it. If you look at the Friends for Life stamp set, you’ll notice that the Happy Birthday Greeting is actually stacked, so the word “birthday” is below the word “happy”.

I used the Blueberry Bushel Stampin’ Write Marker (from the Regals Collection) to colour directly onto the stamp, one word at a time. I inked up “happy” and stamped it onto the strip, then I cleaned my stamp (to fully remove any remaining ink), inked the word “birthday” and stamped it onto the strip, so I could have the words horizontally aligned. I think that was the most difficult part of this simple colourful card, and it’s not THAT difficult!
I added a few Basic Gray and Smoky Slate Pearls as a finishing touch. I actually purchased the Full of Life Suite which includes the paper, bundle and Iridescent Striped Trim and Iridescent Faceted Gems, but I felt that the main tones of colour given off by the Iridescent Gems didn’t match my colour scheme as well as the more neutral gray toned pearls did. Backed everything with a bit of Peach Pie Cardstock and put it onto a Basic White Card and my simple colourful card was ready!
You can grab these products in the YamStamps Stampin’ Up! Canada Online Store by clicking on the links, or going to YamStamps.com/shop. Stamp and die bundles are an additional 10% off during June! If you’d like assistance placing your order, or would like to pay by etransfer, you can contact me. Create your own simple colourful card that doesn’t look so simple! Like I say – paper crafting doesn’t have to be difficult to be impressive!
Hello! I’m here with my essay about how I spent my summer vacation….and a few photos to make it more interesting! (Also to apologize for the bit of blog silence….since lots of words take me lots of time – which is why I can keep up with the YamStamps Facebook Page a little more easily – less words!!).
You may or may not know that in addition to YamStamps, I work in healthcare and I also volunteer as a photographer with our city’s youth marching band, the Burlington Teen Tour Band. I was a member of the band when I was a teen (just a few years ago….*cough*), and then became involved again when my son joined the band. I did some chaperoning and then got to be one of the volunteer photographers. Five years later, my son left the band and went to university, and I stayed on as a photographer!!
My summer vacation was spent travelling with the band to England and France, since they were invited to be representatives of Canadian youth at the Juno Beach Ceremonies to mark the 80th Anniversary of D-Day. Such a meaningful tour and such an honour for the band to be able to perform for veterans, including Lieutenant General Richard Rohmer who recently turned 100 years old and is a patron of the band.
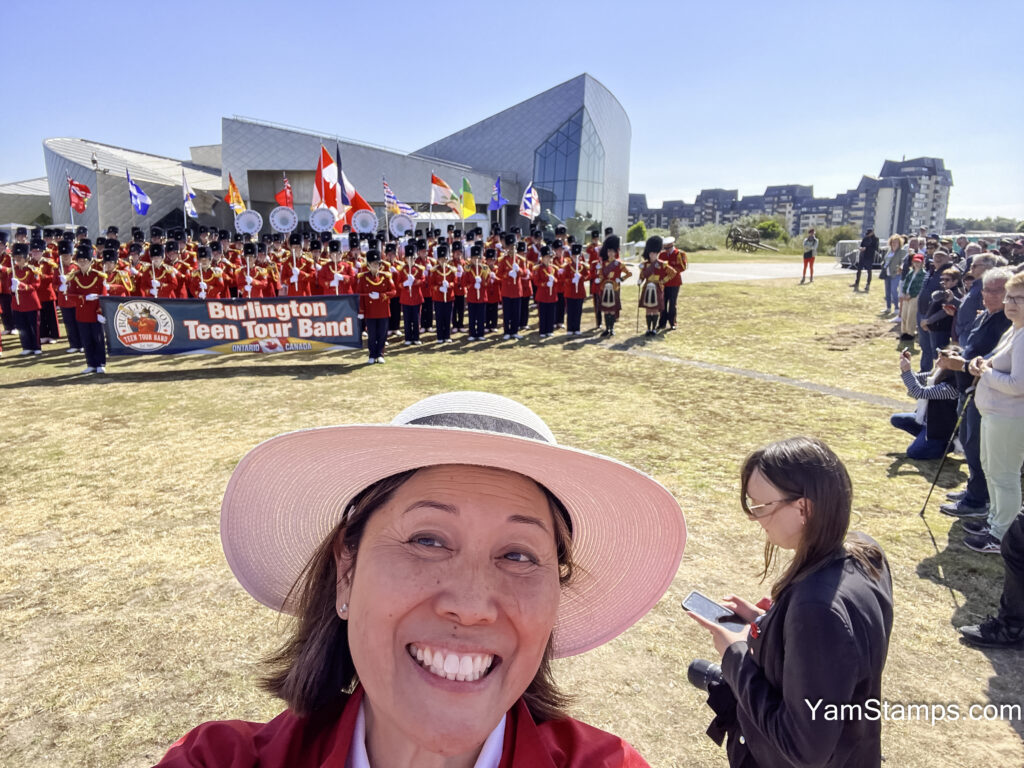
haha! This is a cheeky selfie I took quickly after taking the group photo. I can take photos….but I’m not so good at selfies!
Of course, we also had time to do some sightseeing and souvenir shopping… I am still working on editing photos from the trip but have managed to get some uploaded. You can find the Burlington Teen Tour Band website here and there’s links to the photo website on there as well.

However, it was lots of fun, and the “real” photos I took turned out pretty well I think.
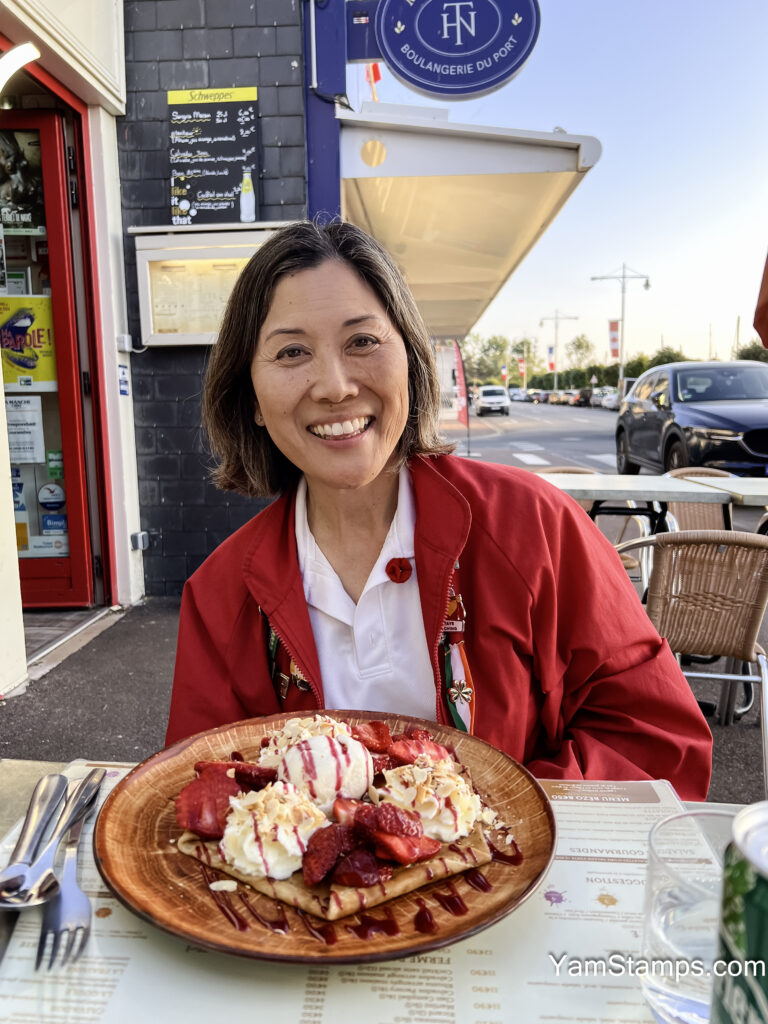
This was a FANTASTIC crepe that I had while in France! Good thing we did so much walking while we were there!!! (For those keeping track, I usually avoid dairy and gluten, however I have some supplements that I can take that help me tolerate them on occasion, and this was an occasion!!).

I don’t know if you can read the sign on the shop front, but it’s “STAMP”! I have no clue what the shop sells, but I liked its name…even on vacation I can’t get away! It’s my reminder to get back to crafting! Come back to YamStamps.com to see some more crafty posts!
I don’t always tease the projects in my newsletters, but sometimes I can’t resist! Here’s one of the tutorials that will be in the June multi-project newsletter which will be sent out to subscribers on Tuesday, 4 June. If you’d like to get the step by step instructions and supply list, you’ll need to be subscribed before then! You can sign up at https://go.yamstampsmore.com/nl or pick any of the multitude of ways to sign up here on YamStamps.com (the box at the top right, the box on the front page, the chatbot or the dreaded pop up LOL what can I say, I wanted to be sure you didn’t miss out?!).
Anyway, this is one of the projects – featuring the Friends For Life Bundle. That’s all the info I’ll give you for now – because the tutorial will have it all! Each week will bring some new, exclusive ideas, information and inspiration to your inbox – these projects won’t be featured anywhere else in the YamStamps world (except for occasional teaser photos like this one). The first newsletter of the month is always the multi-project version, and the other weeks tend to focus on just one tutorial or idea.
So remember – for first crack at this project tutorial, sign up before June!!
For one day only, Tuesday 21 May, get free shipping on product orders of $100CAD (before taxes, after discounts)! It’s a great way to extend the long weekend celebration! Shop online at https://yamstamps.com/shop
MESSAGE ME! You can message me starting now….and I will place orders on Tuesday 21 May for you! I am doing a group order as well, so if you have a smaller order, I will combine it with other smaller orders so that everyone can qualify for the free shipping. I will contact you when the products arrive and you can swing by my place and pick them up! If you have an order that qualifies for free shipping on its own, I’ll enter it so that it gets shipped directly to your door.
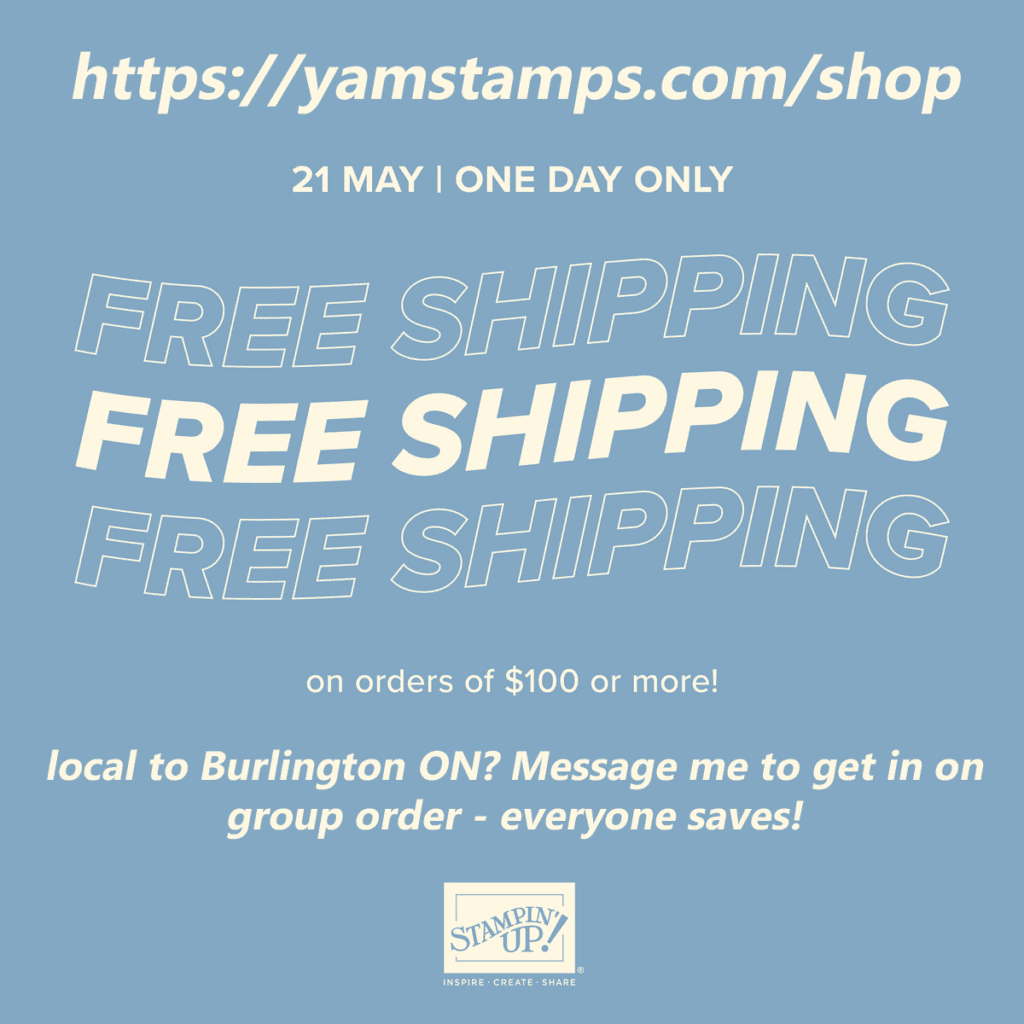
So if you have some down time this weekend, spend some time looking at the online store/catalogue and start making your list! Please contact me if you have any questions! Happy Shopping!
Each week, I send out crafty tutorials, tips and information to YamStamps Subscribers. If you need some crafting inspiration (and let’s face it, who couldn’t use a little inspiration??!!) be sure to be subscribed! You can sign up using the various methods here on YamStamps.com – the box on the homepage, the box at the top right of the blog page, via the fun chatbot or yes, that pop up. I just wanted to give you plenty of chances to get subscribed LOL!! If you sign up before Tuesday 4 June, this is one of the project tutorials you’ll receive…

When you first sign up for the newsletter, you’ll get access to an exclusive video tutorial. You’ll also receive the current month’s multi-project issue. At the beginning of each month, I sent out a newsletter with lots of information and multiple project tutorials, and then in the following weeks, it’s usually a single project tutorial with some updates. Each tutorial features a photo of the completed project, a supply list, and step by step instructions.
I know that I love being creative and seeing how things turn out, but there are times when I just want to make something pretty and not think too hard….so tutorials and step by step instructions are fantastic for that! They’re also a great way to get new design ideas and learn some new techniques.
So if you need some crafting inspiration, would like to get updates on crafting sales and general crafting tips, please be sure to sign up for the YamStamps Newsletter! Next issue goes out on Tuesday!
Of late, I’ve been doing primarily online classes and clubs, but last month I actually did an in person event! I was invited to do a fundraising/cardmaking event for Grace United Church here in Burlington ON. W4 (Women who Work and Worship) had an event to help replenish the card stash for their Care Network – who send out cards to those in their congregation in need of a pick me up. It’s a lovely concept, and I’ve done this in the past (pre-covid) so I agreed to dust off my wheelie bags and take the show on the road again!
This is one of the cards we made at the event – a one colour clean and simple card that’s easy for crafters of all experience!
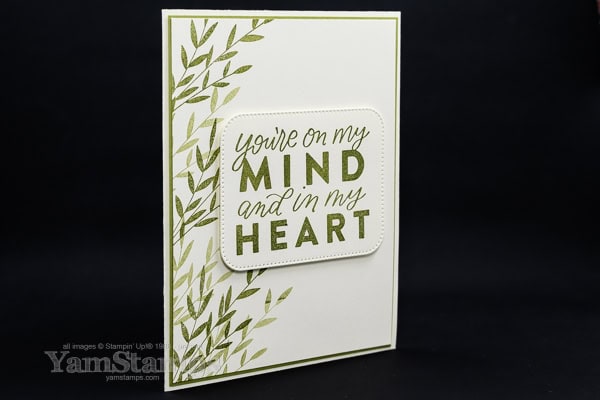
The stamp set I used for the main sentiment has now retired, but you could use something from Kindest Expression or any other sentiment set you might have on hand. I do think a larger sentiment looks good on this kind of card design – it doesn’t get lost on the card front. We used the Nested Essentials Dies for the sentiment piece. The leaves along the side of the card are from the Painted Lavender stamp set. The only colour used on this card is Old Olive, and the cardbase is Very Vanilla which I think goes with some of the colours that are a bit more yellow based in tone.
For a one colour clean and simple card, I like to add interest with angles and asymmetrical designs, so I added the leaves along the left side of the cardfront. For the leaves, I inked up the stamp in Old Olive ink and then stamped on an angle, going off the edge of the card, and re-stamped without re-inking the stamp to get variations in the colour of the card. The very bottom set of leaves has a bit of a colour variation within the image – because I stamped off the top edge of the cardstock initially, then re-stamped at the bottom, but because there was extra ink left on the top of the leaves, it’s a little darker on the re-stamped image – so you may want to keep this in mind when creating your own version. It’s not a fatal flaw, but it may be something that annoys you, so be aware! (Or hide it with some bling or with your sentiment!!).
When creating a less intricate design like this one colour clean and simple card, I like to also use dimension for a bit more interest – so the sentiment is popped up with some Stampin’ Dimensionals. I think a small border for backing cardstock on a clean and simple design is eye catching, though it can be a little trickier because your cutting (and pasting!) have to be a bit more accurate, but it only takes a few more seconds to make sure it’s lined up well.
This one colour clean and simple card is a perfect way to let someone know you’re thinking about them – and it won’t take you forever to create!
I’m working on new designs featuring some of the new 2024-2026 In Colors and of course, 2024-2025 Annual Catalogue new product, so be sure to come back to YamStamps.com to check out what I’ll be sharing!!


