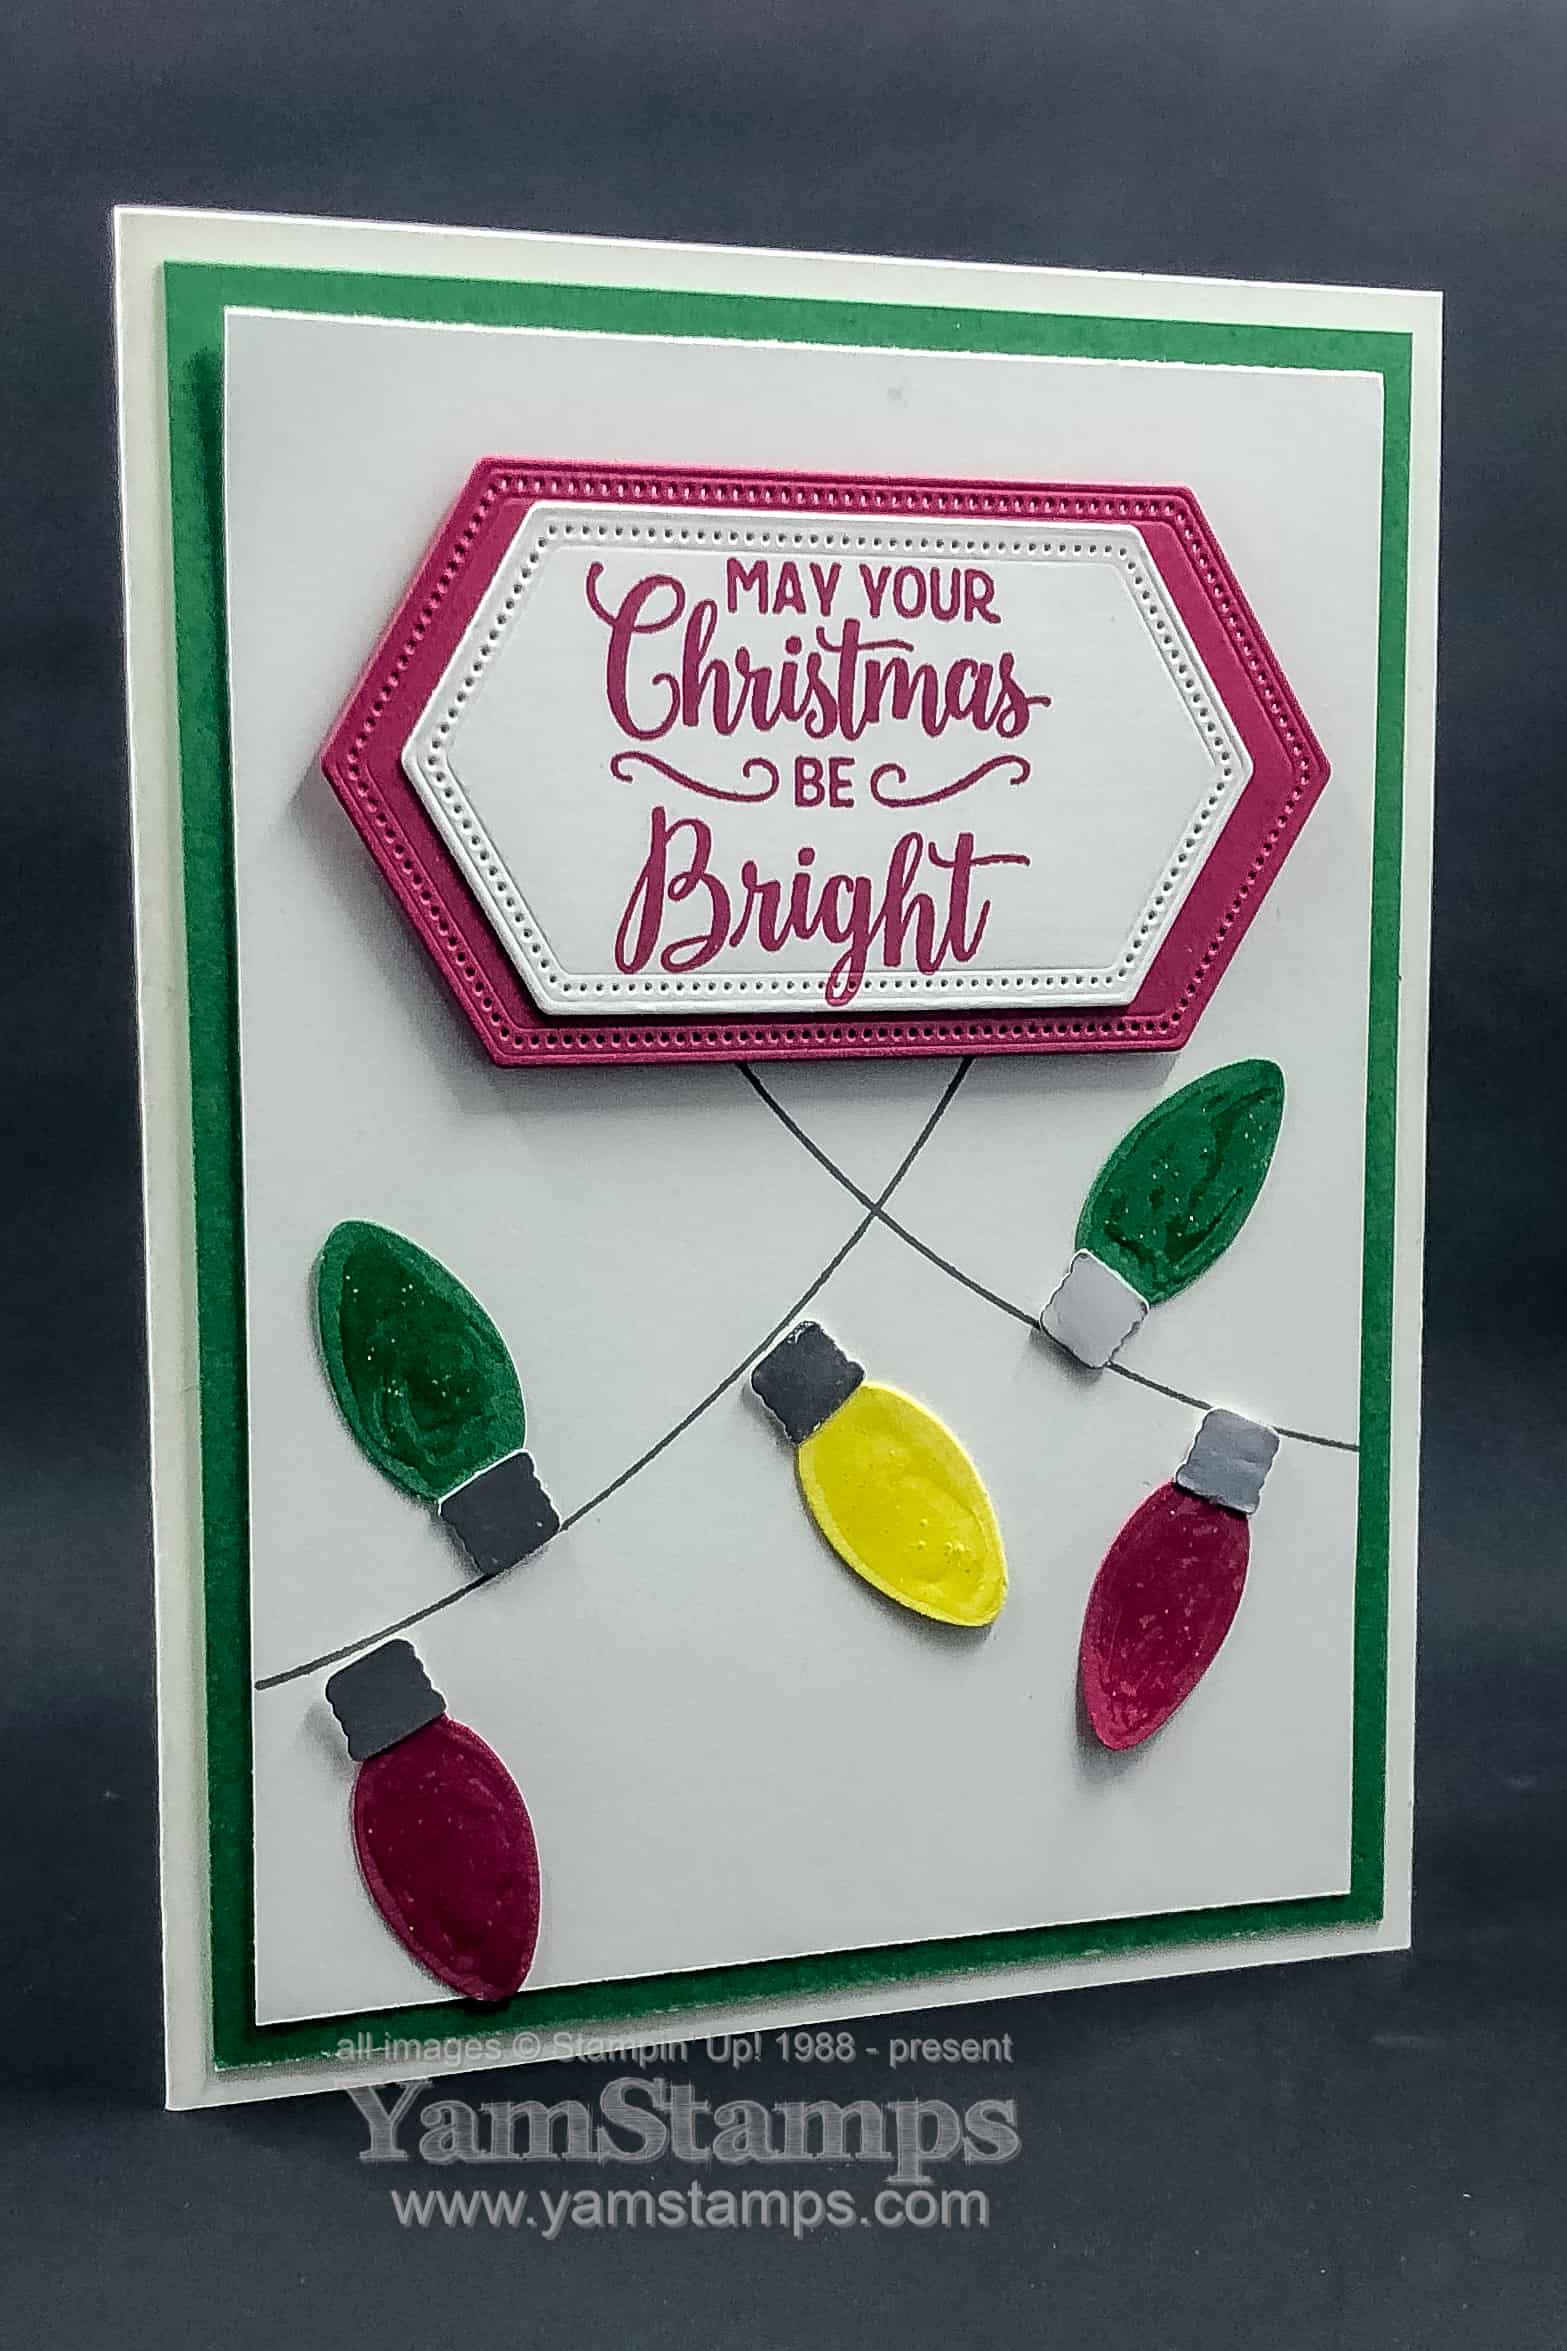
The bulbs were made glittery by an application of Shimmery Crystal Effects. It was a quick application, if you can’t tell LOL!! I figure the recipient should be distracted by the shiny objects and will overlook the not totally perfect application….and as I always say – if the person who receives a handmade card criticizes it, THEY DON’T DESERVE THAT CARD! (joking). (not really).
In the meantime, I’m already looking ahead to next year – as I’ve got my new January-June Mini Catalogues and Sale-a-Bration Catalogues on order! I’m anxiously awaiting their arrival. I’ve used the Stampin’ Up! mailing system to send a bunch out to those who have placed orders with me in the last year and will follow up with those on my list to be sure that they arrive safely in the next while!
If you are signed up for the YamStamps Paper Crafting Newsletters, you’ll be receiving the FINAL week of the Twelve Weeks of Christmas Projects next week. Can you believe it?? In the meantime, I will be *cough* finishing up my own holiday cards with the hope that they will get into the mail system by Valentine’s Day…..so while I go to work on that, please continue to enjoy this sparkly Christmas Lights Card…because it may be the only way I manage to spread a little paper crafting holiday joy at the rate I’m going!!
And when I say Winter Evergreen Card, I also mean that the card design is evergreen!
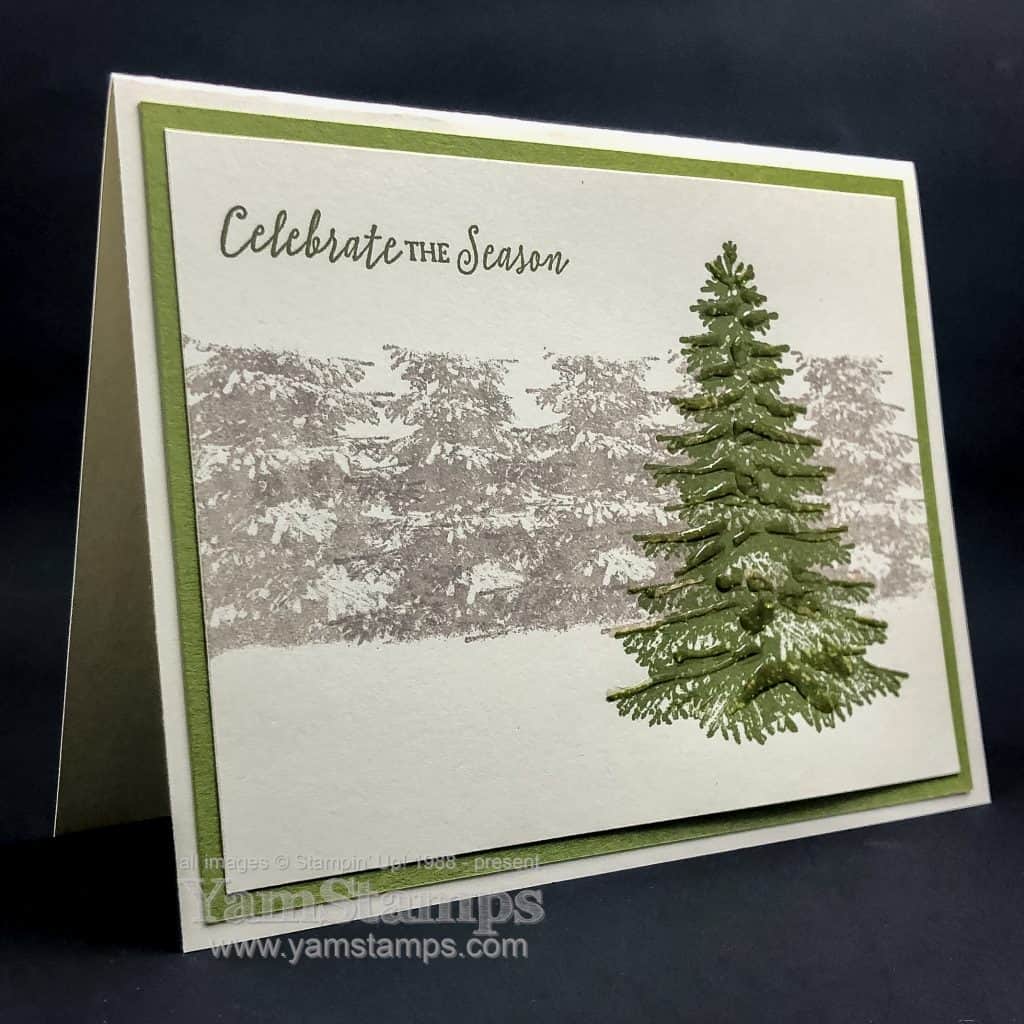
his card features the Winter Woods stamp set, one of my favourites. I love the tree images in it – and the evergreen tree is beautiful. For this card, I added a touch of the Shimmery Crystal Effects onto the foreground tree to make it look like it was covered in ice – much like many of the trees in our neighbourhood after the recent ice/sleet storm! Pretty to look at – especially from the warmth and safety inside the house! (I was fortunate not to lose power, unlike some of my poor friends).
And if you’re wondering about the evergreen comment, well, you can’t keep a good card design down….
haha! This was my papercrafting version of the ten year challenge that people were doing on social media. The idea was to post a pic of yourself from 2009 beside a pic of yourself in 2019. My selfie game is not so strong, but I have TONS of pictures of cards – so that’s what I did. And I’d like to say that I did the card design on purpose….but that would take a lot of planning on my part, so no. I did remember this design and liked it, but honestly didn’t remember that it had been 10 years since I used it LOL!! I did share this on the YamStamps Facebook Page and Instagram, so it will live on in social media infamy.
If you’d like to build up a stash of cards that you can copy 10 years from now, like this Winter Evergreen Card…be sure to register for an upcoming card making class! I’m actually done my scheduled classes for the month, but the first card class of 2020 will be on Wednesday, January 8th – see the YamStamps Events Page for more dates and information, and then contact me to sign up!
Given the weather outside, it seems appropriate to share this shimmery icicles card! The Burlington Santa Claus Parade had to be cancelled due to the freezing rain storm, so I spent time inside doing some photo editing and a bit of paper crafting. While I was sad about the cancellation, I was glad not to be outside in the awful weather!
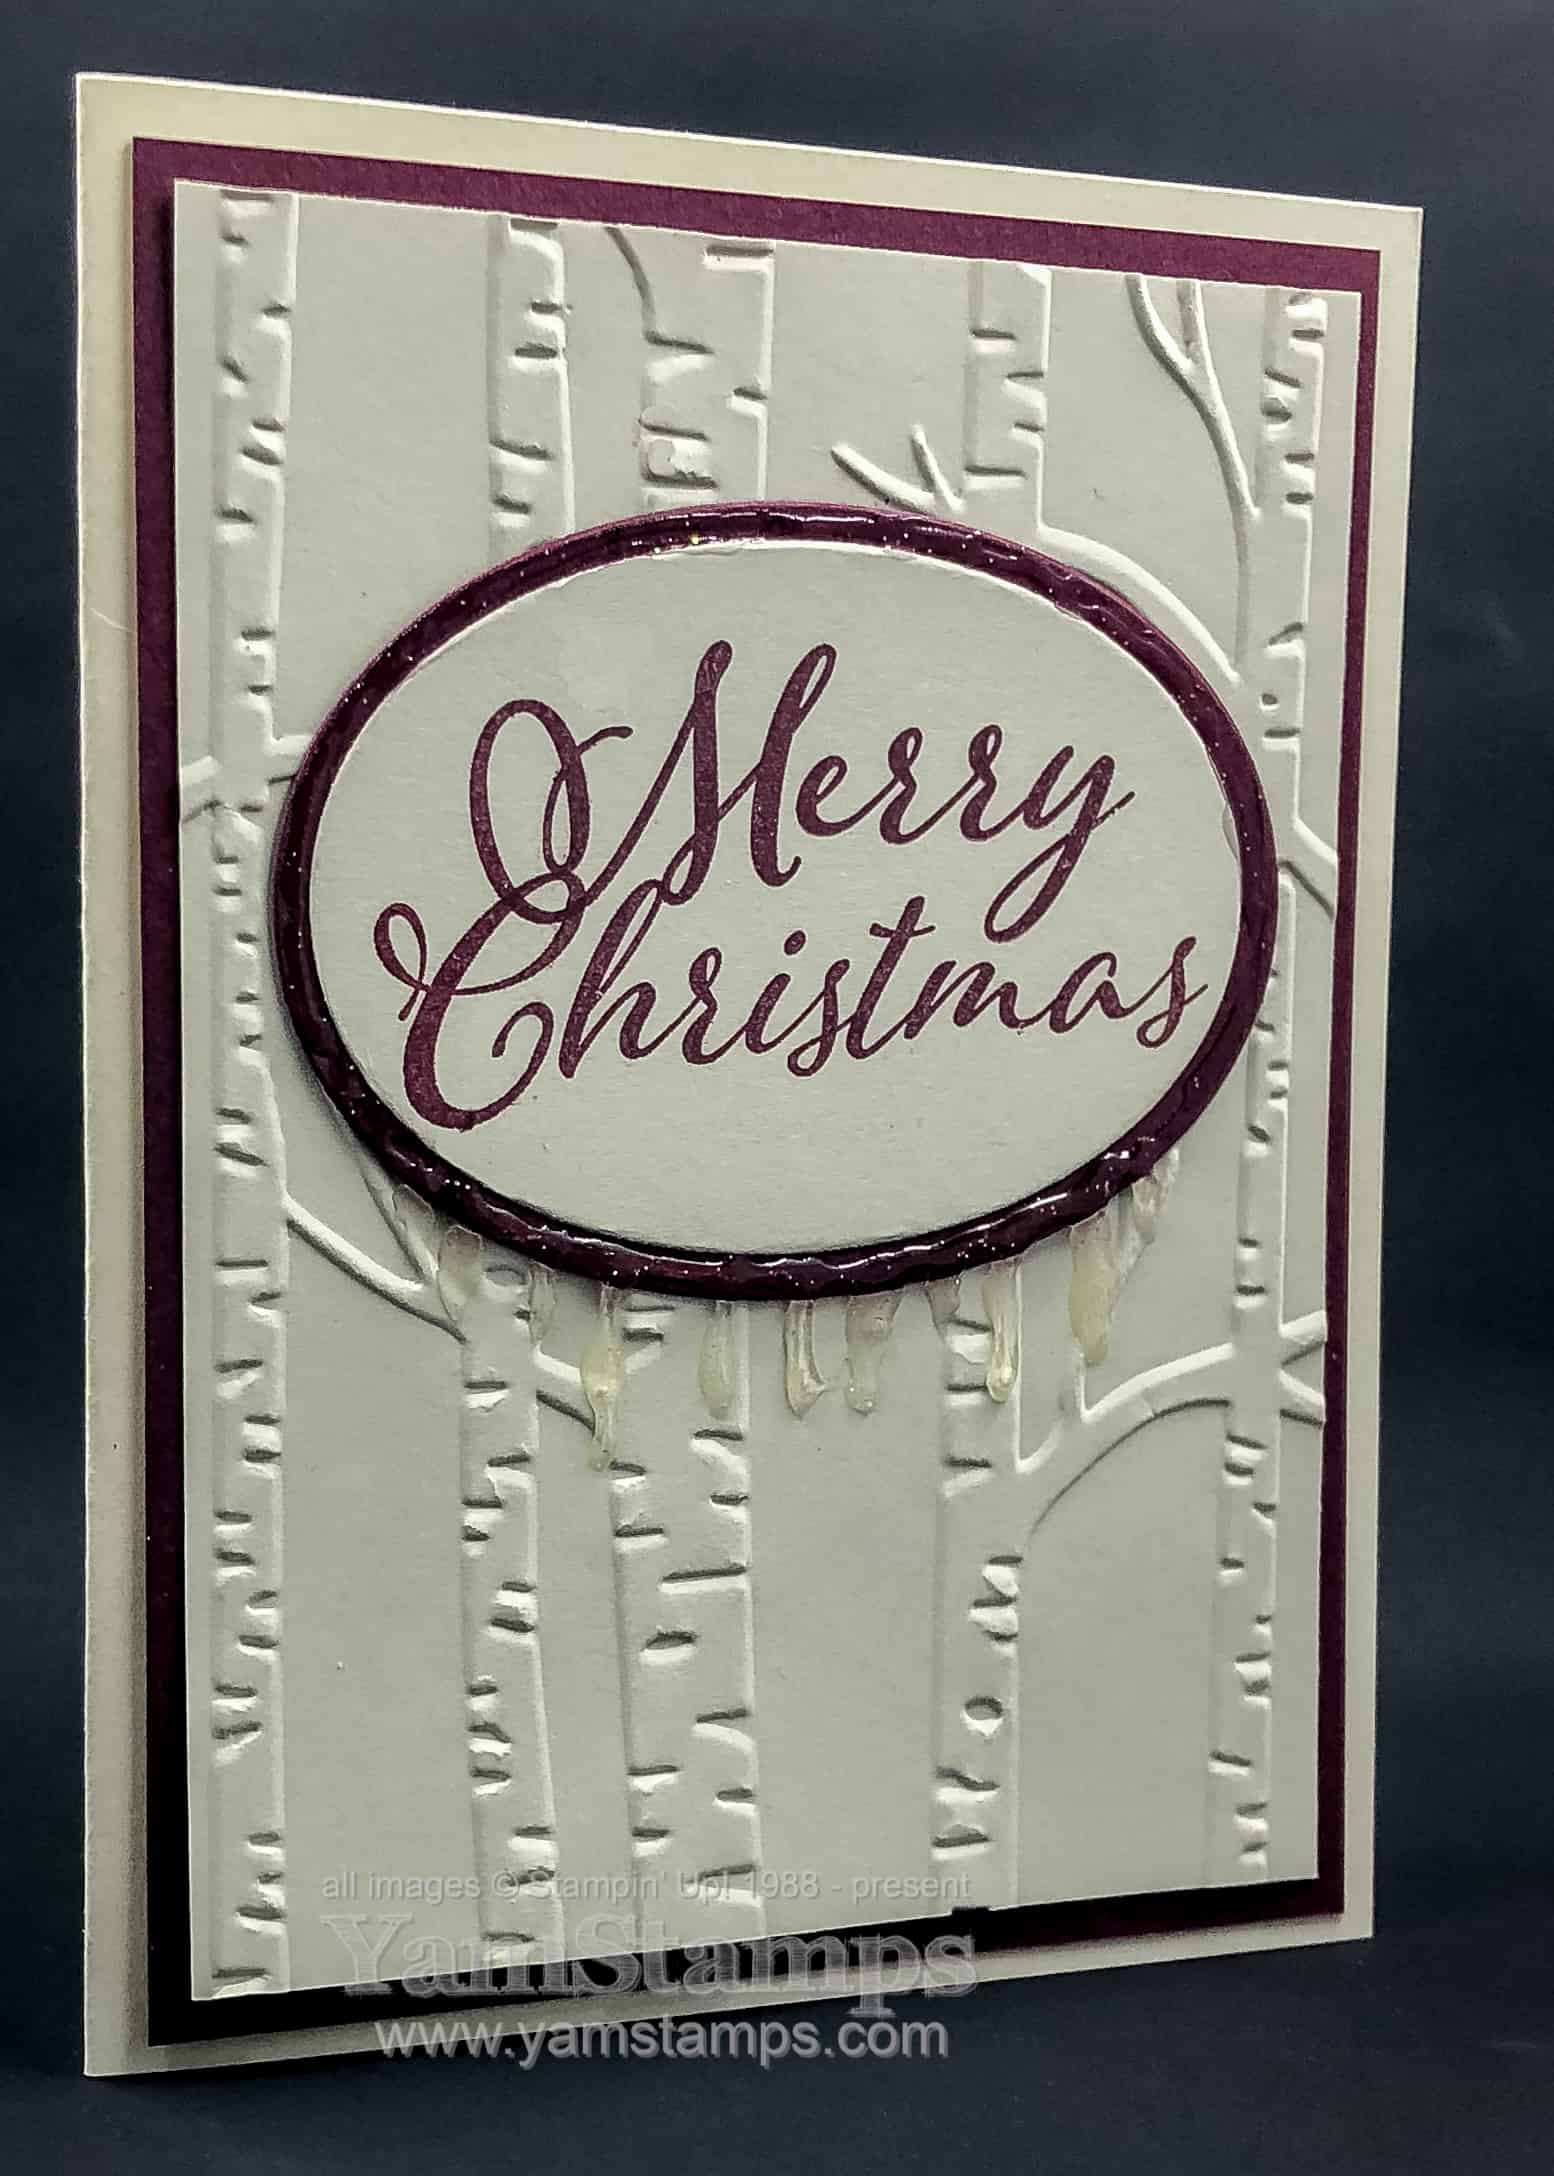
This card was from the November Christmas Card Class, where we used Shimmery Crystal Effects on each of the projects.
I still love that Woodland Embossing Folder! It’s great for adding texture and interest to the background of a card. The design of the card itself is quite clean and simple otherwise. Layering Ovals for the sentiment, which is from the Merry Christmas to All stamp set.
We added Shimmery Crystal Effects around the backing oval of Merry Merlot Cardstock, and then drew icicles from the bottom portion of the frame. Easy peasy! You do need to allow a fair bit of time for drying – otherwise the card will be glued to the inside of the envelope!! The Shimmery Crystal Effects is fairly thick and you can layer it up and get a 3D effect.
This would be a fun card to make for your friends – and you can easily mass produce it by using the Stamparatus for the sentiment, and then just “assembly line” the rest of the card production.
I can’t believe we’re in December. All of the Christmas Card Classes are done for the year, but there’s still the Monthly Card Classes and Stampers Club on the calendar. I’ll be adding some new classes for the new year, and don’t forget that the Holiday Punch Art Online Class is still open for enrollment until end of day December 2!
The shimmery icicles card is the preferred way to view ice for me right now – and from the inside of my warm home. I am debating on how safe it is for me to navigate the green bin and blue bin to the curb tonight….or if I wait until tomorrow when it may be better?! Stay safe everyone!
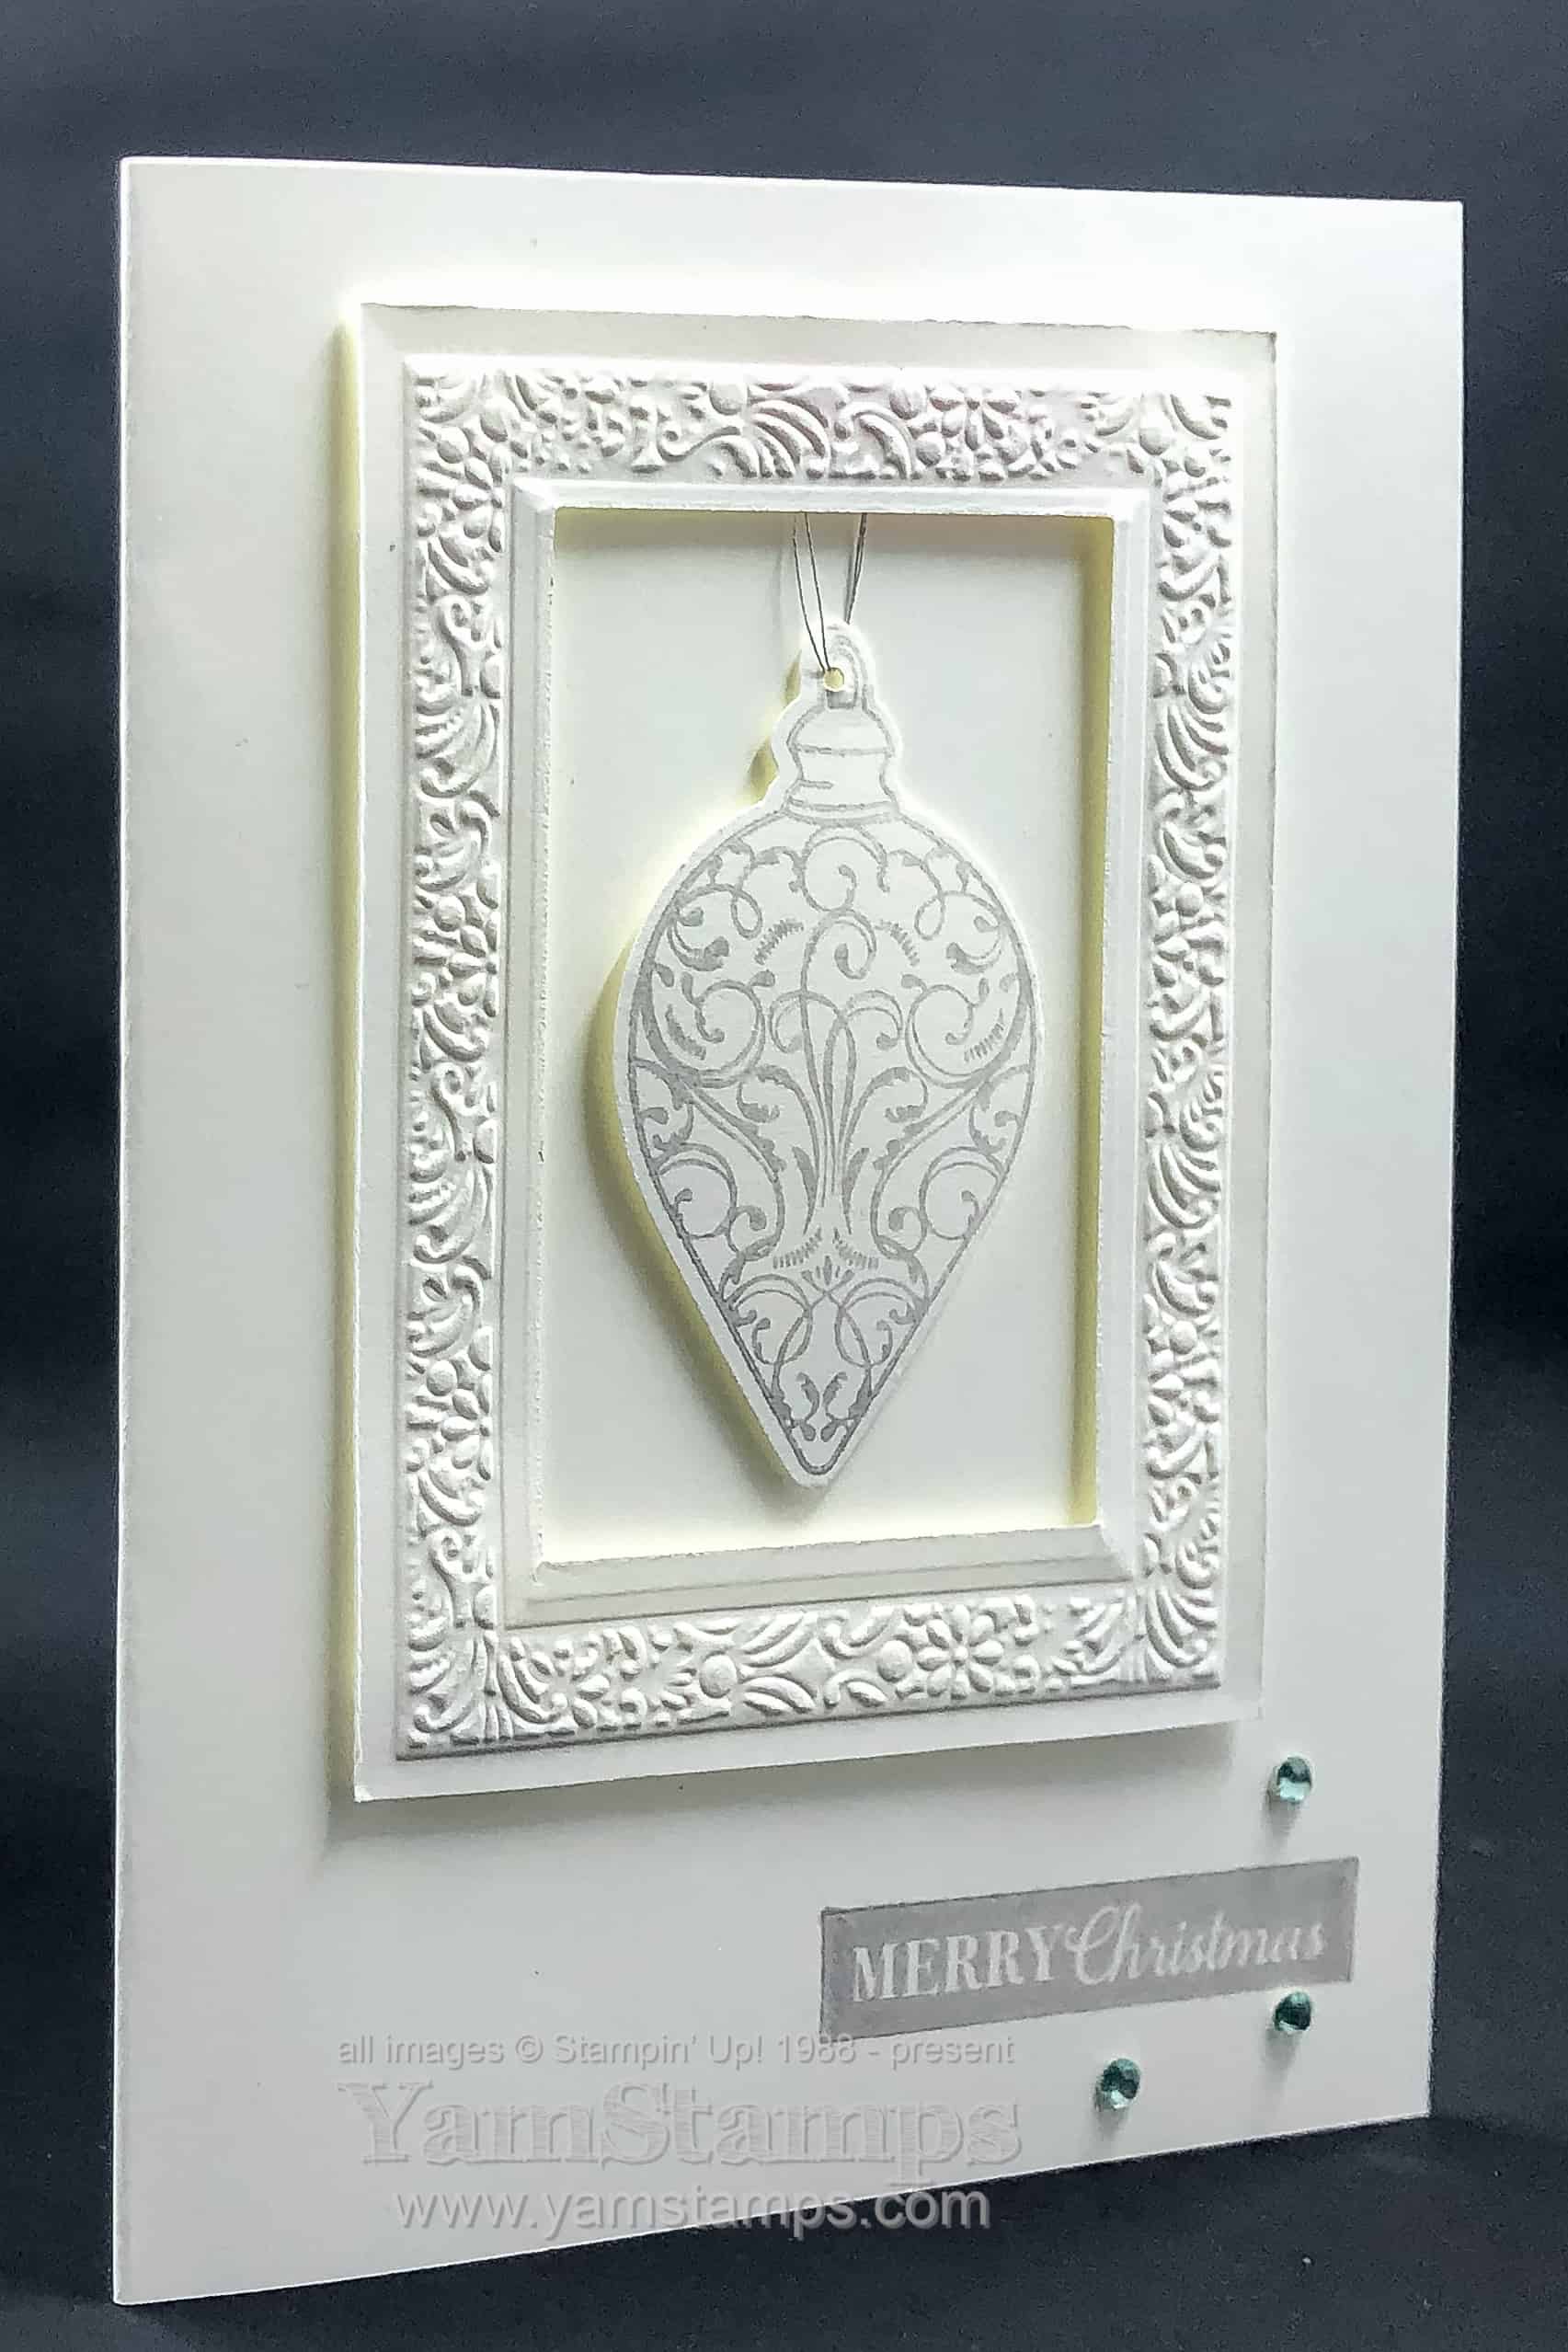
I love the monochromatic look – using just one colour on a project. It’s an easy way to make an impression, and depending on the colour you choose, it can be a dramatic one! Here’s a Monochromatic Christmas Card that we did during the October Christmas Card Class.
For this holiday card, I chose to use a metallic tone – in this case, silver. I used the Delicata Metallic Shimmery Silver Ink. Unfortunately, in the meantime, the Delicata ink pads have sold out! If you want to recreate this card/look – you could choose a grey tone – like Smoky Slate, or heat emboss using Silver Embossing Powder. I shared a card on the YamStamps Facebook Page using Copper Embossing Powder as a way to get a coppery metallic look.
The ornament is stamped and punched out with the Christmas Gleaming Bundle, and I added an extra hole punch to string some of the Silver Metallic Thread. The ornament is hung from the rectangular frame from the Heirloom Frames Dies and 3D Embossing Folders. When you use the frames, I found it more effective to cut first, then emboss – otherwise you tend to flatten the embossing if you do it the other way around. I did “cheat” after and trim a bit at the edges of my cardstock. A bit of subtle bling (is there such a thing?) from the Holiday Rhinestone Basic Jewels. Oh – I guess that technically makes it not a monochromatic card, since I used the light blue ones?! Oops. Well, I’m still calling it a Monochromatic Christmas Card in any case.
My LAST Christmas Card Classes (I can’t believe it) will be this upcoming Wednesday at 1pm or 7pm. Cost is $30 and includes a bottle of Shimmery Crystal Effects. I have had some late openings in the classes, so if you’d like to attend, please contact me ASAP to save a spot. Regular card classes continue on the first Wednesday of each month, and the December class will have one holiday card in the set. You can check out upcoming events on the YamStamps Events Page.
Also upcoming – I will have a Black Friday – Cyber Monday special on an older online class of mine. The Holiday Punch Art Online Class came out a few years ago, but I’ll be offering it at a special price! Check back on Friday for the link – and be on the YamStamps Mailing List to get notification in your inbox!
Hi! I’m recovering from tech trauma…I had website issues earlier this week, and then had some issues when trying to do a scheduled Facebook Live. It seems like all is well now (fingers crossed) so hoping it’s going to be back to “business as usual”.
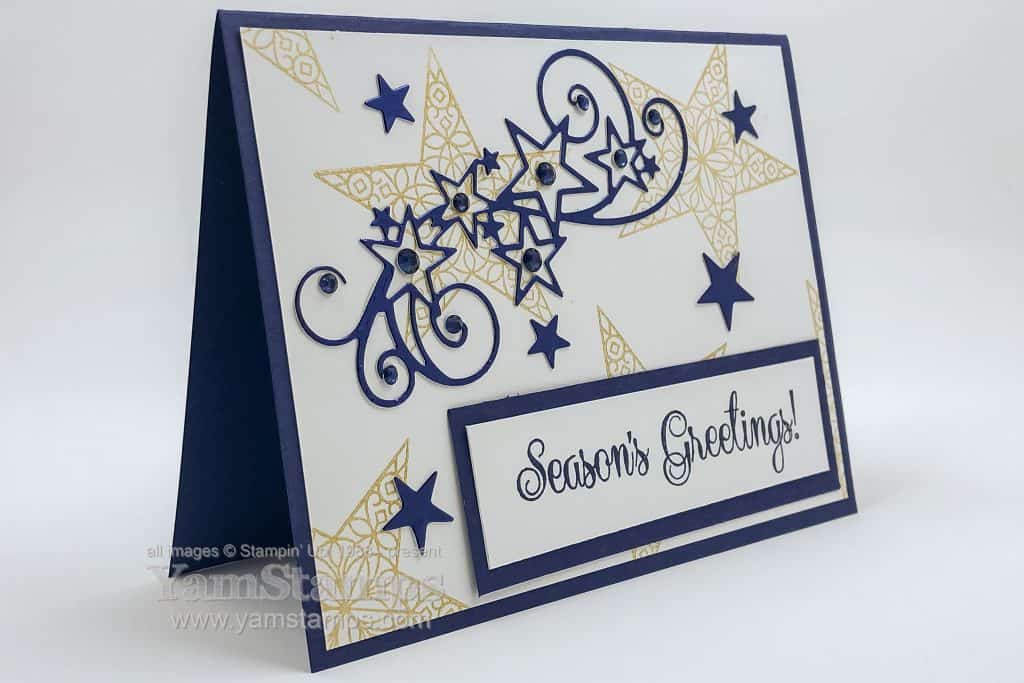
I bring you another starry card…but this time it’s GOLD and blue, rather than silver and blue, because I can only handle so many changes at one time.
The stars in the background are stamped with the Golden Giltz Delicata Metallic Ink Pad. Just a heads up – these ink pads will NOT be carrying over – so if you want the Gold or Silver ink pad, you’ll want to place an order ASAP before they are all gone – gold is already on low inventory notice and copper is already gone (I just saw that when I was linking things up here!).
November’s Christmas Card Class is scheduled for November 27th at 1pm or 7pm. Everyone will receive a bottle of Shimmery Crystal Effects – we’ll use a bit for our projects and then you’ll have the rest of the bottle to glitz up your other projects at home! It’s sure to be a glittery class. You can contact me to register by November 13th – cost is $30 and includes all supplies required (including adhesives). I wonder if I’ll be able to design yet anotherstarry card in blue for that one?!
Check out the YamStamps Events Page to see what else is being offered. I’ll be working on finalizing the start of my 2020 Events Calendar and will get that published soon. In the meantime, sign up for the YamStamps Mailing List by using the box at the top right of this page, or click here. You’ll get notifications of upcoming classes and events as well as the weekly paper crafting ideas and information, so you won’t miss out!
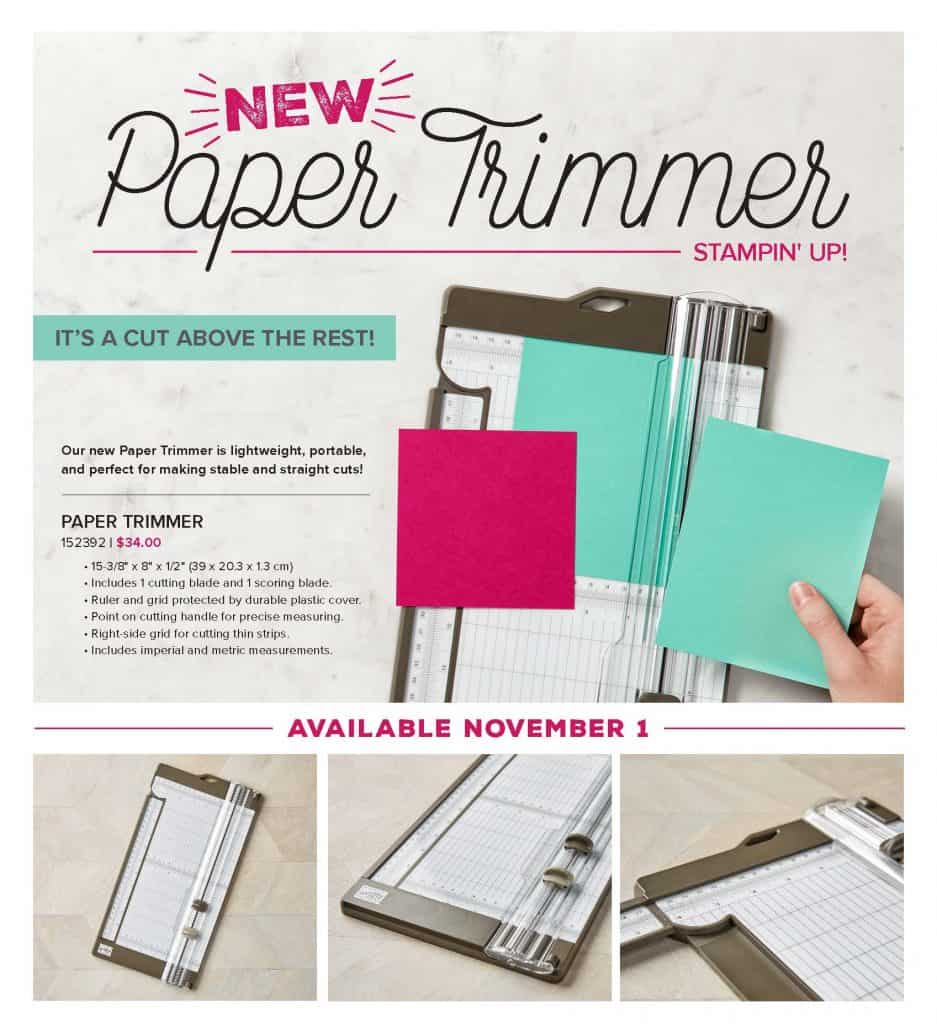
Stampin’ Up!’s new Paper Trimmer is available for customer orders today! It has a cutting blade and a scoring blade – and its size can accommodate 12″ x 12″ sheets. I’ve had mine for a few weeks now (demonstrators were able to order this in October) and I am quite liking it!
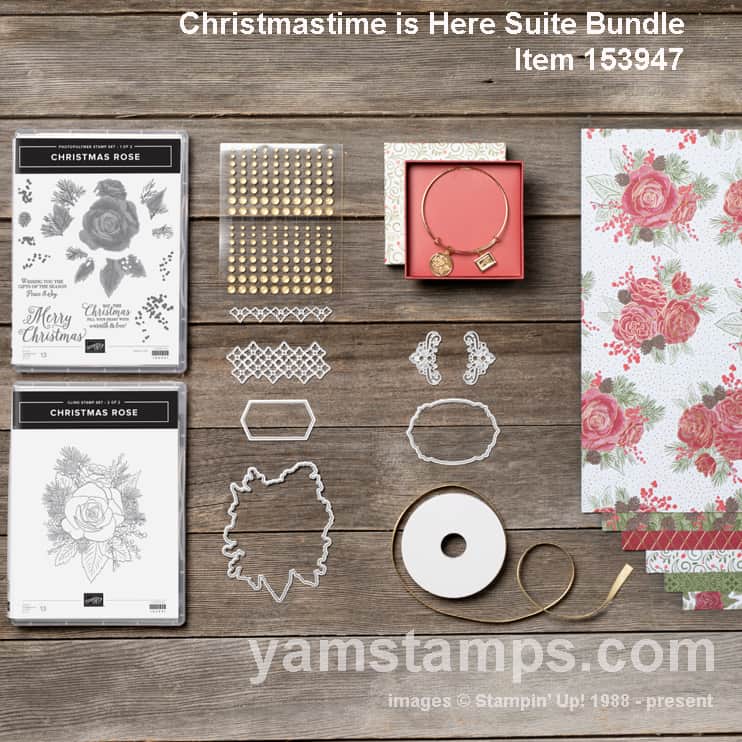
Next Up….while supplies last (no firm end date) – the Christmastime is Here suite! First of all – do you instantly start singing the song in your head?! I do….
If you guessed the bracelet, you’d be correct. Even though it’s gold tone and I’m more of a silver tone girl, I love that it coordinates with a lot of the bangle bracelets that I already have (it’s Alex & Ani style)
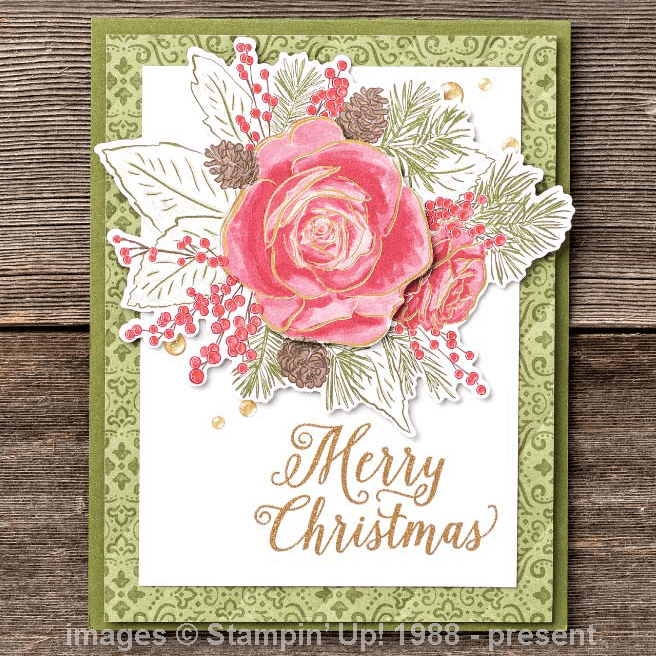
By the way – you may notice that the large rose die fits the Designer Series Paper – so if you don’t feel like doing two step stamping? Just die cut the paper that’s already done!
You can click on the links to see the specific items or use the shortcut yamstamps.com/shop to get to the YamStamps Online Stampin’ Up! Canada store. You can also message me if you need assistance placing an order or have any questions.