Jan 31, 2019 | Big Shot, cards, rubber stamping, Stampin' Up!
January 31 is Inspire Your Heart With Art Day! Who knew that there was an “official” day for this?! I think that technically this is any day when I get to craft, but it’s nice to mark it this way.
Here’s a card I created to commemorate Inspire Your Heart With Art Day. I was a little literal….so it has a heart on it…
I used the Meant to Be cling bundle – which has the Meant to Be stamp set and the Be Mine Stitched Framelits dies together at a discounted price. I love being able to tie elements together on a project, so I also used the Rectangle Stitched Framelits Dies to die cut the backing layers for the front of the card. Last but not least, I embossed the heart with the Tufted Dynamic Embossing Folder for extra texture and detail.
I hope that you are able to take a moment or two today to Inspire Your Heart With Art. Crafting is a great creative outlet for me. I also find inspiration in other art forms, especially music. I often listen to music while I craft – usually something I can sing along to. Are you a “craft in silence” or “craft with distractions” kind of person? For me it often depends on if I’m working to a deadline or not…and how close that deadline is looming!
If you are looking for a creative outlet, don’t forget the YamStamps Monthly Card Classes! Next class is this upcoming Wednesday, February 6th at 1pm or 7pm in Burlington, ON. Please contact me to register (or use the link on the YamStamps Events Page). If you aren’t able to make it on a class date, consider getting a group of friends together and booking a private class!
In the meantime, I’m looking to Theatre Night tonight – a group of friends and I have a subscription to attend shows in Toronto. It’s always fun to get together and enjoy a night out. I am definitely taking the “Inspire Your Heart With Art” theme seriously!
Jan 19, 2019 | Business Opportunity, cards, rubber stamping, Stampin' Up!
Love what you do and share what you love – that’s part of the sentiment (if not the exact wording) of Stampin’ Up!’s Statement of the Heart, which features on the card that I’m sending to my “Eh” Team members this month. The “Eh” Team is the name of the group of demonstrators who have signed up with me or one of my team members. I know a lot of demonstrators put a lot of though into what to call their group, and truthfully I think I must have put some thought into it (this was a while ago…) but in the end, I think this name does reflect me, and my team! We are Canadian, hence the “eh”, and we are a team, and I am a child of the 80s…plus it’s tongue in cheek, which is how I approach most of life I think! So despite the team name, the cards are not goofy! (well, at least not these ones).
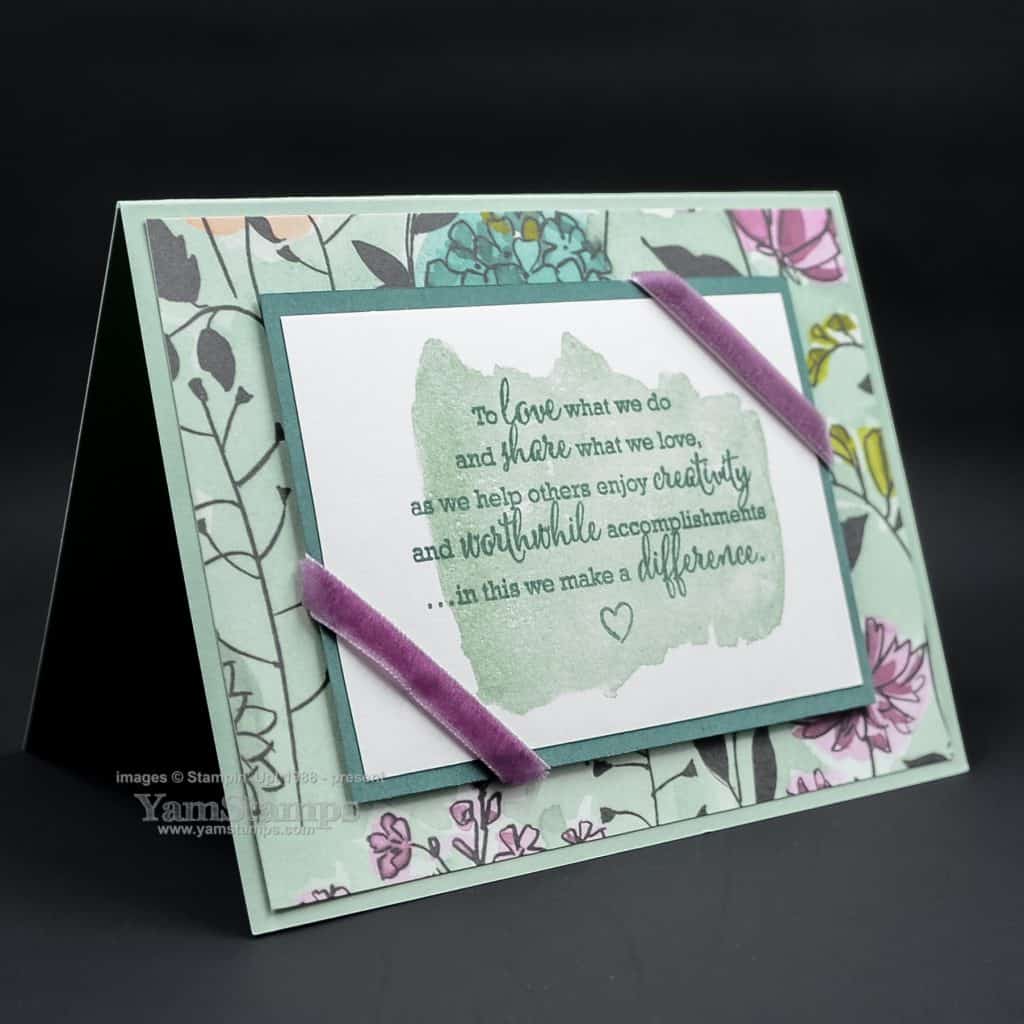
I used products from the Share What You Love suite from the Annual Catalogue. The Statement of the Heart stamp was available for a limited time a while ago, and I combined it with the background stamp from the Love What You Do stamp set and the Share What You Love Specialty Designer Series Paper. I used some of the Rich Razzleberry 1/4″ Velvet Ribbon on the corners to soften the hard lines of the design a little. The colour scheme is Mint Macaron and Tranquil Tide, taken from colours in the patterned paper.
The Stamparatus is great for creating a number of similar cards – the stamps stay on the plates, and then you change out the cardstock, ending up with images in the same position. If the inking was uneven, I was able to restamp and know it was in the exactly same spot.
If you’d like to become part of my “Eh” Team, you can get more information here: yamstamps.com/join or you can contact me directly with specific questions. My next Information Evening is scheduled for Thursday, February 7th at 7pm – you can RSVP for directions for this free event. In the meantime, I still have some cards to write and address!
Sep 25, 2018 | cards, rubber stamping, Stampin' Up!
If you’ve been following the YamStamps Blog, Facebook Page or Instagram – first of all, thank you, and next of all – you’ll know there’s nothing I like better (well, not too much) than an easy card design! I used this card design recently and liked it so much, I did a variation of it as well (keep reading to see both).
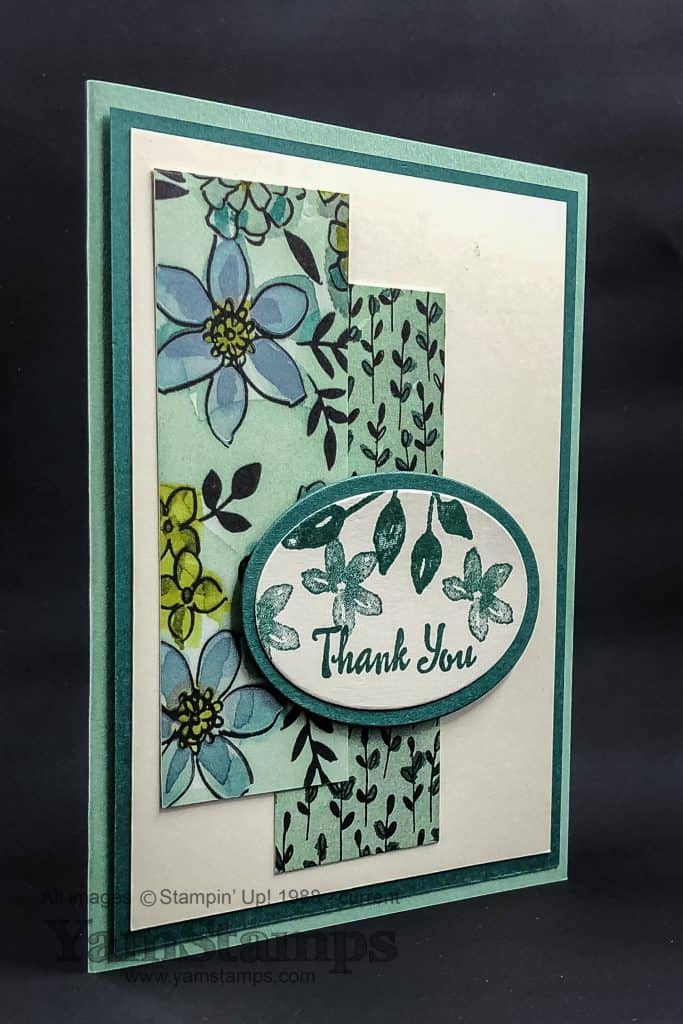
One of the things that makes this an easy card design is the use of Designer Series Paper. Using a patterned paper makes a card design interesting, without having to fuss much. In this case, I used two strips from the Share What You Love Specialty Designer Series Paper. I happen to have a fair bit of this paper around, in part because I love it and in part because it’s the paper used for the Scrapbook in a Box Class! In this case, you could use scraps of it to stretch your investment even further. Using two patterns from the same package of paper means they will coordinate in colours too. I used two designs that featured a fair bit of Tranquil Tide and Mint Macaron. I used images from the Petal Palette stamp set, which is available in red rubber clear mount or red rubber wood mount. I cut the oval of Tranquil Tide out of the back layer of cardstock – one of my favourite frugal crafting tricks! If you wanted to step up this design a bit more, you could always use an embossing folder to add texture to the Very Vanilla cardstock in the background.
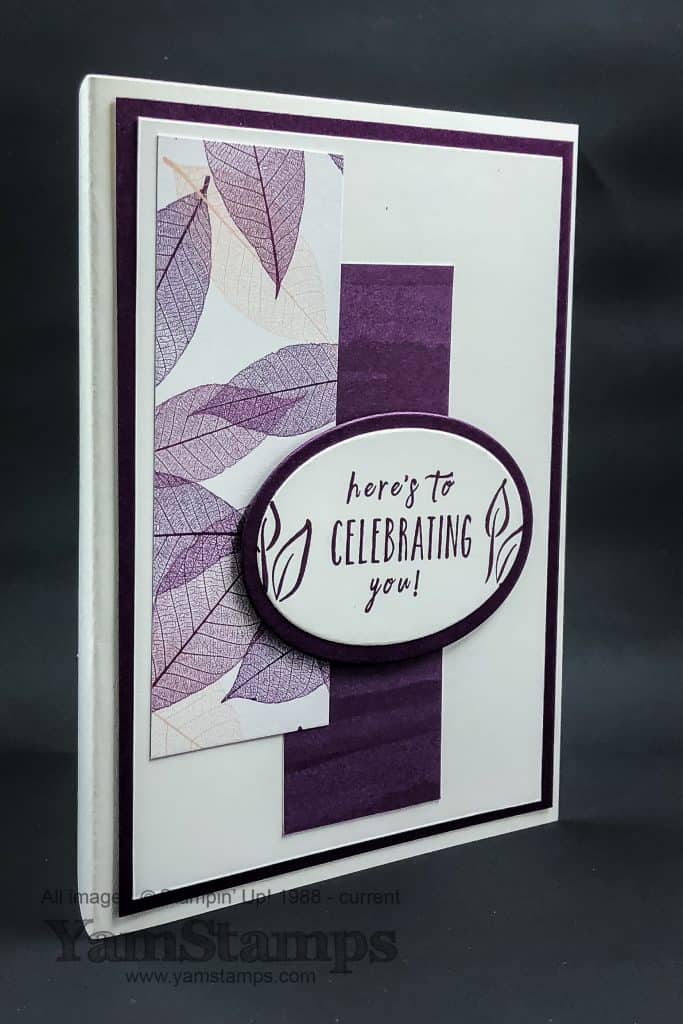
So when you like a design, and as a bonus, it’s an easy card design, the only appropriate thing to do is make a variation!! In this case, I used the Nature’s Poem Designer Series Paper, and just one main colour – Rich Razzleberry. The images are from the Perennial Birthday stamp set – available in red rubber clear mount or red rubber wood mount. As you can see, the possibilities are endless – just change out the Designer Series Paper used, pick out the coordinating colour and add a sentiment of your choice!
I continue to work on getting the cards out and IN THE MAIL! So when I come upon an easy card design, I will use it as much as possible – but because you can change out elements, it means that it’s not always “the same card”. A bunch of cards just hit the mail (fingers crossed they arrive at their destinations soon…amid rumours of pending Canada Post strike action…) so I’m feeling almost accomplished! If you are looking for ways to build your card stash – I can help!! There are spots in the Monthly Card Class – October’s date is Wednesday, October 3 at 1pm or 7pm. You can contact me to register, or register online through the YamStamps Events page. If you’re not local to Burlington, consider one of my online classes – ideas and inspiration with lifetime access! Check out the list at YamStampsMore. As always if you have any questions, please feel free to contact me.
Jul 12, 2018 | cards, rubber stamping, specials, Stampin' Up!
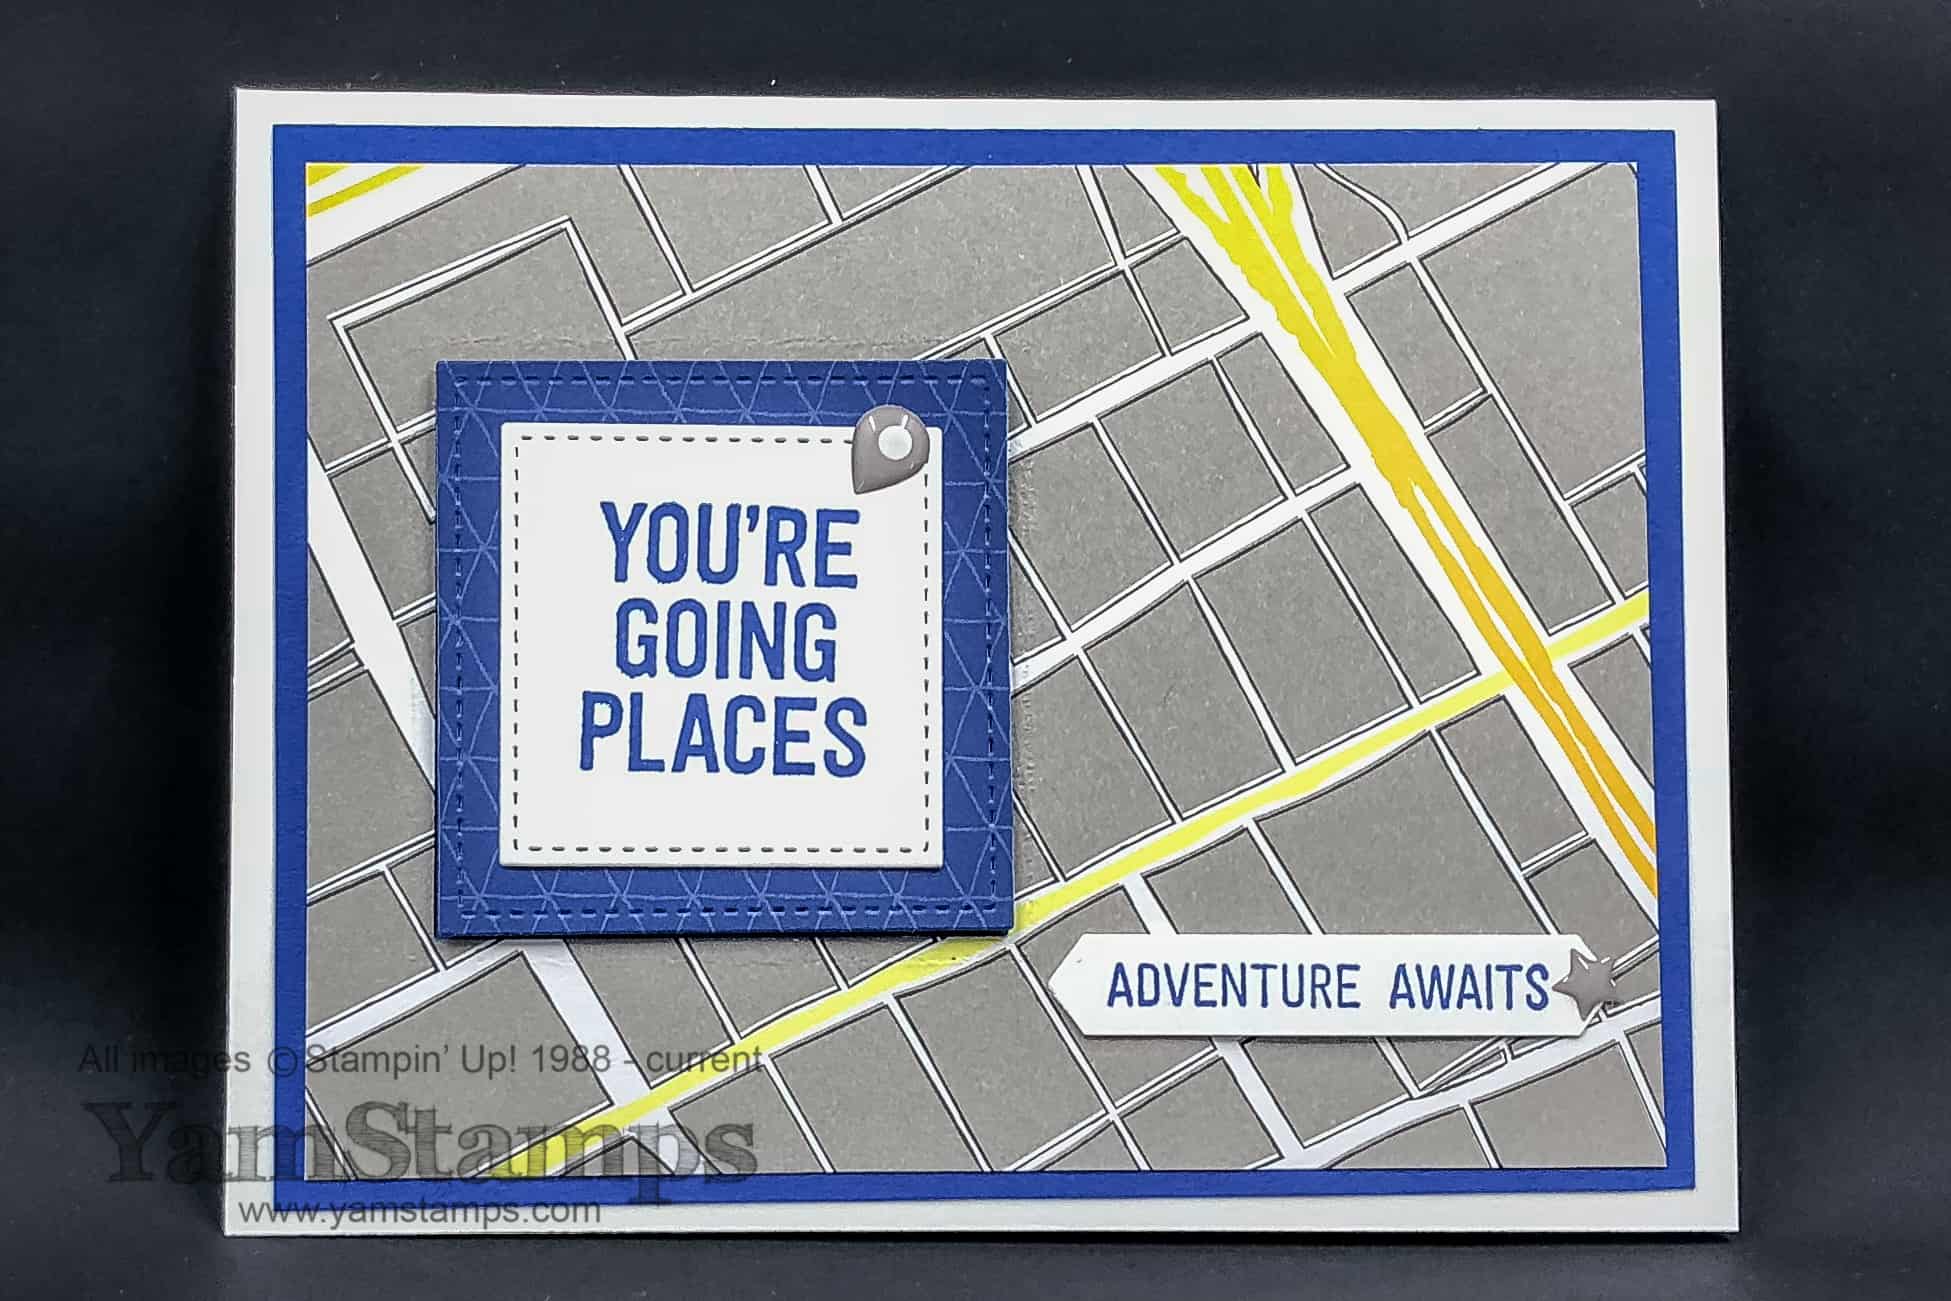
I love to travel, so Stampin’ Up! stamp sets and papers that are travel themed always catch my eye. This Going Places card features a few travel themed products! The stamp set En Route is available in red rubber wood mount or clear mount options, and the Best Route Designer Series Paper – which is part of the Buy 3 Get 1 Free Special running this month! The adhesive travel-themed embellishments are from the Best Route Enamel Shapes – available in colours that coordinate with the paper – because who needs to think too hard?!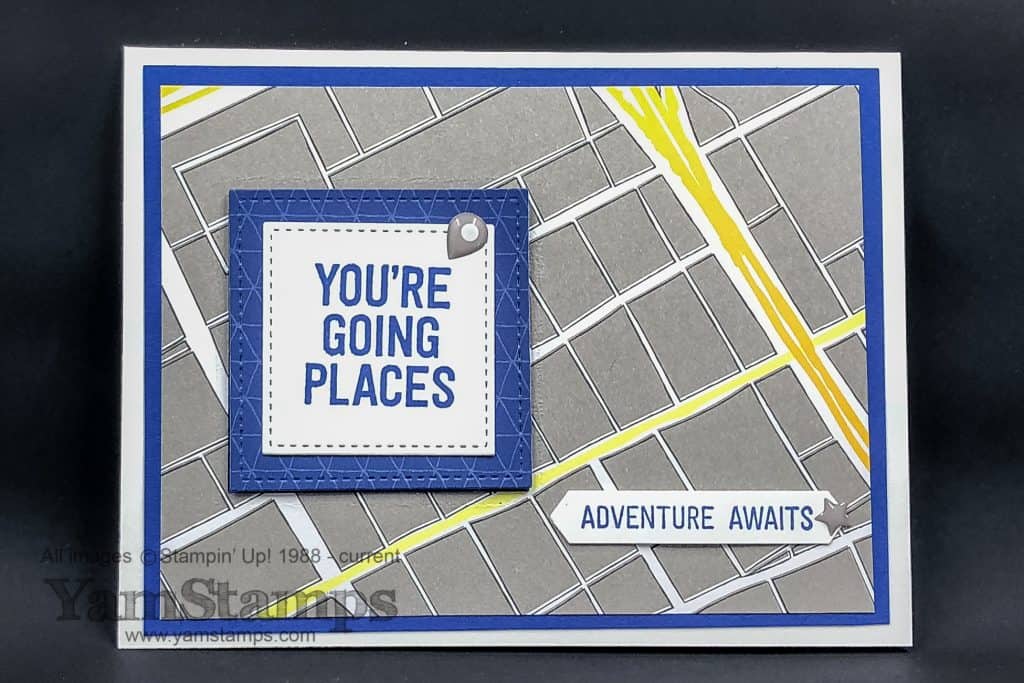
The sentiments are cut with the Stitched Shape Framelits and the Classic Label Punch. The Stitched Shape square of Designer Series Paper is actually cut from the paper used on the card – it’s the flip side of that design! I adhered that square into the hole where it was cut from because I like to be thrifty with my paper – even if it is buy 3 get 1 free…I love the coordination of the Blueberry Bushel cardstock with the Designer Series Paper and the ink. Makes my crafting easy! This Going Places card would be great for a graduate, a traveller, or someone setting off on a new adventure in life.
This was one of the designs I submitted for the Canadian Demonstrator swap that I participated in last month. As part of my goal to blog more regularly, I’ll be sharing a swap card a week here on the YamStamps site. (This card is a “bonus” LOL). If you’re interested in getting more card ideas and samples, be sure to be signed up for my newsletters! Each week I send out paper crafting information and inspiration – including a big projects newsletter at the beginning of each month. Click here to sign up or use the box at the top right of the blog to register.
One last note – I’ve set up a Christmas Card Class for July 25th – consider coming out to get a start on those holiday cards! Contact me to register or check out the YamStamps Events page for all the upcoming dates. Hope to see you soon!
Jun 18, 2018 | Big Shot, cards, rubber stamping, Stampin' Up!
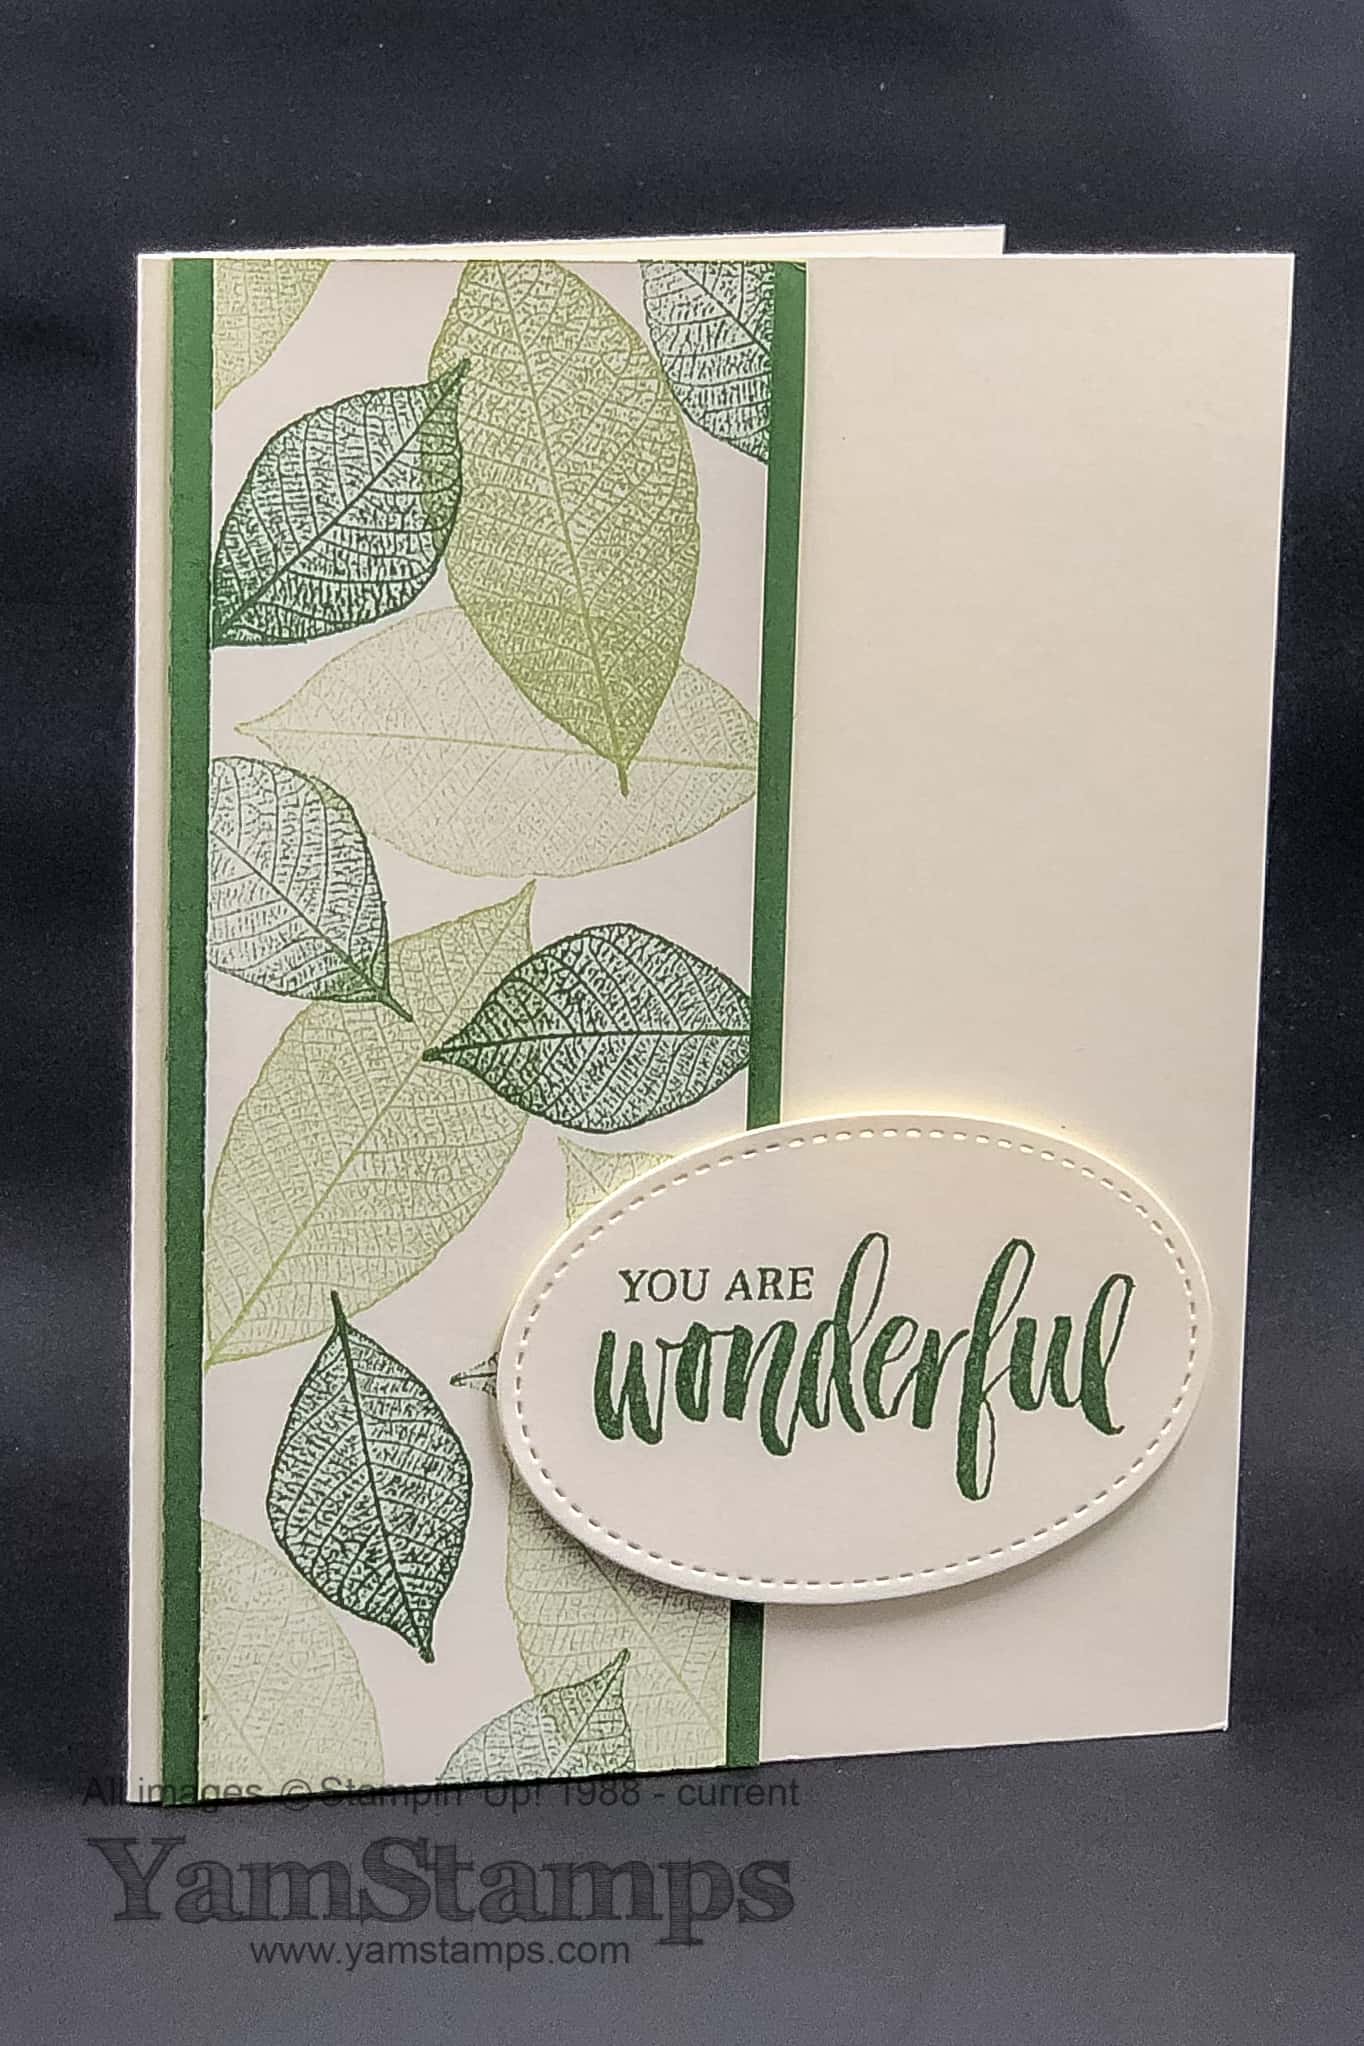
One of my past online classes was a Monochromatic Class – where you used one colour in your project. Sounds a little boring, but I promise, it isn’t! Plus it makes crafting a little easier, so what’s wrong with that?! So along those lines, I present a single colour leaf card.
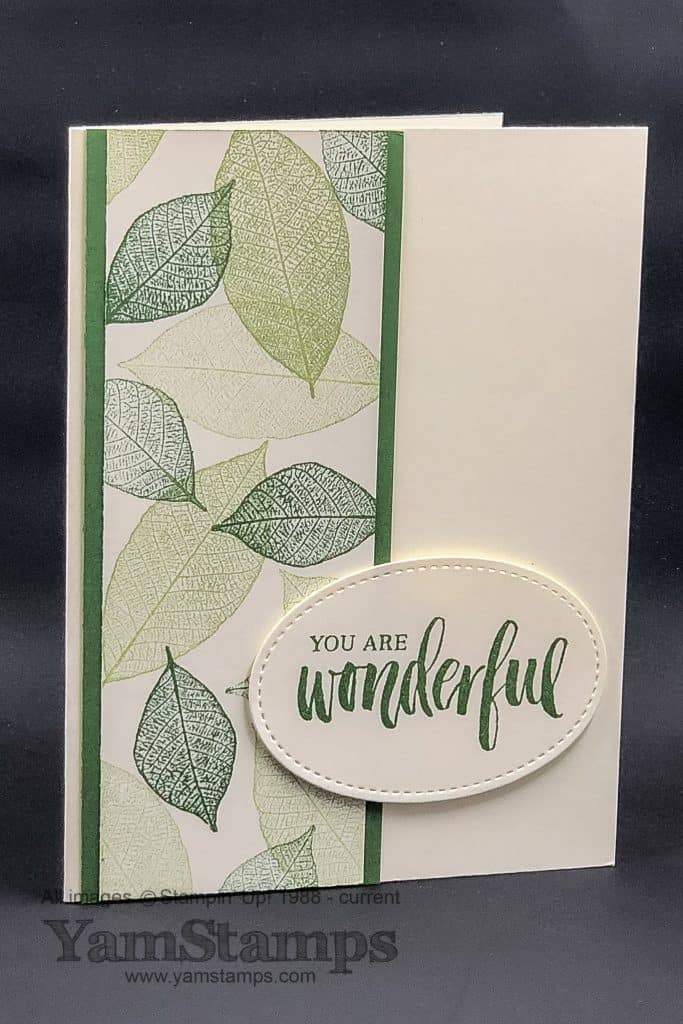
Notice that single colour doesn’t mean you can’t play around with shades of a particular colour! For this single colour leaf card, the base colour is green. In the Stampin’ Up! world, the colours are Garden Green and Pear Pizzazz. You can get further shades by using first, second or third generation images. First generation images mean ink the stamp, then stamp onto the paper. Second generation is inking the stamp, stamping off / stamping onto scrap paper, THEN onto the paper. So guess what third generation is…. Yes, 10 points for you if you said inking the stamp, stamping off twice on scrap paper THEN onto the project paper. Now, I do find that this technique works better with red rubber stamps (in the Stampin’ Up! world those would be the wood mount or clear mount stamps), rather than the photopolymer stamps, which don’t seem to hold onto the ink quite as well, at least when I’ve tried. You can still do this technique, but you want to stamp off with a light hand so there’s still enough ink left on the stamp surface.
The Rooted in Nature stamp set is available in Wood Mount or Clear Mount versions, and also can be bundled with the coordinating Nature’s Roots Framelits Dies.(Wood Mount Bundle / Clear Mount Bundle) For this card, though, I chose to use the Stitched Shapes Framelits to cut out my sentiment. I love this sentiment – perfect for special occasions or just because. In my case, it may end up being a graduation card…(I know I said that about my last card, but I need options…LOL).
If you are interested in trying out an online class, right now I have two current offerings – there’s the Clever Cards class – interactive card designs, and the new Scrapbook in a Box class which has an option to purchase the Class By Mail as well – so pre-cut cardstock/Designer Series Paper is sent to you! Check them out at YamStampsMore – or message me/leave a question below for more information. There’s always the in person options for classes as well – check out the YamStamps Events Page for details. Hope to see you in class soon – whether in person or online!
Oct 30, 2017 | Events, rubber stamping, Stampin' Up!
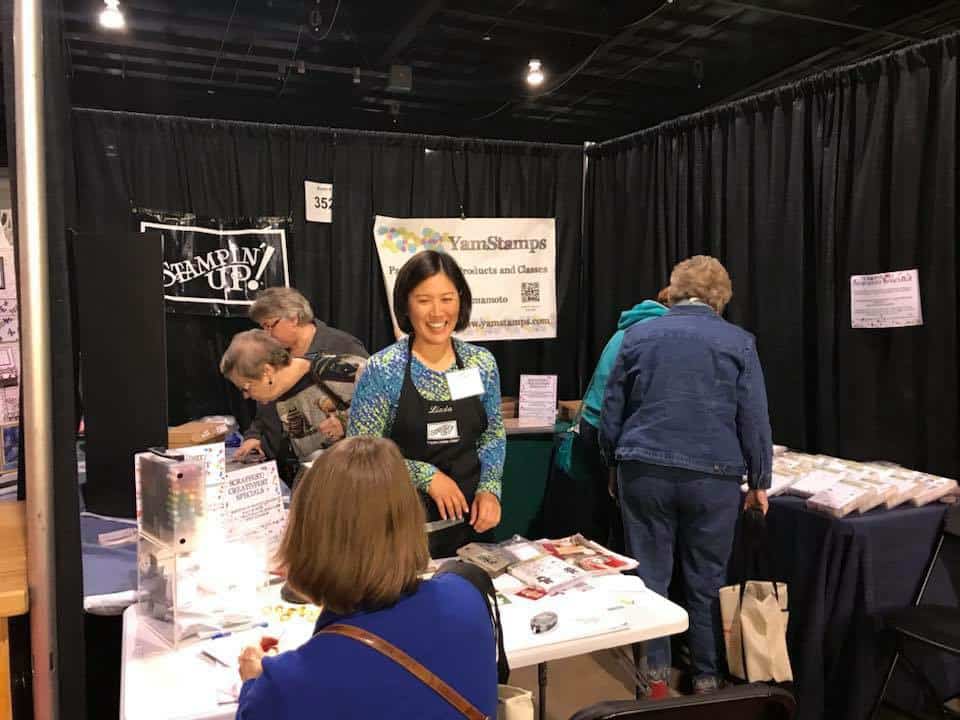
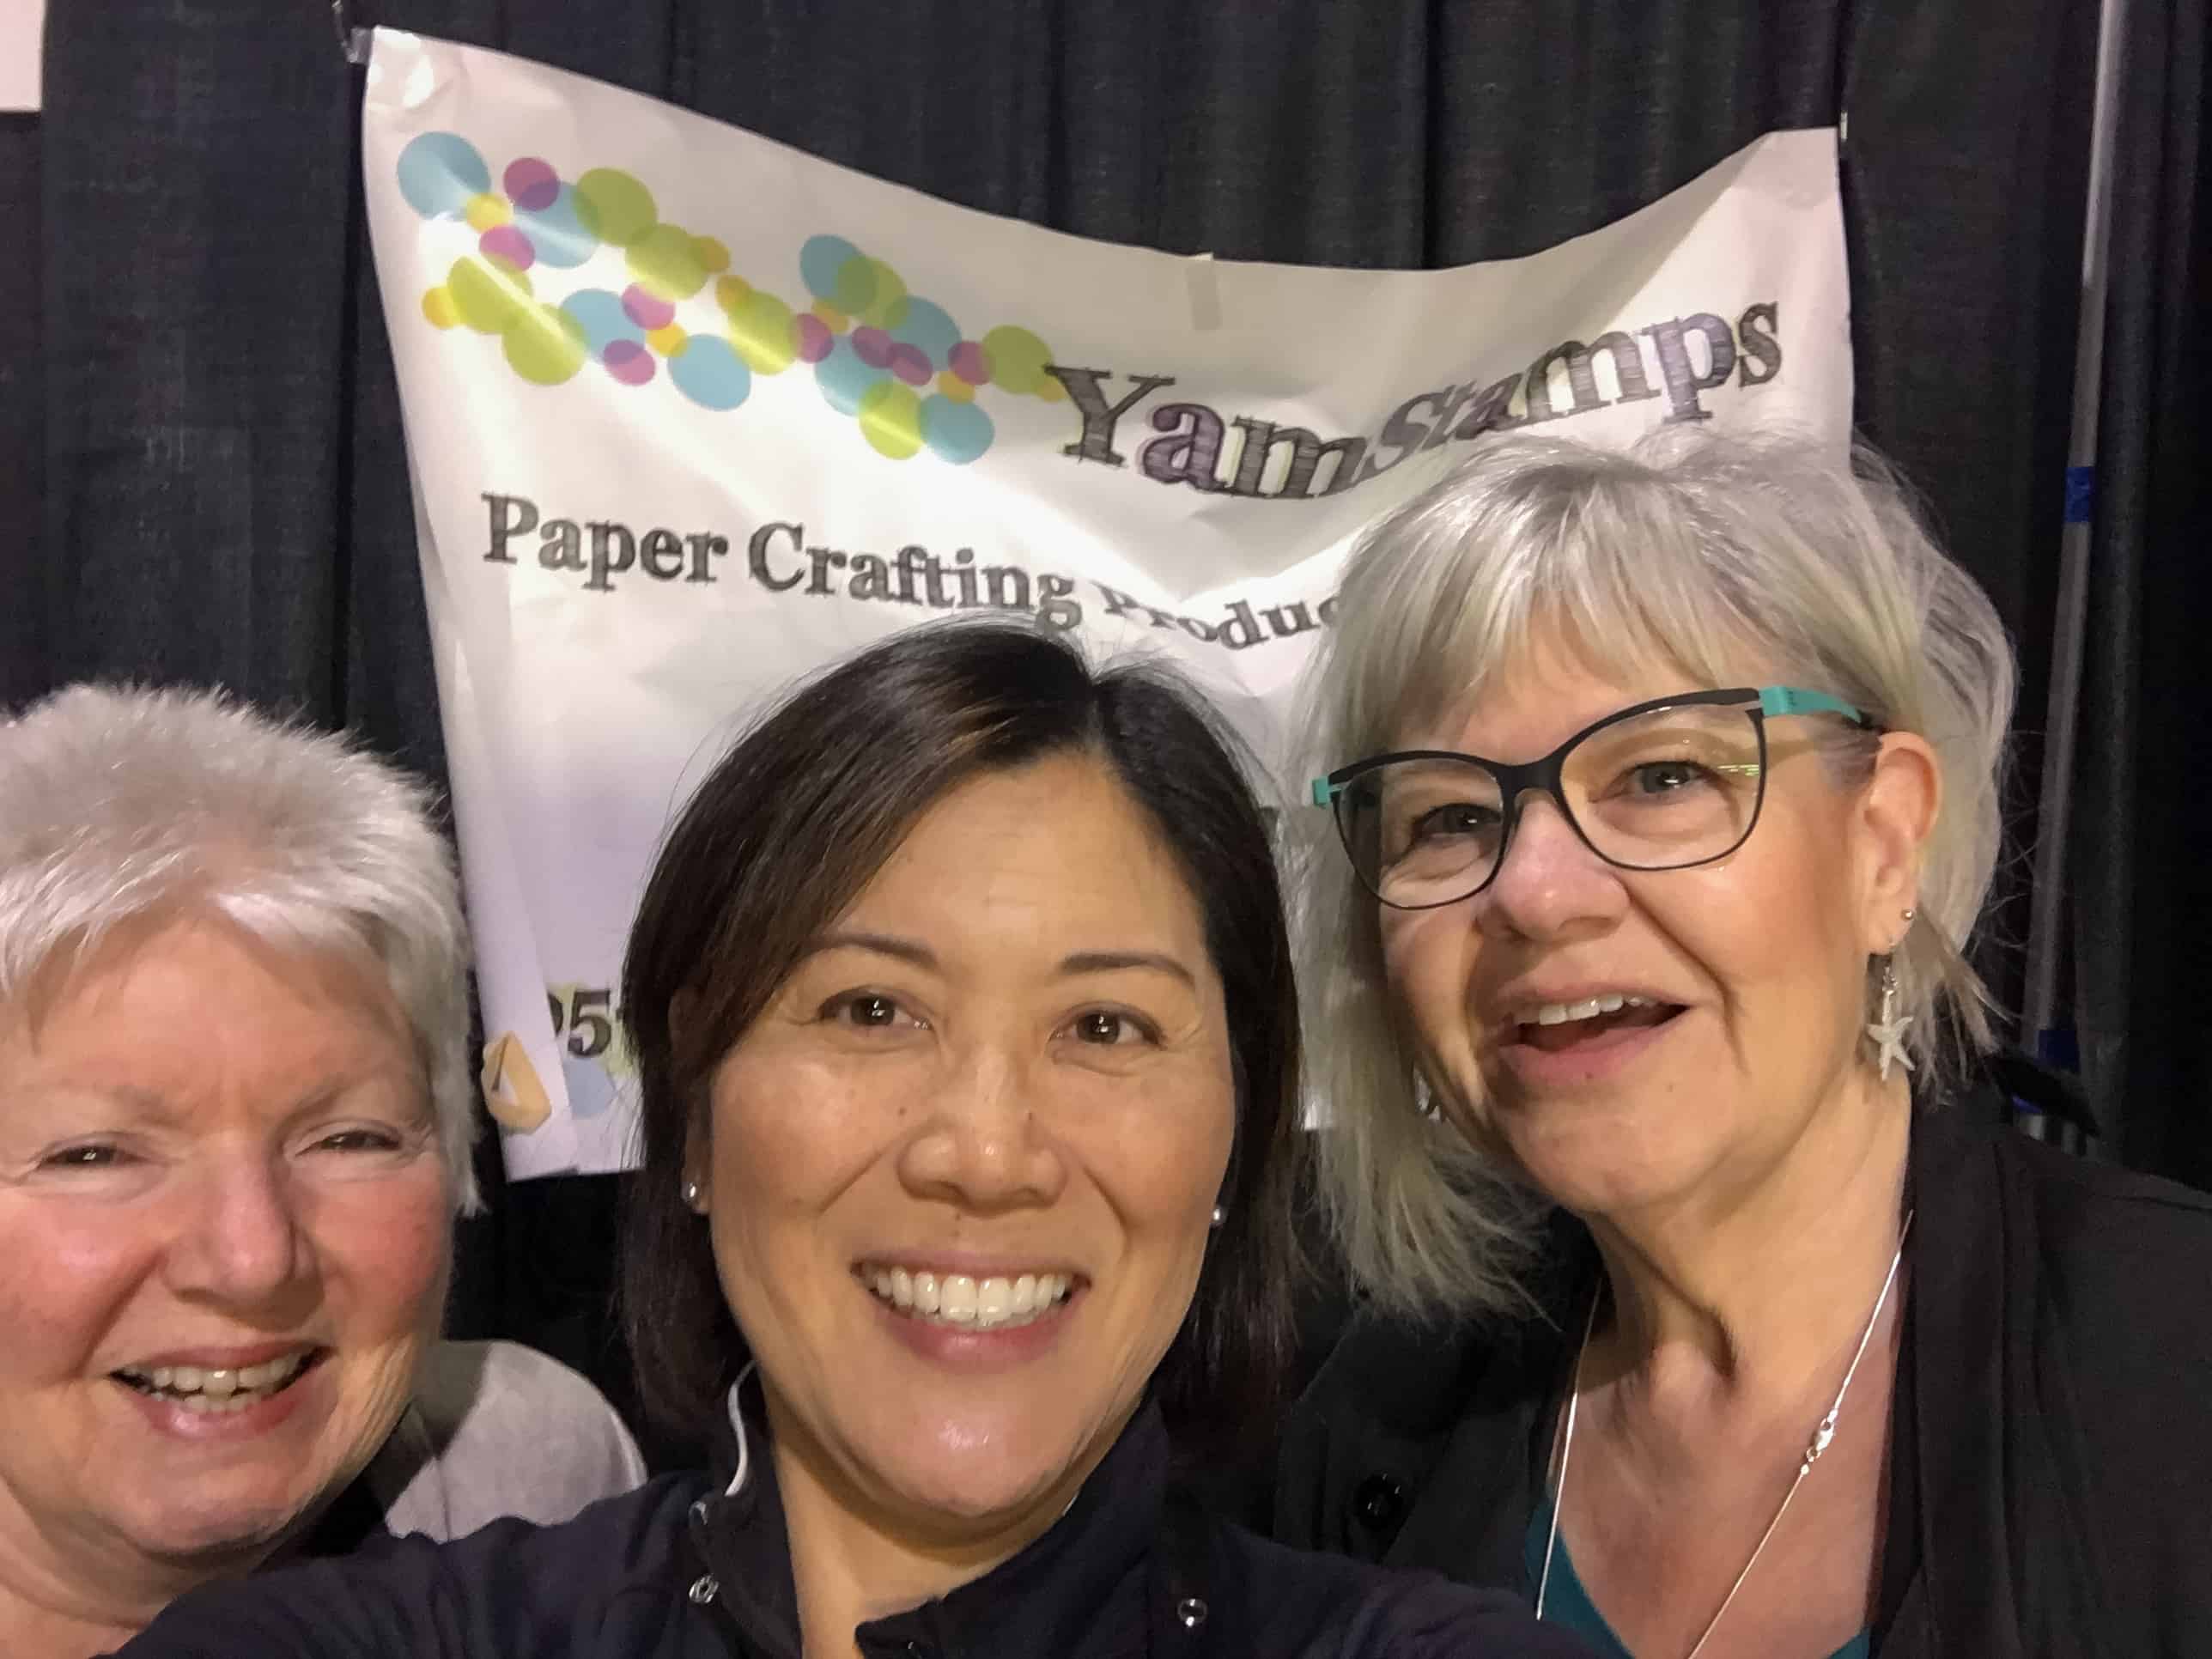
I survived! Scrapfest / CreativFest 2017 in Mississauga was a lot of fun, but it was tiring for sure. Here I am, and it must have been early enough so I wasn’t yet drooping, but late enough so that I was awake (and smiling)…LOL. I had super helpers – Arlene was there for all three days, Anne made it for two (something about trick or treating with the grandchildren on the Saturday, I mean, really…..LOL), and my mother filled in on the final day too. Thank you to everyone who stopped by, filled out a ballot, chatted, shopped and visited. Thanks to my helpers, and thanks to Lisa of Scrapfest.
Congrats to Jackie H who won the free draw and had her choice of either a Big Shot Die Cutting Machine or a full set of Stampin’ Write Markers, and to Sandre, who won the same choice in the draw that was exclusively for those who purchased a starter kit by Sunday.
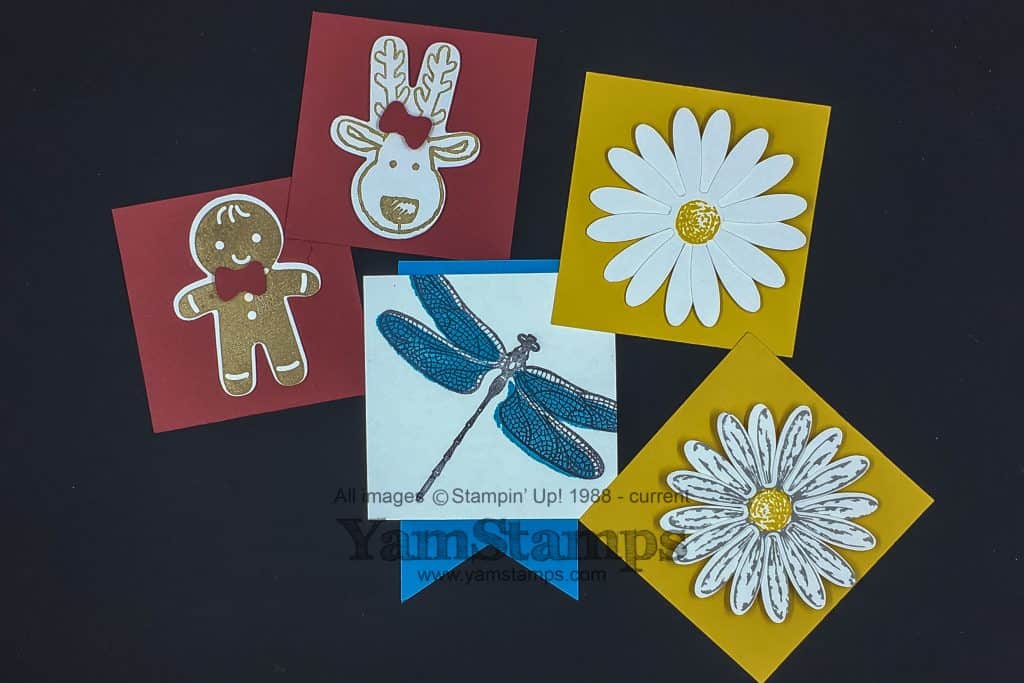
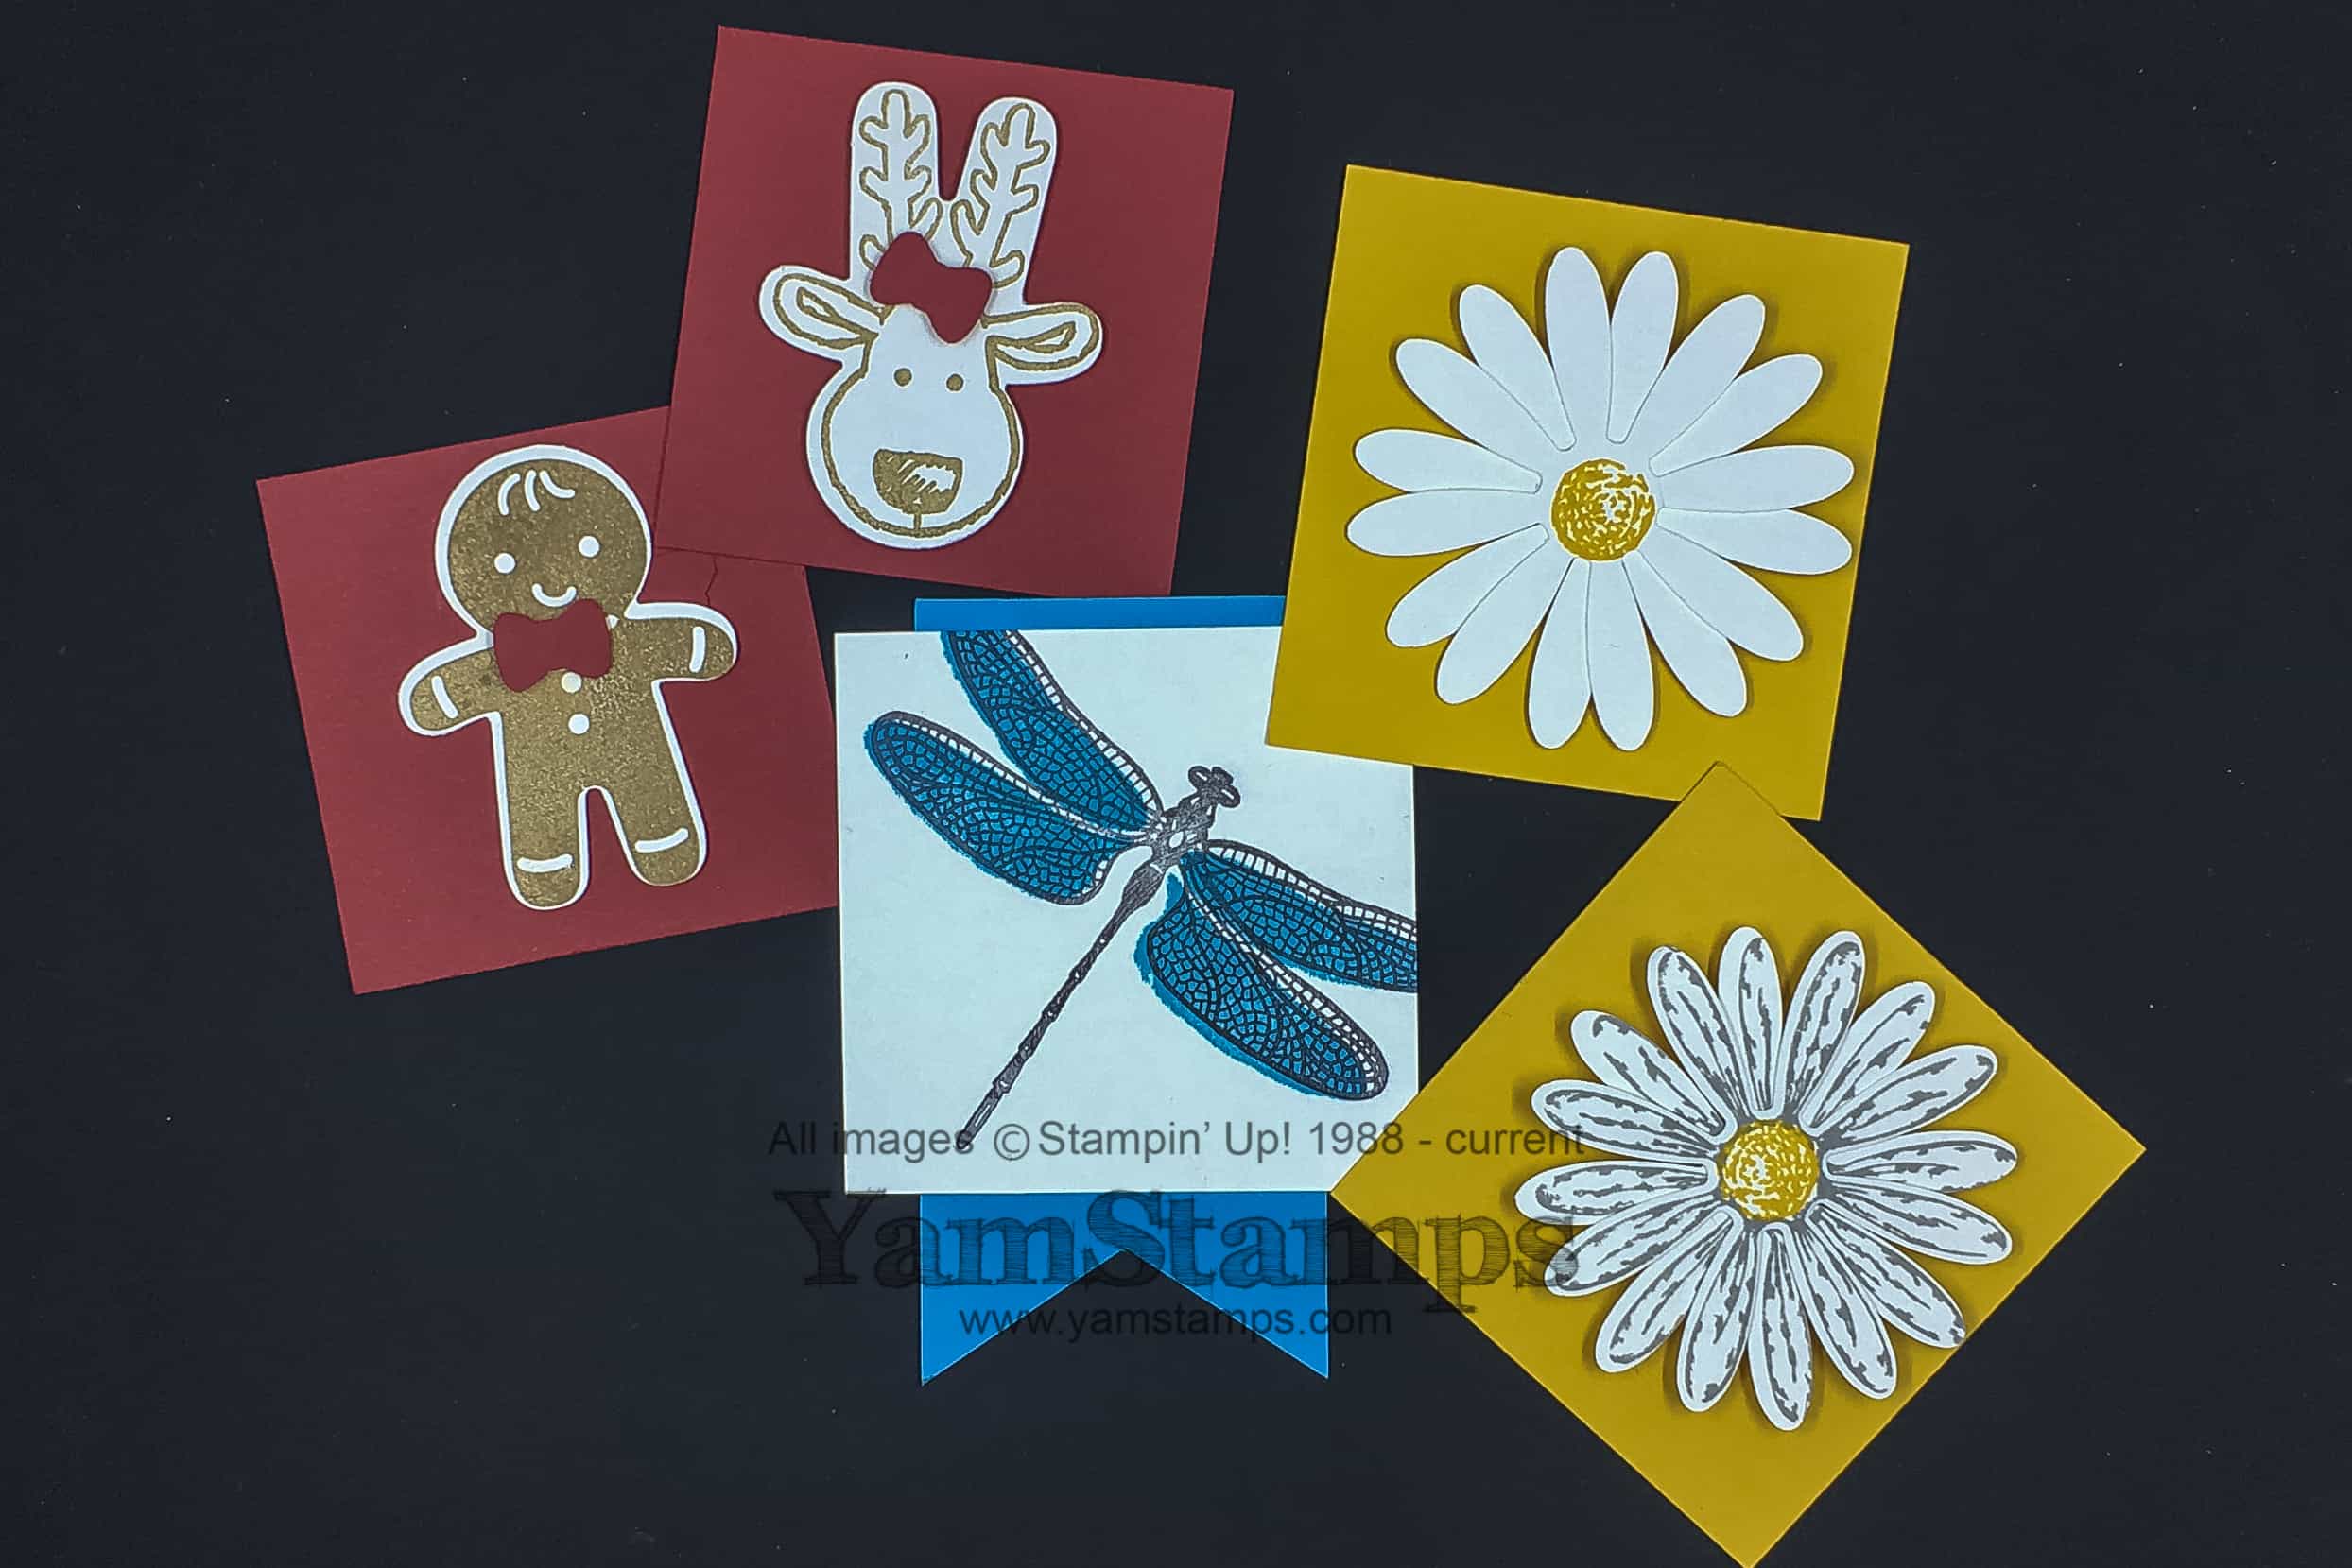
These are the various free make and takes we did over the three days. We did the dragonfly the first day (Dragonfly Dreams and Triple Banner Punch were the featured products), the gingerbread man/reindeer the second day (Cookie Cutter Christmas set and builder punch), and the Daisy the last day (Daisy Delight set and punch / discounted bundle). I wanted to have make and takes that were cute, but quick and easy – Scrapfest attendees tend to be set on cruising all the booths, sometimes in a limited amount of time, or en route to a special class, so it’s good to have something that’s not too much brainwork. (OK maybe that last part was just for me….). I figure that people can take their make and takes and use them as tags for gifts, or stick them onto a cardfront or scrapbook page. Or hang them on the fridge. Whatever works.

Here’s a selfie attempt – that’s Arlene on the left of the picture and Anne on the right. Arlene is the only one who seems to know where to look when taking a selfie….and yes, we did fix the sign so it hung better than that…. I hope to be able to be at the next Scrapfest event – it’s always fun to meet new people and catch up with customers and friends who are getting a little crafty shopping time too! To those who requested to be added to my mailing list – I’ve finished that job earlier today and you should have received something from me already – please let me know if you didn’t get an email and wanted to be on the list! To those who requested catalogues – I’m working on confirming mailing addresses and getting things organized for mail out.
In the meantime – tomorrow brings Week 5 of the Twelve Weeks of Christmas to subscribers’ inboxes, and Wednesday is the weekly email….so I’d better get busy!