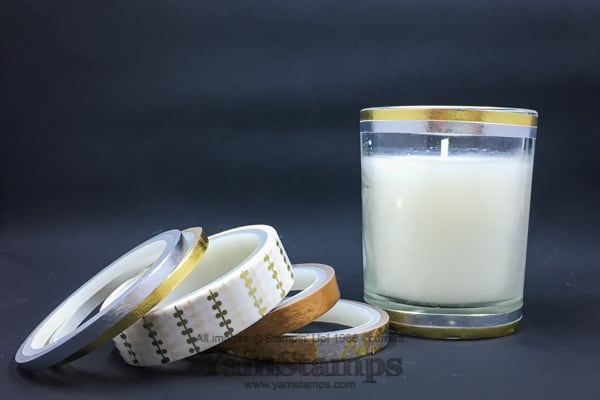
Today is the registration deadline for the Basic+ Option for the September Christmas Card Class! Class times are 1pm or 7pm, Wednesday September 13th here in Burlington ON. Your Basic+ Class fee of $30 is due at time of registration, and will include all supplies required to make the 4 different Christmas cards during class, PLUS you will receive 5 rolls of metallic washi tape from the upcoming Stampin’ Up! Holiday Catalogue! Pictured above, the five rolls of tape are GORGEOUS and make your crafting easy and elegant.
The votive candle in the picture is simply decorated with strips of the gold and silver washi tape around the top & bottom of the candle – adds an easy custom touch. You could group them on your mantle, or place them on a mirror as a table centrepiece. I shared this idea (among others) with the people at Weddingbells Magazine a while back – because who couldn’t use a little bit of elegance AND thriftiness at a wedding?!
Happy Valentine’s Day! I hope that you are able to spend time with those you love, and/or spend time doing something you love! My gift to you is a video of Valentine’s Day crafts! I thought I’d share one of the videos from my appearance on Halton Insider last week. I was fortunate to be invited to TV Cogeco to film some segments to air! I managed to load a few of the appearances on the YamStamps YouTube channel, so you can catch them there, but I thought I’d share one here on the YamStamps blog as well. (If you can’t see the video below, click on the link to go to YouTube to see them).
In this segment, I show a couple of really quick and easy paper crafting decorations you can make – fun for adults or children! You don’t need fancy equipment to make these decorations (though it does make it more fun…haha). You could whip up a few of these right now and still have lots of time to enjoy them!
So you’ll need something to cut the paper with, something to attach the paper with (tape, stapler) and something to hang the decoration – ribbon, string, twine….. You could make them fancier by using different papers, by decorating the papers – stamp on them, colour them, draw on them, emboss them…. I love that you can totally customise these Valentine’s Day crafts to your taste!
(Warning, shameless plug coming up) The same concept goes for the projects in the Clever Cards Online Class! You will learn the concepts of how to make some tricky looking cards (which actually aren’t all that tricky to make once you know how!) and then you can decorate them to your personal taste (or the taste of the recipient) once you have the basics. You may be able to pick up that I tend to go for the more clean and simple look, but you can definitely make more complex and complicated looks if that’s what you’re going for!
Thanks again for reading the YamStamps blog. I feel quite lucky that I am able to spend time doing something I love, and being able to share it with others! Happy Valentine’s Day! Now go make some “love”ly cards and decorations!
Manic Mondays feature projects that can be done quickly – and Paper Pumpkin kits are a great way to get crafting! During Sale-a-Bration (until March 31st), you can also get a DEAL. The three month prepaid subscription is on sale for $74 CAD and you also qualify for a free Sale-a-Bration item! Each month, you’ll receive a box delivered to your door, full of everything that you need to create that month’s project! Past Paper Pumpkins have been kits to create cards, packaging, memory keeping projects, 3D items such as framed artwork….each month it’s a surprise! The great thing – everything you need is there. It comes with a small ink spot (great for travelling to crops, taking on trips or taking with you while you wait for others to finish practice/work/lesson/you name it), a stamp set, and the consumable product (paper, vellum, whatever!).
Here’s a peek at what the January kit was – just in time to create some fun Valentine’s Day packaging, but you can use the items in the kit to create other variations of the packaging or cards!
Paper Pumpkin subscribers can also purchase past kits and refills to replenish their supplies as available, so if you really like a certain project, you can create even more. Kits usually contain supplies to make multiple cards or smaller items; the larger projects are often limited to single items, but again, refill kits can be purchased to create more.
These kits are great if you want to craft, but don’t always have the “mental mojo” to come up with projects, or, like me, never know what’s going to happen, or what supplies you will need. In the past, I’ve had customers order them for their children or grandchildren – they can get together and make the project together! I did have one set of family members who each had their own subscription, and even though they were long distance from one another, could still craft “together” in their own homes.
I hope you’re able to spend some time with people you love and/or doing something you love! Here in Burlington, we’re focusing on staying warm….because it’s COLD outside this weekend! So cold that my running friends and I deferred our usual early Saturday AM run (ummmm -23C not counting windchill? no thank you!) and are planning on running tomorrow, when temperatures are due to be a balmy -8C.
Tomorrow is the last day for guaranteed supply of the limited time Sale-a-Bration items featured on the last few pages of the Sale-a-Bration catalogue – so if you really wanted some of that fantastic Perfectly Artistic Watercolour/Marble Designer Series Paper, the Hello stamp set, or the Sky is the Limit biplane stamp set, get your order in now! If supply allows, there MAY be the opportunity to pick up these items after today, but no guarantee. Place your order online in the YamStamps Online Stampin’ Up! Canada store, or contact me if you need assistance placing your order. Happy Shopping!
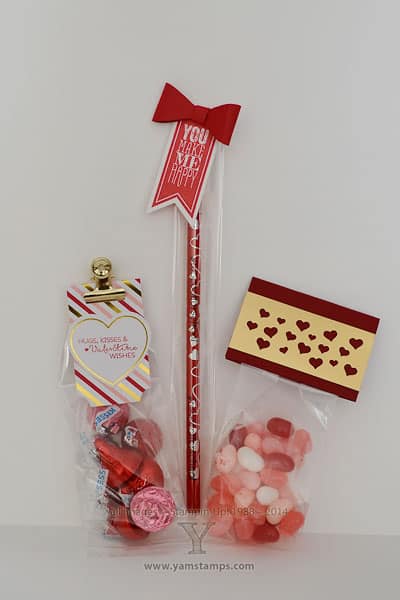
It’s easy to whip up a few quick sweet treats for your Valentine! These are some that I created for my Morning Live appearance – always good to have lots of samples on the table I think. (even if you can’t get a good look at them all…). It doesn’t have to be complicated to show someone that you care!
I used the Confetti Heart Punch with the Gold Foil paper for the jelly bean bag topper – super quick and easy – just fold a piece of Cherry Cobbler cardstock over top of a cello bag and seal closed. The pencil features a bow from the new Bow Builder Punch, and the project on the left is created using last month’s Paper Pumpkin kit.
Paper Pumpkin is Stampin’ Up!’s subscription kit – you receive a fun box of crafting supplies to create a project each month, with plenty of supplies left over to embellish other projects. You can also deviate from the instructions and come up with your own ideas. You get photopolymer stamps, an ink spot and the project supplies; you even get an acrylic block in your first kit. OK, I did have to supply my own candy for this one though… If you’re interested in the Paper Pumpkin program, right now, the three month subscription is on special – plus you’ll qualify for a Sale-a-Bration reward too!
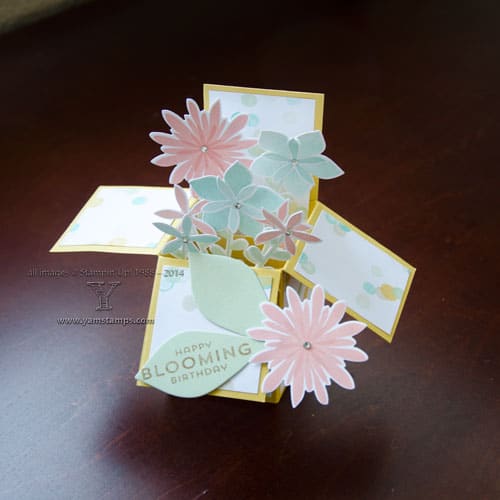
So last week was busy visiting with friends and picking up some fun tips and tricks for my Stampin’ Up! business at the Stampin’ Up! 2014 Convention Inspire, Create, Share. I will post more photos in the next while as I’m able. I thought I was so good, uploading photos to my site that I could then whip up a blog post while on the road. HOWEVER…I have learned that I should have just done the whole blog post ahead of time, as the display on my laptop died while I was in Salt Lake City – mid post! I’m taking it to the computer doctor later to see if anything can be done. SO – now I’m home again, and can finish this post for you!
This is a card in a box that I created as a potential project for the Scrapbook & Cards Today blog – featuring the Flower Patch photopolymer set and Flower Fair Framelits (also available as a bundle). This one also uses the Lullaby Designer Series Paper, which is included in this month’s Buy 3 Get 1 Free deal! This project took a little more time than some of my other usual projects – I like quick and easy but impressive…but in truth, this actually wasn’t too awful – because of the coordinating stamp set and framelits. This card comes folded flat and fits in a regular A4 envelope for mailing, but once the recipient opens the envelope, they can turn it into this 3D version!! The construction of this card is not as complicated as it might seem – let me know if you’re interested in instructions or a class and I can see what I can do. In the meantime, I’m off to finish prep for tonight’s Stampers Club. Oh, and unpack my suitcase. Oh, and start some laundry. Oh……LOL!!
(PS And part two of “Why does technology hate me?” means that my internet connection was lost just as I went to publish this post. Never mind, it’s back now, and here’s the post!!)

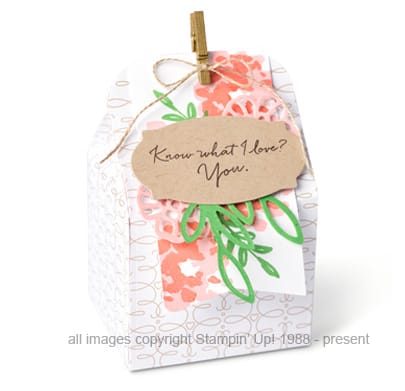
 This is a card in a box that I created as a potential project for the Scrapbook & Cards Today blog – featuring the


